Practicing fit with calipers

Signed-In Members Don't See This Ad
See more from Dalecamino

Dalecamino

Local Chapter Leader
Joined
Jan 2, 2008
Messages
14,608
Location
Indianapolis, In.
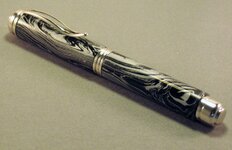
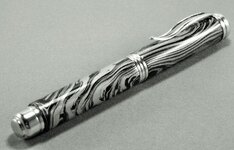
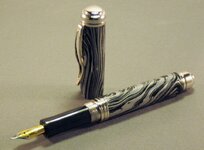
It is a challenge for me to, get the body to match components with the pen bodies. When I THINK I know when to stop turning and, start sanding it, sometimes turns out, I was wrong. Different materials , have different results. Therefore, they're never the same. This one is, a M3 Lava blank. It requires sanding then, polishing with the two compounds used for metal. So, I got it pretty close but, over sanded at the finial and, under sanded at the center band. Since the components were each made separately, they are not uniform either. Further complicating the process of, getting a good fit. So, I need more PRACTICE. Thanks for looking!
 

Attachments

  • IMG_1521 (2).jpg
    IMG_1521 (2).jpg
    291.6 KB · Views: 365
  • IMG_1522 (4).jpg
    IMG_1522 (4).jpg
    276.4 KB · Views: 388
  • IMG_1523 (2).jpg
    IMG_1523 (2).jpg
    287.4 KB · Views: 315
Signed-In Members Don't See This Ad
Chuck how much are you off? It doesn't look like too much. I know what you mean about different materials, I have been making some segmented watch parts pans. Epoxy over the watch parts and wood on the ends. Those materials turn and sand at very different rates. Surprisingly the wood seems much harder than the epoxy.

Just learn with each pen and they get better, maybe that new shop will help:) by the way what are you doing turning pens when you got a shop to finish.

Mike
 
My process is pretty straightforward. Find the measurement I want/need to match with a metal piece and set my calipers to 1mil over. Keep trimming until the calipers just slide over the end while spinning. Once I get my multiple coats of CA back on the blank, the edges match up perfectly every time.

If you're a little heavier on the sanding side, bump it up to 1.5 or even 2 mils.
 
I find when using calipers, .005 inches over is barely noticeable, and .010 over is where I start to "feel" like it is proud of the components, but not horribly so... Dead on to the components is sometimes SLIGHTLY noticeable by feel (a slight sharp edge from the metal corners) and anything greater than that UNDER size becomes more and more noticeable.

So I always aim for .003 to .005 oversize, as for me, when it's assembled it LOOKS dead on, and FEELS smooth... The biggest problem with getting there is, as you mentioned, every different material sands down at a different speed. I have in some cases, stopped turning at 0.010 oversize, started sanding and realized that it was going to take forever to get down to the size I need, and gone back to tools to bring it down to .005 or less before I start to sand (with a CA finish, I take the wood to .003-.005 under and build back up). With REALLLY soft wood, I will stop turning quite a bit early and do a "test sanding (measure, sand, measure) to see how quickly it gets taken down, and adjust my target turning size accordingly...
 
Chuck, It has all of the appearance of a high end pen. I really like the all metal look and your finish, looks wonderful, even the lines in the blanks line up perfectly. Thank you for showing us your design and I look forward to learning from your endeavors.
 
As it has been said you have to measure the very end where the blank meets the metal. I find that it is necessary to remove the blank from the lathe and get the measurement. If you are turning between the centers it is not hard to do. If you are under .010 to the final size put the tools down. I have found the desire to make just one more pass more times than not produces an overturned blank.
 
My approach to the issue is to strive for a final diameter that is about .001"~.003" over size. That way if I get too small, it is actually just getting down to the "exact" fit. The result is to tend to be very slightly under turned almost all the time. Then include this important additional final step prior to pressing parts together: with a piece of 320grit sandpaper laying on the bench, break the edge of the barrel by holding it at an angle about 15* off vertical and slide across the sandpaper while twisting. (Use light pressure, taking off as little as you can.)This puts a micro-chamfer on the end of the barrel making the oversize condition undetectable by the "feel" test. This process is very quick to accomplish, easy to do, and for me has eliminated much of the time consuming fidgeting getting the final fit perfect.
 
Chuck how much are you off? It doesn't look like too much. I know what you mean about different materials, I have been making some segmented watch parts pans. Epoxy over the watch parts and wood on the ends. Those materials turn and sand at very different rates. Surprisingly the wood seems much harder than the epoxy.

Just learn with each pen and they get better, maybe that new shop will help:) by the way what are you doing turning pens when you got a shop to finish.

Mike
They are off enough that, it's noticeable. Thanks Mike!

That is a great looking pen Chuck. I have not turned this material but have heard it isn't the easiest to use. Did you make these components?
Thank you Mike. Yes, I made the components.
Nice pen. What are the component parts?
I made the parts from brass on my metal lathe. Thanks!
Yeah that pen looks terrible Chuck... just send it to me and I'll get rid of it for you..
:>)
Thanks Rich! It's on its way.:rolleyes:

Chuck, It has all of the appearance of a high end pen. I really like the all metal look and your finish, looks wonderful, even the lines in the blanks line up perfectly. Thank you for showing us your design and I look forward to learning from your endeavors.
Thanks for all your compliments and, advice everyone. I need to be clear on my post. I know the procedure as, I've made many of these pens. It's the execution I need practice with.
 
I find when using calipers, .005 inches over is barely noticeable, and .010 over is where I start to "feel" like it is proud of the components, but not horribly so... Dead on to the components is sometimes SLIGHTLY noticeable by feel (a slight sharp edge from the metal corners) and anything greater than that UNDER size becomes more and more noticeable.

So I always aim for .003 to .005 oversize, as for me, when it's assembled it LOOKS dead on, and FEELS smooth... The biggest problem with getting there is, as you mentioned, every different material sands down at a different speed. I have in some cases, stopped turning at 0.010 oversize, started sanding and realized that it was going to take forever to get down to the size I need, and gone back to tools to bring it down to .005 or less before I start to sand (with a CA finish, I take the wood to .003-.005 under and build back up). With REALLLY soft wood, I will stop turning quite a bit early and do a "test sanding (measure, sand, measure) to see how quickly it gets taken down, and adjust my target turning size accordingly...
I have found that anything over .002 inches is noticeable and that you can clearly see the difference too.
 
Well the finished pen looks pretty cool to me!!

But don't worry, once you move into your new shop, all will be perfect!!:biggrin:
 
Well the finished pen looks pretty cool to me!!

But don't worry, once you move into your new shop, all will be perfect!!:biggrin:
Thank you Steven. I will undoubtedly be more comfortable in the new shop. Not sure of the perfect part though :biggrin:

Well done Chuck, I really think the pen look great, I think you have a great fit and fantastic finish. Well done.
Thank you for the vote of confidence :biggrin: There WILL be more.
 
Still looks pretty good to me Chuck. If you don't like it you could always give it to your cousin. Pretty sure they'd love to have it:biggrin:

Mike
 
Back
Top Bottom