
Craftdiggity
Member
Okay. I've been getting way more interest in these things than I expected, so rather than trying to respond to everyone individually, here is a rough tutorial on how I turn my bracelets and pendants.
When they come out of the molds, the bracelets are nearly finished. First, I rough sand the inside of the bracelet using a 2" drum. I then use a disc sander to rough sand the outside and square up the rough edge. I mount it on a jam chuck that I made out of a 3" block. All it really is is a turned cylinder with a tenon that fits the inner diameter of the bracelet. The tenon should not be more than half the width of the bracelet. This will allow access to the inside of the bracelet for sanding and shaping.
Here is a shot of the bracelet on the chuck:
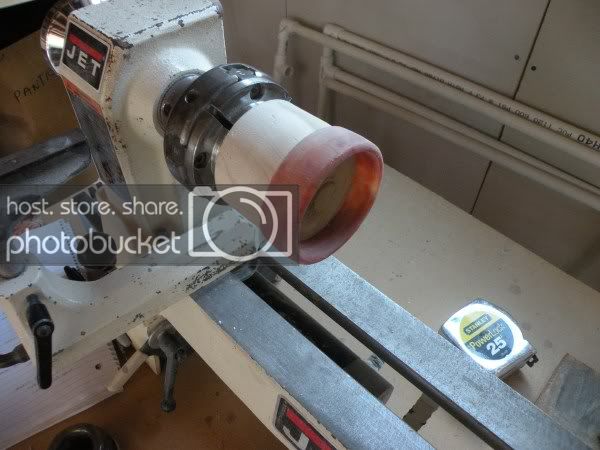
I mount the squared edge is against the block and sand inside and outside all the way to 2000. Sometimes, if the blank is a little out of round, I use a skew or scraper very lightly to shape before sanding, but this is usually not necessary.
After I get one side up to 2000, I flip it over and take the other side up to 2000. Sometimes, it will be loose on the tenon at this point due to the sanding. I use a strip of sandpaper face down wrapped around the tenon to keep the bracelet snug.
After that, polish however you like. I use the Beall system and it works out great. For polishing the inside of the bracelets, I use these from PSI:
http://www.pennstateind.com/store/LBUFFC175.html
For pendants, I made another cylinder which tapers down to about 1 1/4" and is concave on the end. I roughly sand the curved side of the pendant blank so that it is smooth. I use double sided tape and mount the pendant blank to the end of the cylinder. I bring up the tailstock up to the blank and tighten the center to the blank so that the pendant is secured to the cylinder. I really like the PSI mandrel saver for this since it is not pointed and there is no risk of cracking the blank with a pointed end.
I use a skew at this point to shape and square up the rough side of the blank. Once I get it shaped nicely, I pull the tailstock away and start sanding. I take it up to 2000, then I flip it over and sand the other side up to 2000. There is no need to use the skew on this side since it is already shaped. I take it up to 2000, and then I'm done. I drill whatever size hole I decide, and then polish with the Beall system.
This is just a rough tutorial. I will put together a real one with pics.
Let me know if there are any questions.
When they come out of the molds, the bracelets are nearly finished. First, I rough sand the inside of the bracelet using a 2" drum. I then use a disc sander to rough sand the outside and square up the rough edge. I mount it on a jam chuck that I made out of a 3" block. All it really is is a turned cylinder with a tenon that fits the inner diameter of the bracelet. The tenon should not be more than half the width of the bracelet. This will allow access to the inside of the bracelet for sanding and shaping.
Here is a shot of the bracelet on the chuck:
I mount the squared edge is against the block and sand inside and outside all the way to 2000. Sometimes, if the blank is a little out of round, I use a skew or scraper very lightly to shape before sanding, but this is usually not necessary.
After I get one side up to 2000, I flip it over and take the other side up to 2000. Sometimes, it will be loose on the tenon at this point due to the sanding. I use a strip of sandpaper face down wrapped around the tenon to keep the bracelet snug.
After that, polish however you like. I use the Beall system and it works out great. For polishing the inside of the bracelets, I use these from PSI:
http://www.pennstateind.com/store/LBUFFC175.html
For pendants, I made another cylinder which tapers down to about 1 1/4" and is concave on the end. I roughly sand the curved side of the pendant blank so that it is smooth. I use double sided tape and mount the pendant blank to the end of the cylinder. I bring up the tailstock up to the blank and tighten the center to the blank so that the pendant is secured to the cylinder. I really like the PSI mandrel saver for this since it is not pointed and there is no risk of cracking the blank with a pointed end.
I use a skew at this point to shape and square up the rough side of the blank. Once I get it shaped nicely, I pull the tailstock away and start sanding. I take it up to 2000, then I flip it over and sand the other side up to 2000. There is no need to use the skew on this side since it is already shaped. I take it up to 2000, and then I'm done. I drill whatever size hole I decide, and then polish with the Beall system.
This is just a rough tutorial. I will put together a real one with pics.
Let me know if there are any questions.