Polishing Pendants

Signed-In Members Don't See This Ad
See more from bitshird

bitshird

Member
Joined
Aug 27, 2007
Messages
10,236
Location
Adamsville, TN, USA.
OK what are the majority of the pendant makers using as a finish, and how are you doing the backs, just rounding the edge and sweeping back in behind the edge a wee bit, Or are you aligning the pendant back up after flipping it over, This part still has be bumfuzzled and if you are how do you get the thing to stick after you've finished the front?? I'm wondering if these things are a great candidate for either dip or spray lacquer finish, but to me it looks like a bit of hand sanding has to be done.
 
Signed-In Members Don't See This Ad
i also finish the back first. Most of the pendants i make are made out of PR, and i use double sided duck tape to stick them to the backer so they have no problem sticking even after finishing.

turn, sand and finish the back.
flip it over
re-round, turn, sand, and finish the front.
remove and repeat as neccessary.

hope that helps.
 
Ken have you read my tutorial? I don't finish the fronts until last.
Hans, I probably glazed over it, is it in the Library?

i also finish the back first. Most of the pendants i make are made out of PR, and i use double sided duck tape to stick them to the backer so they have no problem sticking even after finishing.

turn, sand and finish the back.
flip it over
re-round, turn, sand, and finish the front.
remove and repeat as neccessary.

hope that helps.

OK do you put an contour on the back like a skew cut around the hole, or do you just finish the back then flip the disk and then drill it from the front?? also what do you finish it with?
 
Hans I just followed your tutorial to make my first pendant. Thanks so much. I can't afford the backer plate so your method works great. The only thing I did different was use a friction polish instead of CA. My wife wants me to make more for her, lol.

Edit: I also want to thank Mikemac for getting me off my butt and down into the shop again. I asked him off forum for some advice and he freely gave. Now I heading down there for some more fun.
 
Last edited:
Tyhanks Hans, I found it after I asked you, I figured their had to be an easier way to polish the little bugger54s, I've done a couple, but I haven't been able to get the quality of polish I would like, but that's been a problem on everything I've tried. some days you eat bear and some days the bear eats you
 
I am also too cheap to buy the backer plate, so i made one. I use a piece of corian turned round and drilled and tapped to fit my stopper mandrel. It has three tapped holes. One for center, and two holes for design ideas and string holes.


I don't use polish on my PR, unless you count Plast-X plastic scratch remover. I start with 600 grit sandpaper, utilizing the AWESOME tip added about the soapy water. Then i soapywetsand with all the MM.. starting with 1500 and going thru 12k. After that, i usually hit them with the beall first two wheels, no wax.. then a bit of Plast-X. They shine like a new penny after that.

Once i got too excited with the trip wheel and wore down the top surface a tiny bit. It was a really neat thing that i did because the material wore down differently according to coloring, so there were these "veins" that you could feel. It was really wild. I am going to try it again and see if it happens the same.

The hole is a topic of interest for me. I used to turn the hole into the piece, but i found it added alot of time and energy to an otherwise simple and quick project. Now i finish the entire pendant, then use my drill press to drill a small hole near one edge for a jumpring. I think the jumprings make them look more professional anyway, so it is a double win! No sanding the tedious string hole!!! BUT... sometimes, if it is for a special person, i will turn the hole from the front, and sand polish it from the front as well. After i remove it from the lathe, i hand sand the back side sharp edge around the hole.

Just like all turning, there are probably 15 different ways to do it and come up with the same outcome. Hope all that helps!!
 
Can you show me what you mean by a jumpring?
(underlined twice because you said it is a "Double Win"....) :biggrin:

Now i finish the entire pendant, then use my drill press to drill a small hole near one edge for a jumpring. I think the jumprings make them look more professional anyway, so it is a double win!
 
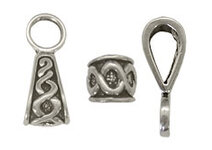
Bails also work well on this style pendant, we used to buy the pendants in stone and they sold like the dickens. here is one style of bail. the ring at the bottom has to be sawn off and turned 90 degrees but it makes a beautiful way to hang the pendants.
 

Attachments

  • nice bail.jpg
    nice bail.jpg
    30.1 KB · Views: 120
Back
Top Bottom