
mark james
IAP Collection, Curator
Unintended consequences: This pen design began as a challenge with shapes, I figured it out in the end, but the final product left me less than impressed. BUT, I found a new click mechanism kit I really like, and a finish that for me that I really needed to get better at. So all-in-all this project was a great success.
OK, so last year I was able to figure out some designs with squares, triangles and diamonds. I really wanted to use them all in the same manner I had been using - in a "sandwich" configuration, sliced up for inlays in a 4-corner block. A quick layout gave me some direction, but a new polygon emerged with compound angles that was needed. I knew where I wanted to end up, just didn't have a map.
So here was the process:
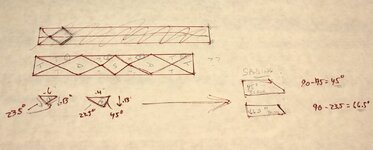
1. Rough pencil draft for basic shapes and dimensions (Picture 1).
2. Transfer to a better diagram (Picture 2).
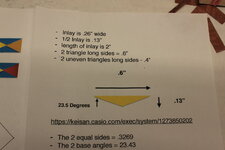
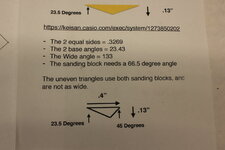
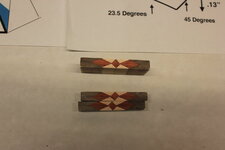
3. Calculate the polygon dimensions (Pictures 3 and 4).
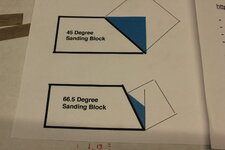
4. Make the sanding blocks for the needed angles - 45 degrees and 66.5 degrees (Picture 5).
5. Sand a bunch of triangles and compound angle polygons (Pictures 6 and 7).
Note: The triangles used the 66.5 degree block for each side. The compound polygon used both sanding blocks.
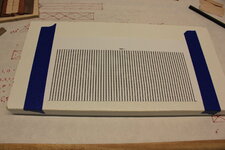
6. Tape a grid to a small flat board (small as I needed to hold it up to view it from the side to see if the joints were tight (Picture 8).
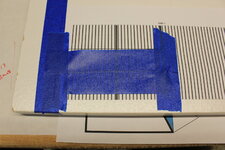
7. Attach some tape with the sticky side up, to hold the pieces in alignment (Picture 9).
8. First layer is placed on the tape (Picture 10).
9. Second layer has been glued in. (Picture 11).
10. Checking the joints (Picture 12).
11. Final layers (Pictures 13 and 14).
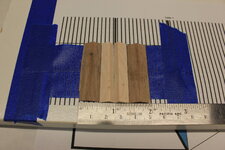
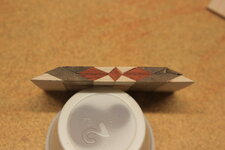
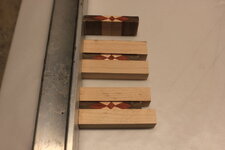
12. Cut up slices, 1" x 2" and 1/2" x 2" (2) (Pictures 15 and 16).
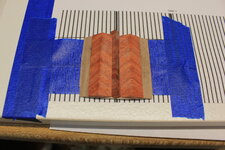
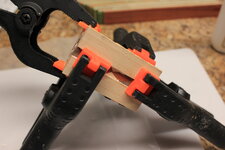
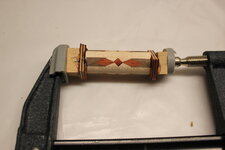
13. Constructing the 4 corner blank (Pictures 17 and 18).
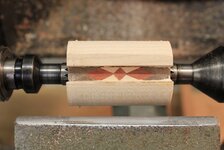
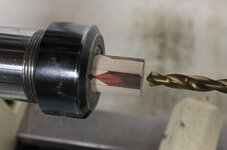
14. Turning the blank down to fit into a collet chuck to drill the tube hole (Pictures 19 and 20).
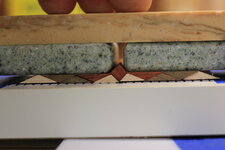
15. Adding the veneers and end caps (Picture 21).
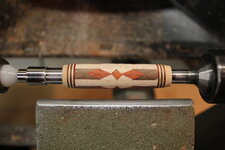
16. Turning the final blank (Picture 22).
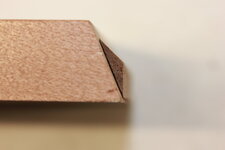
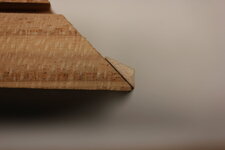
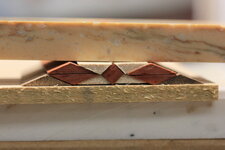
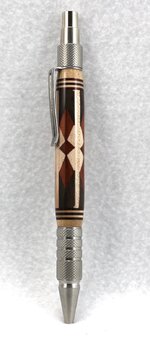
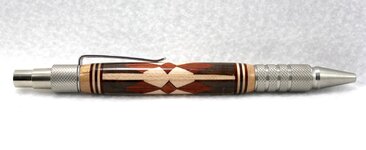
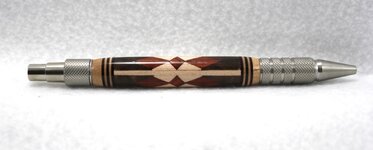
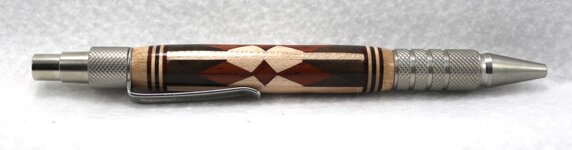
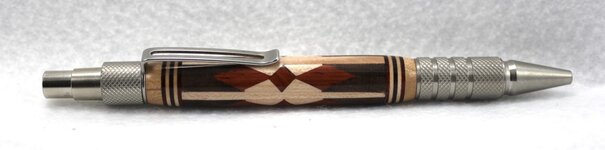
17. Views of the final pen (Pictures 23 - 27).
My thoughts: The segmented inlays are fine. A bit too thick, but I don't think I can get these any smaller, maybe someone else can. I wish I had used a black veneer to seperate visually the inlays and the four corners. I don't like the maple-maple match between the straight sections (the corners) and the compound polygons; it just doesn't do much for me. I like the end veneers and end caps; my alignment was decent. There are slight tapers in the corner sections, not bad but still bugs me.
Well, that was fun. Started in fall 2018, tinkered in January 2019, life got busy, but finally done. Hopefully the pictures will inspire others to break down these steps into your own projects.
OK, so last year I was able to figure out some designs with squares, triangles and diamonds. I really wanted to use them all in the same manner I had been using - in a "sandwich" configuration, sliced up for inlays in a 4-corner block. A quick layout gave me some direction, but a new polygon emerged with compound angles that was needed. I knew where I wanted to end up, just didn't have a map.
So here was the process:
1. Rough pencil draft for basic shapes and dimensions (Picture 1).
2. Transfer to a better diagram (Picture 2).
3. Calculate the polygon dimensions (Pictures 3 and 4).
4. Make the sanding blocks for the needed angles - 45 degrees and 66.5 degrees (Picture 5).
5. Sand a bunch of triangles and compound angle polygons (Pictures 6 and 7).
Note: The triangles used the 66.5 degree block for each side. The compound polygon used both sanding blocks.
6. Tape a grid to a small flat board (small as I needed to hold it up to view it from the side to see if the joints were tight (Picture 8).
7. Attach some tape with the sticky side up, to hold the pieces in alignment (Picture 9).
8. First layer is placed on the tape (Picture 10).
9. Second layer has been glued in. (Picture 11).
10. Checking the joints (Picture 12).
11. Final layers (Pictures 13 and 14).
12. Cut up slices, 1" x 2" and 1/2" x 2" (2) (Pictures 15 and 16).
13. Constructing the 4 corner blank (Pictures 17 and 18).
14. Turning the blank down to fit into a collet chuck to drill the tube hole (Pictures 19 and 20).
15. Adding the veneers and end caps (Picture 21).
16. Turning the final blank (Picture 22).
17. Views of the final pen (Pictures 23 - 27).
My thoughts: The segmented inlays are fine. A bit too thick, but I don't think I can get these any smaller, maybe someone else can. I wish I had used a black veneer to seperate visually the inlays and the four corners. I don't like the maple-maple match between the straight sections (the corners) and the compound polygons; it just doesn't do much for me. I like the end veneers and end caps; my alignment was decent. There are slight tapers in the corner sections, not bad but still bugs me.
Well, that was fun. Started in fall 2018, tinkered in January 2019, life got busy, but finally done. Hopefully the pictures will inspire others to break down these steps into your own projects.
Attachments
-
 IMG_1302.jpg120 KB · Views: 393
 -
 IMG_1314.jpg187.5 KB · Views: 383
 -
 IMG_1316.JPG146.8 KB · Views: 342
 -
 IMG_1317.JPG147.2 KB · Views: 371
 -
 IMG_1315.JPG130.5 KB · Views: 388
 -
 IMG_1335.JPG94 KB · Views: 365
 -
 IMG_1330.JPG89.2 KB · Views: 374
 -
 IMG_1304.JPG227.7 KB · Views: 385
 -
 IMG_1305.JPG314.8 KB · Views: 360
 -
 IMG_1306.JPG276.2 KB · Views: 384
 -
 IMG_1308.JPG314.9 KB · Views: 372
 -
 IMG_1309.JPG179.3 KB · Views: 384
 -
 IMG_1303.JPG168.5 KB · Views: 386
 -
 IMG_1313.JPG113.1 KB · Views: 395
 -
 IMG_1318.JPG105.6 KB · Views: 396
 -
 IMG_1319.JPG205.7 KB · Views: 404
 -
 IMG_1321.JPG141.4 KB · Views: 384
 -
 IMG_1322.JPG169.7 KB · Views: 375
 -
 IMG_1323.jpg212.9 KB · Views: 369
 -
 IMG_1325.jpg144.3 KB · Views: 393
 -
 IMG_1329.JPG140.2 KB · Views: 405
 -
 IMG_1337.JPG217.8 KB · Views: 400
 -
 IMG_1338.jpg130.1 KB · Views: 390
 -
 IMG_1342.jpg97.1 KB · Views: 394
 -
 IMG_1341.jpg89.3 KB · Views: 381
 -
 IMG_1340.jpg77.2 KB · Views: 392
 -
 IMG_1339.jpg71.2 KB · Views: 382
Last edited: