Pinstripe Pen Blanks...to buy, or make

Signed-In Members Don't See This Ad

jrista

Member
Joined
Aug 12, 2021
Messages
2,241
Location
Colorado
I'm curious if anyone knows of any pinstripe pen blanks. I'm trying to think of some kind of "upper class" style of pen blanks, have for a while actually. I have a few ideas, but after starting to re-watch House of Cards, I noticed all the upscale suits, ties, upholstery, etc. and I started getting more ideas. I noticed just how much pinstripe there is in that show. I have some casein pinstripe blanks, whiter in color, that I've picked up from a few places. They are not always perfectly strait stripes, and not always even.

I am wondering if anyone has come across any proper pinstripe blanks, in some classy colors. Say a navy blue, with lighter pinstripes, or a charcoal gray with a lighter gray pinstripe, or even some of that lighter yellowish gold, with lighter yellow pinstripes.

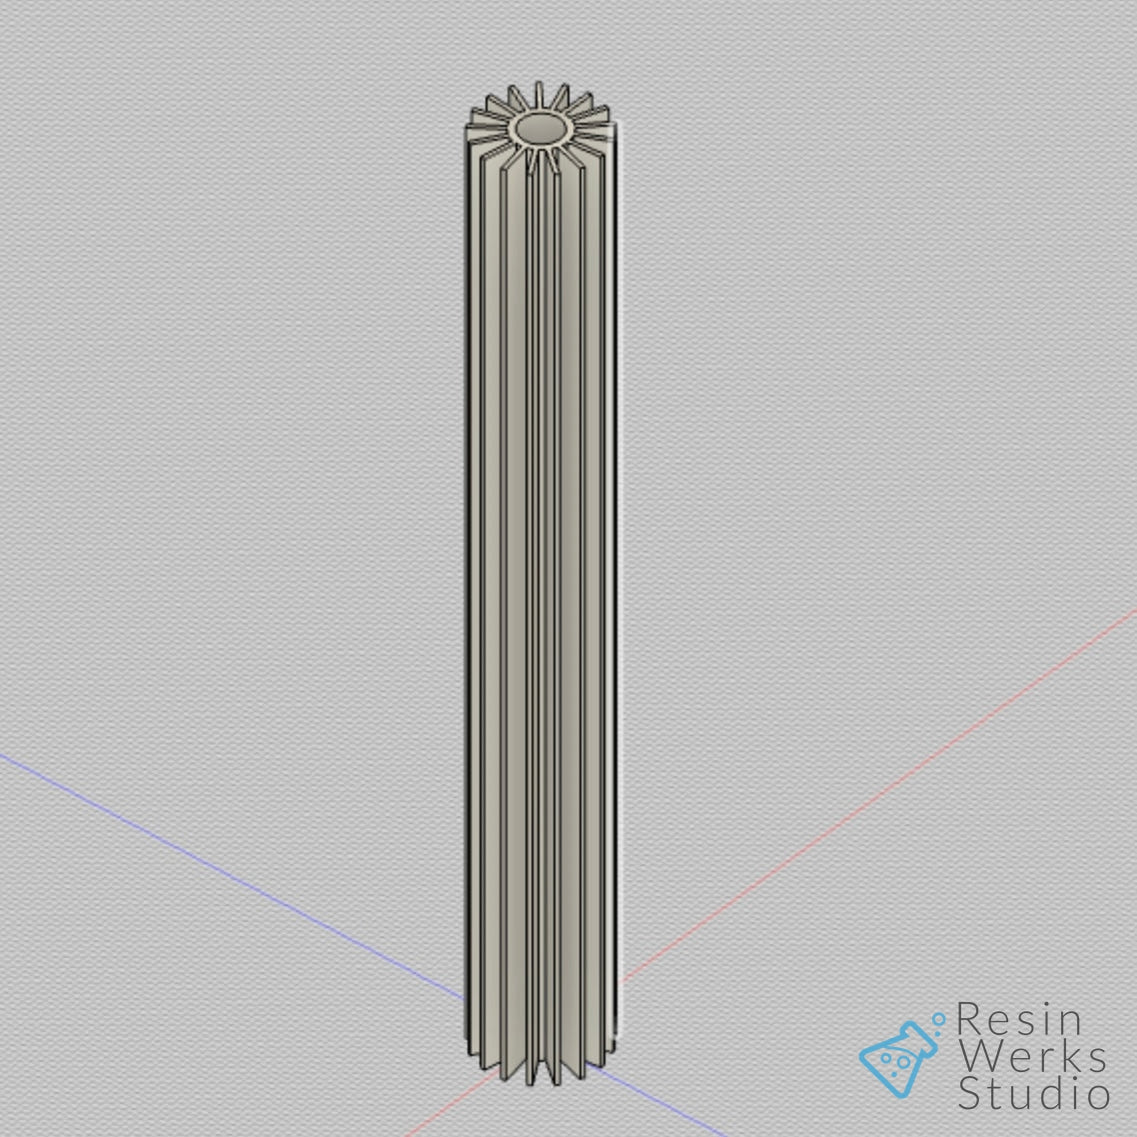
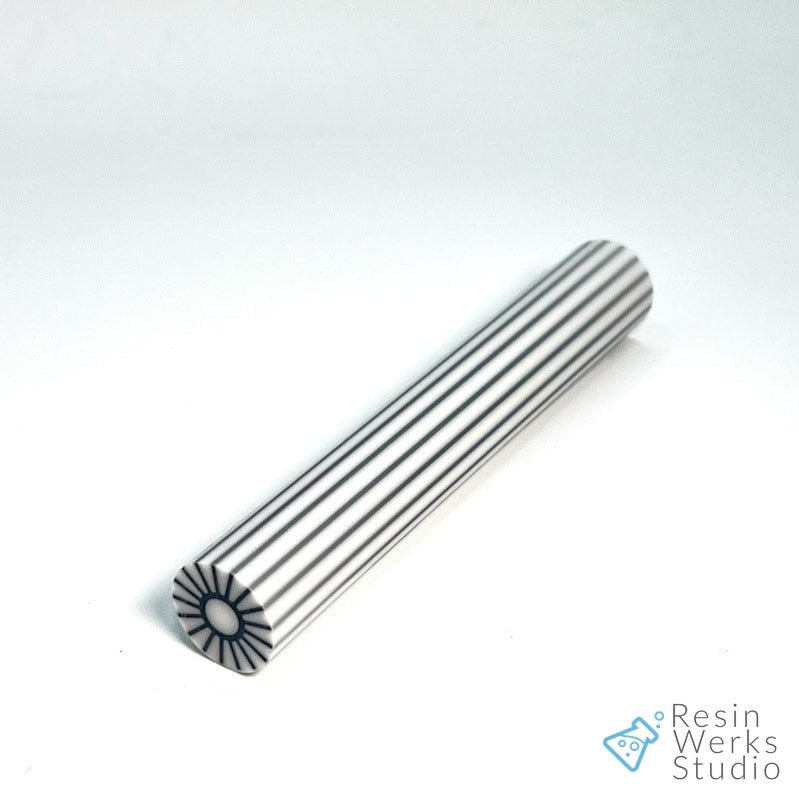
I'm also curious, as I'll probably have to make some of the more exotic designs I'm thinking of myself...how one might go about making their own pinstripe blanks. I have one idea myself, which involves casting some solid color base blanks, turning them round, slicing them in half and sandwiching some material for the pinstripe color, then slicing that in half again and repeating the process several times. I suspect that will not give me exactly the look want, as I'm sure there will be some kind of offset problem between the size of the kerf and the thickness of the pinstripe material, etc. I'm sure there is a better, more reliable way to make such blanks.

I also want to make blanks with stripes of alternating sizes, which I'm sure would require a more advanced technique, as well as blanks that maybe have certain shapes embedded in some of the stripes (i.e. circles, maybe diamonds, etc.) I'm starting to think, I may need a mill to do this...
 
Signed-In Members Don't See This Ad
Joined
Aug 5, 2009
Messages
3,229
Location
Millersburg, OR
I did a few quite some time ago. I used a table saw to cut 6 triangular pieces, glue your accent piece to one side of the main piece and glue together into a hexagon shape. The very center will be hollow and it would be best to turn round or be careful drilling it.
 

hooked

Member
Joined
Mar 25, 2019
Messages
281
Location
Boston
If you have access to a 3D printer, you could 3D print the stripes in any color you would like and then cast them in resin.


Painfullyslow

Member
Joined
Mar 5, 2022
Messages
378
Location
Connecticut
If you have access to a 3D printer, you could 3D print the stripes in any color you would like and then cast them in resin.


Huh, I wish that I had known about those STL files. I ended up making my own. Just drop the finished product into a 3/4" PVC pipe and pour in your resin. This reminds me that I made about a dozen of those blanks but I don't think that I have used any yet. Time to get to the lathe.


20220612_091404.jpg


20220612_091411.jpg
 

Curly

Member
Joined
Nov 20, 2010
Messages
4,849
Location
Saskatoon SK., Canada.
A long time ago member, penl8the, made a fixture for ripping wedges that he glued together with veneer to make pinstripe blanks. Might be the same way Displaced Canadian did them. His table saw jig is in the library. http://content.penturners.org/library/tools_and_jigs/jig_sucks_thin_strips.pdf

penl8the's pictures of his pens are gone in his threads, likely hosted offsite, but I did find this one another member made using one of Branden's blanks. https://www.penturners.org/threads/pin-stripes.126917/#post-1712270 I'm pretty sure one made it to the Front Page and Jeff could find it.

You could try sawing resin blanks or use dyed wood.
 

jrista

Member
Joined
Aug 12, 2021
Messages
2,241
Location
Colorado
If you have access to a 3D printer, you could 3D print the stripes in any color you would like and then cast them in resin.


Hmm! This looks really promising. I don't have a 3D printer yet...but...maybe its just time to get one now. I have a lot of ideas for pinstripe blanks, and with printing, I suspect I could even handle variable-thickness stripes and multi-colored stripes, right?
 

jrista

Member
Joined
Aug 12, 2021
Messages
2,241
Location
Colorado
A long time ago member, penl8the, made a fixture for ripping wedges that he glued together with veneer to make pinstripe blanks. Might be the same way Displaced Canadian did them. His table saw jig is in the library. http://content.penturners.org/library/tools_and_jigs/jig_sucks_thin_strips.pdf

penl8the's pictures of his pens are gone in his threads, likely hosted offsite, but I did find this one another member made using one of Branden's blanks. https://www.penturners.org/threads/pin-stripes.126917/#post-1712270 I'm pretty sure one made it to the Front Page and Jeff could find it.

You could try sawing resin blanks or use dyed wood.
Think this kind of segmenting would be possible with a bandsaw? Or would that be too inaccurate over length?
 

Curly

Member
Joined
Nov 20, 2010
Messages
4,849
Location
Saskatoon SK., Canada.
I would think the finish off a bandsaw (smoothness of the cut) would be the biggest obstacle. With a good bandsaw and blade along with careful adjustments you can get a sled to run parallel to the blade but it is a lot easier to get a table saw to do it consistently. If you don't have one you dance with the one that brings you.
 

hooked

Member
Joined
Mar 25, 2019
Messages
281
Location
Boston
Hmm! This looks really promising. I don't have a 3D printer yet...but...maybe its just time to get one now. I have a lot of ideas for pinstripe blanks, and with printing, I suspect I could even handle variable-thickness stripes and multi-colored stripes, right?
You could do whatever you would want with software. Printing multiple colored stripes would be difficult with this design. Although, there may be some crazy commercial printers out there that could do it. I believe most home/hobbyist use printers only print one color at a time, and it prints in layers vertically. You would be able to alter the widths of the stripes and the number of lines, as painfullyslow showed with his mold.

I use the prints and just pop it in a 3/4 piece of PVC and fill it up with resin. I find it works very well. If you would like to try a test pour, let me know, and I would be happy to send you a couple of prints to test with.


1655127048146.png

1655127085194.png
 

jrista

Member
Joined
Aug 12, 2021
Messages
2,241
Location
Colorado
You could do whatever you would want with software. Printing multiple colored stripes would be difficult with this design. Although, there may be some crazy commercial printers out there that could do it. I believe most home/hobbyist use printers only print one color at a time, and it prints in layers vertically. You would be able to alter the widths of the stripes and the number of lines, as painfullyslow showed with his mold.

I use the prints and just pop it in a 3/4 piece of PVC and fill it up with resin. I find it works very well. If you would like to try a test pour, let me know, and I would be happy to send you a couple of prints to test with.


View attachment 336729
View attachment 336730
I might take you up on the offer, to see if investing in a printer is worth it.

I did some poking around, and it looks like there are some "RGB" printers on the market that can pull in all three filaments, mix them into a single color, and output that one color for the print. Looks like you can vary the color over time. Not sure if you can only vary the color by layer, or if these kinds of printers can vary the color spatially as well... I would need to be able to vary the color of each stripe in each layer of the model.


hooked

Member
Joined
Mar 25, 2019
Messages
281
Location
Boston
That printer looks to have three extruders, and everything combines to melt into one at the nozzle. Excellent idea, and you would be able to mix gradients and make colors without buying many filaments. I have never used a printer like this, so I do not know the details about how well they mix colors. I still think that it only creates a vertical gradient.

We use filament that is color shifting so that it changes colors vertically in a similar way. So, for example, my kids get filaments like this:


Alternating staves... one stave being blue, the next red would be challenging to achieve with this particular design in vertical layers. To accomplish this, you need to print staves individually and then form them together.

Think of this design as a 759-floor building. You build one floor at a time from the bottom up. It doesn't print one wall up to level 759 and then return the print head to level one and start again with a new color. It would topple over. At least no way that I know of with a 3D printer. I am just a hobbyist and I use freeware for slicing. Maybe there is more advanced slicing software that has this capability.

If you are looking at printers, I highly suggest looking at the brands Creality and PRUSA. Both have large user communities and quality after-market upgrades available. I have experience with both and find that the print quality is quite high with both.

I just saw this article about different methods of mixing colors: https://all3dp.com/2/multicolor-3d-printer-3d-print-multiple-colors-method/
 
Last edited:

SteveJ

Member
Joined
Jul 11, 2012
Messages
3,375
Location
Grand Junction, Colorado
Quite a number of members have made pinstripes in wood. JTtheclockman and Mark James have both shown some really nice ones.


I've done them a couple of different ways. Cutting a square blank in half and gluing in veneer and repeating until you've got four pieces of veneer (eight stripes) works but isn't very accurate.

Using a round blank cutting slots for the "stripe" is more accurate. I believe both JT and Mark have shown pictures of the process they have used. Each uses an indexing wheel on the lathe and a means of pulling the cutter across the length of the blank.
 

jrista

Member
Joined
Aug 12, 2021
Messages
2,241
Location
Colorado
Quite a number of members have made pinstripes in wood. JTtheclockman and Mark James have both shown some really nice ones.


I've done them a couple of different ways. Cutting a square blank in half and gluing in veneer and repeating until you've got four pieces of veneer (eight stripes) works but isn't very accurate.

Using a round blank cutting slots for the "stripe" is more accurate. I believe both JT and Mark have shown pictures of the process they have used. Each uses an indexing wheel on the lathe and a means of pulling the cutter across the length of the blank.
Yeah, this was what I was thinking when I was writing the original post. That I might need some kind of mill to cut slots, and glue in some material into each slot. Seems much more accurate than slicing and adding a layer of veneer and slicing again.

I did find this rather amazing 3D printer:


Sounds like it can do just what I need...for the low, low price of $7500. 🤣 
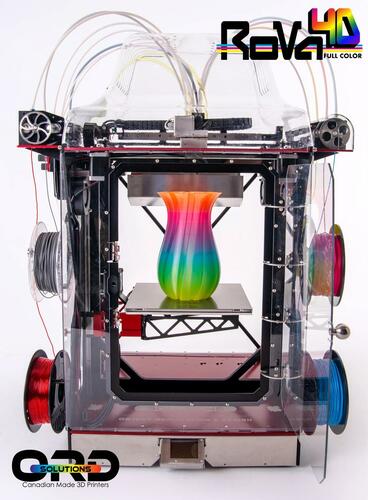
Maybe this will herald the next era of 3D printing, though...CMYKW printing sounds awesome, looks like it can print multiple colors per layer, and is simpler to use (no need to constantly swap filaments for each piece). Hopefully the cost will come down in the future...would love to get into this kind of 3D printing!
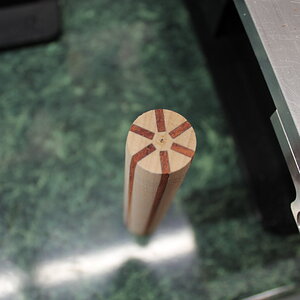
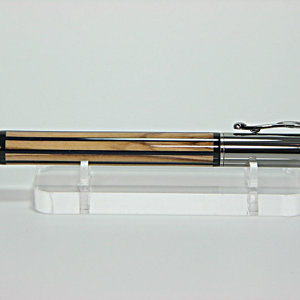
 

Curly

Member
Joined
Nov 20, 2010
Messages
4,849
Location
Saskatoon SK., Canada.
That I might need some kind of mill to cut slots, and glue in some material into each slot. Seems much more accurate than slicing and adding a layer of veneer and slicing again.
All you need is the lathe that you have, a way to index and a router with a slotting bit. https://www.amazon.ca/Yonico-12101q...er+slotting/grooving+bit+1/16+,aps,164&sr=8-5 You make a platform that sits on the bed of the lathe to position the router at close to the right height and then fine tune the height with the router to cut along the centre line of the blank.

Don't overthink. It only leads to failure and overspending. 😉
 

jrista

Member
Joined
Aug 12, 2021
Messages
2,241
Location
Colorado
All you need is the lathe that you have, a way to index and a router with a slotting bit. https://www.amazon.ca/Yonico-12101q-16-Inch-Slotting-Cutter/dp/B07W4XDCXQ/ref=sr_1_5?crid=PMFXX3C87XN8&keywords=router+slotting/grooving+bit+1/16"&qid=1655165669&sprefix=router+slotting/grooving+bit+1/16+,aps,164&sr=8-5 You make a platform that sits on the bed of the lathe to position the router at close to the right height and then fine tune the height with the router to cut along the centre line of the blank.

Don't overthink. It only leads to failure and overspending. 😉
Ah, the wonderful router! I guess I have two key tools I still need: A table saw, and a router! 🤣 Thanks much for the tip!

I had been holding out for a job site SawStop...but the prices just keep rising (I think those are now $1600 or more!!), and I can no longer keep up. I may have to get a smaller table saw, just so I have one...and just careful beyond measure to preserve all my fingers. With the price of even the smallest sawstop table saw as they are now, I could probably get a job site table saw, router, and router table for LESS!
 

jrista

Member
Joined
Aug 12, 2021
Messages
2,241
Location
Colorado
I have posted my method quite afew times here. I use a platform, an indexing wheel, and a router with true router bits. I do not use slicing blades because I make all different sized slots. The Zen that was referenced was done that way. If you want to see my setup the thread I started with it was.

https://www.penturners.org/threads/my-jig.104253/
John, sorry for the late response, but thanks for this. This looks like an awesome setup. I want to be able to do different sized slots as well, so this is quite intriguing. It is also another darn good reason to get a router!

It appears as though you are inserting layers of wood of constant thickness, which would mean that the more you turn down your blank, the less base blank material there would be between each band of alternate wood. I imagine this takes some careful thought and plannig to make sure that you don't cut channels that are too fat (touch or merge) closer to the center of the blank that they merge when turned down? You do seem to have created some fairly wide bands in some of your pens, so I'm curious how you approach that. Do you just cut all the way through the blank and insert a thicker piece of wood all the way through? Or is there another technique you use?
 

jttheclockman

Member
Joined
Feb 22, 2005
Messages
19,145
Location
NJ, USA.
Jon I always turn my blanks down to about 1" in diameter. Using that measurement gets me close to finish size anyway. From there I figure out how many slots I want. I do not cut all the way through. Here is an example. I can make slots starting from 1/16"" up to whatever I want. I think anything less than 1/16" is just not worth it and if you do then better to slice the blank from a square blank and insert material. As I get back into it in the future I will do even more with smaller slots. Also with varied size slots. It really does not matter. I would never put a blank like these on a slimline even if I ever made one.:) I should mention the 3 blanks shown on the bottom page are still sitting on the bench. The black and aluminum with the dots was an experiment I tried. I later refind it to my liking and that too is sitting on bench. This one I may use for a sierra kit or something like that. The dots are not symetrical enough. I worked that out better.

I should mention, the more slots you make the more your blank becomes fragile. Also your infill better be dead on or you will run into trouble on the final few slots. Now those blanks made with the printers is a whole other animal and that is not for me. I do not need to spend big$$ on something to make a few blanks. If you sell your blanks then maybe a good idea. But with that same thought as a printer you could cut slots thin and use epoxy resin as infill. May try that some day.

Copy of IMGP0491.JPG
Copy of IMGP0495.JPG
 
Last edited:

jrista

Member
Joined
Aug 12, 2021
Messages
2,241
Location
Colorado
Thanks much for the insights, @jttheclockman! I appreciate it!

I think this is the approach I am going to take, for wood and resin, to use a router with a jig like you have to cut slots, or drill holes, etc. I have several ideas that involve circles...keep meaning to try that out.

I also couldn't ever see myself using such a blank in a small, thin pen...that would be so hard to deal with...wow. I haven't turned a slimline in a while now either. I tried turning some "New Series" rollerball pens this weekend...first time in a while I've turned a pen that cheap. I wasn't expecting it, the pens look nice in online stores...but actually handling them, they are very small, not much larger around than a slimline, and they had no protective plastic sleeve that keeps the nib from scratching against the brass tube. The threading was rather poor.

I've definitely become a "high end pen" snob. :p But, I really like the fatter pen designs. Especially rollerball and fountain pens...they just have a feel to them, and a balance the way they sit in your hand when writing, that I really love. That extra thickness to the pen seems like it would help a lot when making segmented blanks like this.

I also love your use of holly and ebony. Can't really get much more contrast than that! I have a few ebony blanks, I'm going to have to pick up some more holly and give some of that high contrast a try.
 

jttheclockman

Member
Joined
Feb 22, 2005
Messages
19,145
Location
NJ, USA.
Thanks much for the insights, @jttheclockman! I appreciate it!

I think this is the approach I am going to take, for wood and resin, to use a router with a jig like you have to cut slots, or drill holes, etc. I have several ideas that involve circles...keep meaning to try that out.

I also couldn't ever see myself using such a blank in a small, thin pen...that would be so hard to deal with...wow. I haven't turned a slimline in a while now either. I tried turning some "New Series" rollerball pens this weekend...first time in a while I've turned a pen that cheap. I wasn't expecting it, the pens look nice in online stores...but actually handling them, they are very small, not much larger around than a slimline, and they had no protective plastic sleeve that keeps the nib from scratching against the brass tube. The threading was rather poor.

I've definitely become a "high end pen" snob. :p But, I really like the fatter pen designs. Especially rollerball and fountain pens...they just have a feel to them, and a balance the way they sit in your hand when writing, that I really love. That extra thickness to the pen seems like it would help a lot when making segmented blanks like this.

I also love your use of holly and ebony. Can't really get much more contrast than that! I have a few ebony blanks, I'm going to have to pick up some more holly and give some of that high contrast a try.
Thanks. I too love the real stark contrast to the two woods. I recently picked up a bunch of aspen which is just about as white as holy. At some time I will play around with it to see how it compares. When I use holy I like to bleach it to realy keep it white. Because even with CA finish it will turn a yellowish. Have to see how aspen takes to finishing and see what difference is if I bleach it as well.
The top pen has bleached holy. The second pen does not. Was in a hurry to make that one and did not take my usually time and skipped some steps. The blanks are without a finish on and that is the color you strive for with wood. Now if using acrylics that is easier.

Copy of Copy of IMGP0892.JPG
Copy of IMGP0246.JPG
Copy of IMGP0252.JPG
 
Last edited:
Top Bottom