
monophoto
Member
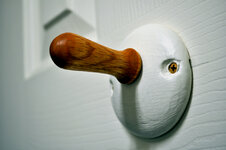
Several years ago, I made a pin to hang a hat on the inside of a closet door. (see photo 1). The pin was turned as a simple spindle in oak, and finished with WOP, and was attached to a base turned from flat stock, and then painted to match the door. The pin had a tenon that was glued into a matching hole in the base, and to achieve an upward angle, the hole was slightly off center and drilled at an angle. This was worked well although I wasn't fully pleased with the final appearance.
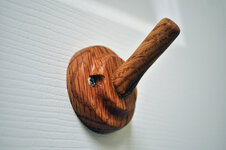
Recently, I wanted to make a couple of additional pins to go on the back of another door, but because the two would be side by side, they needed to be a matching pair. Matching the overall shapes would be simple, but achieving matching upward angles was going to be a challenge.
My solution (see photo 2) was to make the hole in the bases perpendicular to the face of the bases, and then turn the pins on two axes, using a jig to hold the blank in a scroll chuck to get consistent angles. That is, the upward tilt of the pins came about because the pins had a 'dog-leg' shape, with the angle of that shape resulting from the jig used to hold the pins in the chuck for turning, and therefore repeatable. I made both the bases and pins from oak and finished everything using WOP. The attached pdf shows the pieces involved; here's a brief description of the process.
1. The base started as a square scrap of face-grain timber held at the corners in a scroll chuck - flattened the face, and then turned a shallow mounting recess that also assured that the rim of the base would sit flat on the door. Reversed the blank using the chuck jaws in expansion mode into the recess, and rough turned the front. Marked a line across the blank through the exact center, and then drilled and countersunk the mounting holes off the lathe. Remounted the blank on the chuck, drilled out the hole to receive the tenon on the pin in the exact center of the blank, and then finished shaping the base.
2. The pins started out as rectangular scraps of timber held between centers with the grain in spindle orientation. The first turning put a 1/2" tenon at one end about 1/2" long, with a bead next to the tenon such that when the pin was inserted into the hole in the base, the bead covered the joint.
3. Next, I made the jig from a small rectangular scrap of timber - maple, I believe. I marked a center line on the timber, and then holding the timber in a screw clamp, drilled a 1/2" hole on that line at about a 20deg angle (the exact angle is not important). Then, I cut the timber along the marked center line, which also cut the hole along its axis.
4. For the second turning of the pins, I removed two opposing jaws (#2 and #4) from my scroll chuck so that it could grip the jig between the remaining two jaws (#1 and #3). Then, when the chuck closed, the two half-holes in the jig gripped the tenon in the pin blank. Using tailstock support for safety, I was then able to turn the pin. The fact that the one jig, with its one angled hole, was used to mount multiple blanks meant that the offset angle would be repeated for each pin made with that jig.
5. Finally, I applied glue in the holes in the bases, and inserted the tenons, being sure to align the pins such that the angled portion would be pointed upward when the bases were mounted on the door.
Attachments
Last edited: