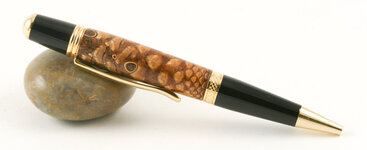
Pine Cone Pen - Try #1

Signed-In Members Don't See This Ad
See more from MartinPens

MartinPens

Member
Joined
Apr 3, 2010
Messages
1,814
Location
Medford, Oregon, USA
My son heard me talking about pine cone pens and disappeared to the back yard. He returned a few minutes later with four pine cones he had knocked off of our pine trees. So.... we drilled a hole and used thin CA to harden. I think the wood hardener soaking technique works best, but I don't have any wood hardner. It turned pretty easy. When getting close to the bushing size, I soaked in thin CA again and filled some of the holes.

I'll think I'll try this again. It was a fun project with my son and my brother was visiting from FL. He's taking it home with him.

Martin
 

Attachments

  • PineConePen-7707.jpg
    PineConePen-7707.jpg
    96 KB · Views: 409
Signed-In Members Don't See This Ad
You did great!!

Was the cone 'green'? Monterery Pine by any chance?


I run my cones across the bandsaw to get rid of a alot of the extra stuff, thin CA, allow to dry for a day and then turn. Adding thin CA once I've turned through it to keep the petal from chipping out.

What is your process?


Scott (I need more cones now....thanks) B
 
Great pen! I want to try making one of these, but I have nothing but hardwoods in my backyard.
 
LOOKS GREAT, I've tried the hardener, Plexiglas in acid-tone and CA I like the CA the best and it is the fastest for me. After I drill my hole, I use thin CA on the inside of the cone before installing my tubes this seems to help stabilize from the inside out. Keep up the good work, pine cones are one of my most requested pens.
 
process

Martin, you devil. That was fast as for the trying and it turned out very nice. Did you put hardner on the whole thing or did you have to cut it to the size first before turning?


For this first one, I just did it quick. I drilled the hole and put a fair amount of thin CA in there and let it try for a while. The hole did not go through the pine cone all the way. I cleaned up the hole on the drill press and put the tube in with medium CA. I squared the open end and cut the pine cone to the length of the tube exposing the other end. I then squared the exposed end. I put it on the bushings and started turning. Pieces were flying here and there. About halfway through I stopped and put on more CA.

I won't be doing it this way the next time. I think the CA has a reaction with the sap and creates little bubbles that interfere with the look.
There was another thread on here somewhere - the guy soaked the cone in Minwax wood hardener after drilling the hole. I'm going to try this next. And then remove some of the material with the band saw.

Let me know what works for you. Half the fun is figuring this stuff out as we go.

Martin
 
tree type

You did great!!

Was the cone 'green'? Monterery Pine by any chance?


I run my cones across the bandsaw to get rid of a alot of the extra stuff, thin CA, allow to dry for a day and then turn. Adding thin CA once I've turned through it to keep the petal from chipping out.

What is your process?


Scott (I need more cones now....thanks) B


I'll have to figure out what kind of tree I have in the back. It's time to start knocking cones off!

Martin
 
Back
Top Bottom