Sylvanite
Member
It's always best to correct the white balance in camera, but sometimes that just doesn't work out. You might use a camera that doesn't have white balance adjustment, or it may be difficult to get right. It can happen that you set everything appropriately but an element in the photo casts a tinted shadow, or some other post-processing step introduces a false color.
There are several ways to correct this problem. In this tip, I'm going to describe the easiest one. I'm using Photoshop Elements 8 as an example. Other versions of Photoshop have the same control, and many other photo editors have something similar.
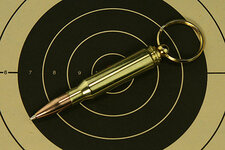
Ok, let's start out with a photo that exhibits incorrect white balance. I took this picture using "daylight" compact flourescent lights, but with the camera's white balance set to "shade". This gives the image a distinctly yellow tone similar to many photos I see posted on the IAP.

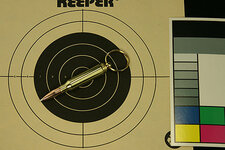
One can fix this problem in post-processing, but you need something in the image that is neutral in color (white, gray, or black). The photo above, however, doesn't have any neutral tones -- the target is beige and the black isn't pure. Therefore, I've zoomed-out a bit and put something white in it. I used a color card made for setting white-balance and exposure, but I could have made do with just a piece of white paper. We'll crop it out later.

On the menu bar, click "Enhance -> Adjust Color -> Remove Color Cast".

This brings up a dialog as shown. The cursor changes to an eyedropper (not shown) and all we need to do now is click on the neutral color. In the image below, I've already clicked on the white section of the color card and the preview shows an image with the white balance set accordingly.

Click the <Ok> button, crop, resize and save the image as shown in previous tips, and we have the following result. That's it!

Some other ways to change white balance in post processing are:
Eric
There are several ways to correct this problem. In this tip, I'm going to describe the easiest one. I'm using Photoshop Elements 8 as an example. Other versions of Photoshop have the same control, and many other photo editors have something similar.
Ok, let's start out with a photo that exhibits incorrect white balance. I took this picture using "daylight" compact flourescent lights, but with the camera's white balance set to "shade". This gives the image a distinctly yellow tone similar to many photos I see posted on the IAP.

One can fix this problem in post-processing, but you need something in the image that is neutral in color (white, gray, or black). The photo above, however, doesn't have any neutral tones -- the target is beige and the black isn't pure. Therefore, I've zoomed-out a bit and put something white in it. I used a color card made for setting white-balance and exposure, but I could have made do with just a piece of white paper. We'll crop it out later.

On the menu bar, click "Enhance -> Adjust Color -> Remove Color Cast".

This brings up a dialog as shown. The cursor changes to an eyedropper (not shown) and all we need to do now is click on the neutral color. In the image below, I've already clicked on the white section of the color card and the preview shows an image with the white balance set accordingly.

Click the <Ok> button, crop, resize and save the image as shown in previous tips, and we have the following result. That's it!

Some other ways to change white balance in post processing are:
- If the camera supports RAW images, one can set the color temperature when importing the image.
- The "Levels" control has similar black/grey/white eyedropper functions, but they affect dynamic range as well as color.
- One can get very specific color control by manipulating "Color Curves", but that is not a straightforward process.
- Adjusting "Hue" (in the "Hue/Saturation" dialog) does not correct improper white balance. It changes the color tone of the photo, but will not adjust colors to produce the correct white. You can fiddle with hue all day and never get the desired result, so don't bother.
Eric
