Photography Basics - Why Use A Light Tent?

Signed-In Members Don't See This Ad

Sylvanite

Member
Joined
Jul 18, 2006
Messages
3,113
Location
Hillsborough, North Carolina, USA.
If you browse through the IAP library and Pen Photography Forum, you'll find several references to commercial light tents, light kits that include tents, and other things that work as light tents, as well as instructions for building one yourself. There's lots of information on what a light tent is, and how to get one, but nothing about why you would want it in the first place.

So, what makes a light tent desirable? Why do we use them for pen photos?

The answer has to do with the way pens (especially the metal components) reflect light. The physics of reflection is actually quite simple:
angle of incidence = angle of reflection.​
That's all. When light strikes a reflective object, it bounces off at the same angle.

The actual photographic application, however, can get very complicated. Complicated enough to fill a book - and in fact, many books have been written on the subject. I'll try to be somewhat more brief.

Consider how reflection works on a curved surface. When light from a single location meets a convex reflector, it is scattered across a wide range of angles. A camera will only see a small portion of it. Conversely, when looking at a convex reflection, we see (or a camera sees) images reflected from a wide range of angles.

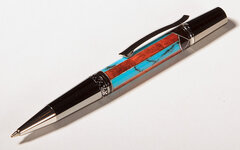
Here's an example of a pen lit with two studio lights. The primary light is above and to the left of the pen. You can see the crisp shadow it creates. The second light comes from the front-right side of the photo. It is comparatively dim and serves to "fill in" the shadow.

attachment.php


The pen blank is lit well enough to see, but the curved metal components are nearly all black. Most of that area is a reflection of the unlit studio.

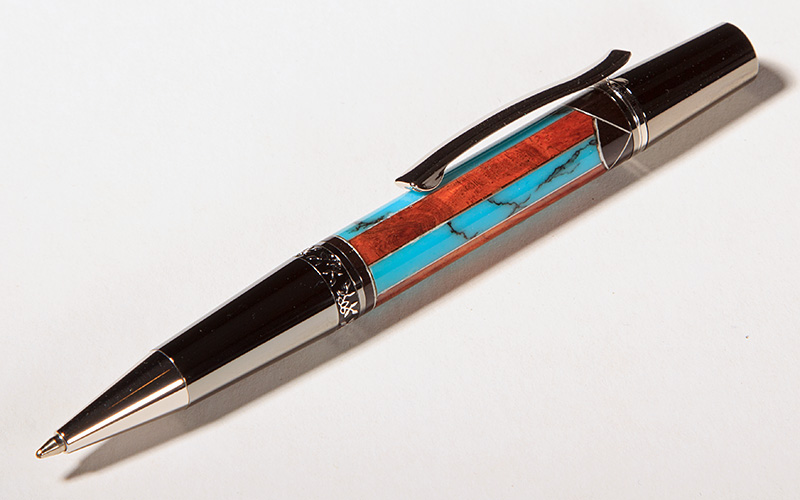
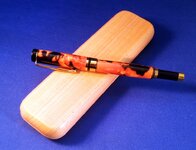
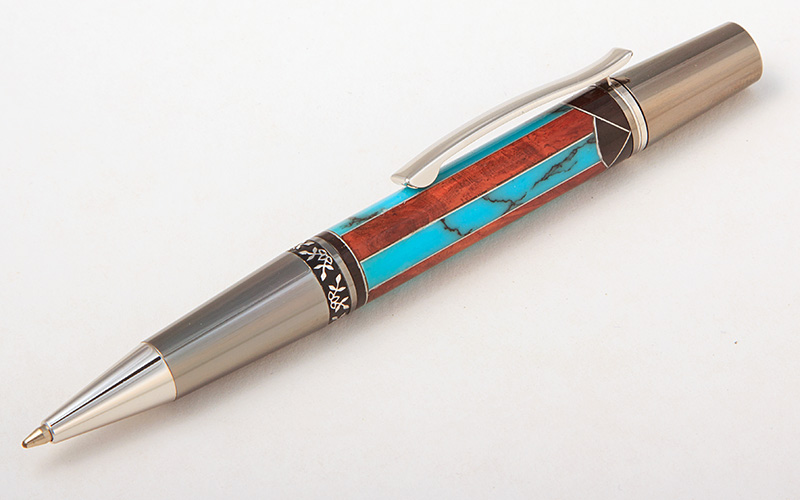
Now here is a photo taken the same way except that the pen is inside a light tent.

attachment.php


A light tent is essentially a dome over the pen that provides (at least some) illumination from all visible angles. This is what photographers refer to as a "large" light source. Note that the shadow under the pen is still present, but it is very soft. Because light strikes the metal components from all angles, some light is reflected back to the camera from the entire convex surface.

This photo is not perfect by any means, but it is a much better portrayal of the pen than the previous image. The large dark spots are gone. The detail in the pen hardware is now clearly visible, as is the metal segmentation in the pen barrel.

Simply put, a light tent yields more complete illumination of curved reflective surfaces. That's why we like to use them for pen photography. There are other ways of producing "large" light, but a tent is simple, inexpensive, and practical.

I hope that makes sense,
Eric
 

Attachments

  • LightTent1.jpg
    LightTent1.jpg
    94.1 KB · Views: 1,592
  • LightTent2.jpg
    LightTent2.jpg
    85.4 KB · Views: 1,567
Signed-In Members Don't See This Ad

mmyshrall

Member
Joined
Nov 11, 2013
Messages
219
Location
Spokane, WA
Hi Eric,

Thanks for the explanation and pictures really are worth a thousand words in this case. I just purchased my light box setup this past weekend, now I need to get busy and turn a pen to try it out.

Michael
 

Edgar

New Member Advocate
Staff member
Joined
Feb 6, 2013
Messages
6,898
Location
Alvin, TX 77511
Thanks, Eric.
That's the simplest & most concise explanation I've seen yet.
I've been considering that $30 light tent kit from Amazon - you just convinced me!

Edgar
 

Edgar

New Member Advocate
Staff member
Joined
Feb 6, 2013
Messages
6,898
Location
Alvin, TX 77511
Talk about FAST!
Here's a couple of shots that I just took a couple of minutes ago with my new $30 Amazon light tent.
I just used a hand-held iPhone & wasn't too particular about the placement of the 2 lights for these test shots & applied a little color balance touchup with Photoshop. Nowhere near as nice as Eric's photo, but much better than anything I've posted so far.

(Full disclosure - turns out that our marketing dept has one of these light tents for taking pictures of our circuit boards & never bothered to tell me about it. Glad I found it before I placed my order.)
 

Attachments

  • First 2014 Pens3.jpg
    First 2014 Pens3.jpg
    247.7 KB · Views: 448
  • First 2014 Pens4.jpg
    First 2014 Pens4.jpg
    267.4 KB · Views: 430

Cmiles1985

Member
Joined
Nov 12, 2013
Messages
1,611
Location
Aransas Pass, TX
You've got me convinced! The explanation makes perfect sense, but the photos really convey the point! I may need to visit Target this weekend to see if they've got the $8 storage bin mentioned in another post (or not be so darn cheap and buy the $30 one on Amazon!)
 

Sylvanite

Member
Joined
Jul 18, 2006
Messages
3,113
Location
Hillsborough, North Carolina, USA.
The cheapest light tent in the world

If you're patient, you don't have to spend any money at all on a light tent. Remember, I said that the tent serves as a "dome ... that provides illumination from all visible angles". Well, that's a pretty good description of outdoors on an overcast day. You don't even have to buy any lights.

A sunny day will yield harsh shadows and uneven reflections like my first photo, but a sky covered in clouds produces lighting more the second.

I hope that helps,
Eric
 

mmyshrall

Member
Joined
Nov 11, 2013
Messages
219
Location
Spokane, WA
Hi Clark,

I ran across a deal this past weekend at Target. I found the storage bin mentioned in the and they had a buy one, get one half off deal on clip on light fixtures. So, my setup cost me $23.96 plus a bit of tax (so about $25.00). From a cost standpoint, the Amazon setup is less expensive, but I already had light bulbs and a tripod so I didn't want extras to worry about.

Michael
 

Sylvanite

Member
Joined
Jul 18, 2006
Messages
3,113
Location
Hillsborough, North Carolina, USA.
Where did you place the lights when you used the light tent?
In this example, I wanted as few variables as possible, so I left the lights in the same positions for both photographs. The primary light is above, to the left, and slightly behind the tent. It shines on the left wall and top of the tent. The fill light is low, and to the right of the camera. It shines on the right wall and front of the tent. Positions of the fixtures themselves is not so critical when using a light tent. What's important is that the lights illuminate the walls of the tent. The tent itself is the light source for the pen.

Regards,
Eric
 

WoodaCoulda

Member
Joined
Oct 15, 2021
Messages
23
Location
Texas
Awesome article as I've found a lot of tips here that has and will help me with making bentwood rings. Since they obviously have a convex surface on the outside (but concave on the inside) in sure a light tent would help out a great deal when compared with the following pics from my phone of just ceiling light.

294C4F95-E111-4E94-9B14-90B3307F3A47.jpeg
2C0F4E6F-8362-48EA-A804-5F6A11BDE478.jpeg
 

jrista

Member
Joined
Aug 12, 2021
Messages
2,241
Location
Colorado
Awesome article as I've found a lot of tips here that has and will help me with making bentwood rings. Since they obviously have a convex surface on the outside (but concave on the inside) in sure a light tent would help out a great deal when compared with the following pics from my phone of just ceiling light.

View attachment 319094

Diffusing the light more, which is what clouds or a tent do, will help spread out the highlights.

That said, before you invest in a tent, are you using your phone? Phones tend to over-compress the images, especially when capturing jpeg. If you have a "raw" mode for your camera, you should use that, then use something like Lightroom to process. Your images here exhibit the artifacts of moderately high compression, and you could extract significantly more detail and more "wow" factor with clearer, sharper photos.

A basic mirrorless camera that is high res and can capture raw images could help take things to the next level, if your phone doesn't support a raw mode. Or, if you are already using a mirrorless (or even a DSLR) camera, make sure you are using RAW, and are processing the images yourself, to avoid that overcompressed look.

Another tip...with closer shots like that, you will generally want the entire ring to be in focus, unless you are explicitly going for some kind of DOF effect. A controlable camera aperture (i.e. what you get with a mirrorless or DSLR camera) that you can "stop down" to increase the depth of field can help there.

Once you are capturing full detail, then some diffusion will certainly help. A tent isn't even strictly necessary to start...some light stands with large diffusing light reflectors can help a lot as well...or, of course, an overcast day.
 

WoodaCoulda

Member
Joined
Oct 15, 2021
Messages
23
Location
Texas
Diffusing the light more, which is what clouds or a tent do, will help spread out the highlights.

That said, before you invest in a tent, are you using your phone? Phones tend to over-compress the images, especially when capturing jpeg. If you have a "raw" mode for your camera, you should use that, then use something like Lightroom to process. Your images here exhibit the artifacts of moderately high compression, and you could extract significantly more detail and more "wow" factor with clearer, sharper photos.

A basic mirrorless camera that is high res and can capture raw images could help take things to the next level, if your phone doesn't support a raw mode. Or, if you are already using a mirrorless (or even a DSLR) camera, make sure you are using RAW, and are processing the images yourself, to avoid that overcompressed look.

Another tip...with closer shots like that, you will generally want the entire ring to be in focus, unless you are explicitly going for some kind of DOF effect. A controlable camera aperture (i.e. what you get with a mirrorless or DSLR camera) that you can "stop down" to increase the depth of field can help there.

Once you are capturing full detail, then some diffusion will certainly help. A tent isn't even strictly necessary to start...some light stands with large diffusing light reflectors can help a lot as well...or, of course, an overcast day.
Hi jrista! Thanks mucho for the great pro-tips! Just recently got serious with this hobby " "turned" fledgling business. This site and the amazing expertise that comes with it is greatly appreciated. Next stop…pens!!! 🤣
 

jrista

Member
Joined
Aug 12, 2021
Messages
2,241
Location
Colorado
Hi jrista! Thanks mucho for the great pro-tips! Just recently got serious with this hobby " "turned" fledgling business. This site and the amazing expertise that comes with it is greatly appreciated. Next stop…pens!!! 🤣

Well, I wouldn't necessarily call them "pro" tips. :p I just recently went through this process myself, bought several light tents, several lights, and just about every pen stand out there, and even recently just ordered some various fabrics to use as base/backdrop content. So I'm learning as well...just offering some "noob" tips based in very recent experience, really! I have been a photographer for over a decade, so I'm quite familiar with cameras, but most of my experience there lies in nature, landscapes, astrophotography, which are entirely different beasts when it comes to light. ;)

In my recent foray, I picked up 3 tents, 16x16, 24x24 and 36x36. The first one I ordered was 36x36, and it was just way larger than I thought it would be. Then I got the 16x16, and it ended up too small...it wasn't exactly smaller than I thought, but I found I couldn't actually fit things in it well enough to get the kind of scene I wanted to fit within the FoV of the camera and lens. So I ended up with the 24x24. It is large, but, it seems to be about the right size to really get the photos I want. For pens, at least, which sometimes involves more than one...

For the use case of more macro-closeup photos of rings, I would say a tent in the realm of 16x16 would be just right, and should diffuse the light quite nicely for your rings.

Now, once I got the tents in play, I found that it was just a bit too tedious to fiddle with them all the time, and to get the best diffusion I have found I DO need to use the front covers that have a camera slit in them to put the lens through. If I leave this front cover off, the tents sag, and they get unruly (at least, for the type of tent I bought:

https://www.amazon.com/dp/B01GE79L98?psc=1&ref=ppx_yo2_dt_b_product_details

So recently, I've ditched the tents for now, and have just been using these two diffused lights I picked up, along with some color-temp adjustable high CRI LED bulbs, and I'm just putting my "scene" on a table. I'm still learning the optimal position for the lights...I think what I've learned from reading and trial and error, is that you want a primary light a bit behind the subject, to cast a shadow into the foreground, then the secondary fill light would actually be a bit off to the side and pointed at the front of the scene, which helps reduce contrast, lighten the shadows, and give you a nice scene. I've got a couple of pens to photograph here...I'll see if I can get some examples of the setup. The lights, BTW, are these:


WoodaCoulda

Member
Joined
Oct 15, 2021
Messages
23
Location
Texas
Well, I wouldn't necessarily call them "pro" tips. :p I just recently went through this process myself, bought several light tents, several lights, and just about every pen stand out there, and even recently just ordered some various fabrics to use as base/backdrop content. So I'm learning as well...just offering some "noob" tips based in very recent experience, really! I have been a photographer for over a decade, so I'm quite familiar with cameras, but most of my experience there lies in nature, landscapes, astrophotography, which are entirely different beasts when it comes to light. ;)

In my recent foray, I picked up 3 tents, 16x16, 24x24 and 36x36. The first one I ordered was 36x36, and it was just way larger than I thought it would be. Then I got the 16x16, and it ended up too small...it wasn't exactly smaller than I thought, but I found I couldn't actually fit things in it well enough to get the kind of scene I wanted to fit within the FoV of the camera and lens. So I ended up with the 24x24. It is large, but, it seems to be about the right size to really get the photos I want. For pens, at least, which sometimes involves more than one...

For the use case of more macro-closeup photos of rings, I would say a tent in the realm of 16x16 would be just right, and should diffuse the light quite nicely for your rings.

Now, once I got the tents in play, I found that it was just a bit too tedious to fiddle with them all the time, and to get the best diffusion I have found I DO need to use the front covers that have a camera slit in them to put the lens through. If I leave this front cover off, the tents sag, and they get unruly (at least, for the type of tent I bought:

https://www.amazon.com/dp/B01GE79L98?psc=1&ref=ppx_yo2_dt_b_product_details

So recently, I've ditched the tents for now, and have just been using these two diffused lights I picked up, along with some color-temp adjustable high CRI LED bulbs, and I'm just putting my "scene" on a table. I'm still learning the optimal position for the lights...I think what I've learned from reading and trial and error, is that you want a primary light a bit behind the subject, to cast a shadow into the foreground, then the secondary fill light would actually be a bit off to the side and pointed at the front of the scene, which helps reduce contrast, lighten the shadows, and give you a nice scene. I've got a couple of pens to photograph here...I'll see if I can get some examples of the setup. The lights, BTW, are these:

A veritable cornucopia of information! Any recommendations on a beginner-ish camera for yonder product photography?
 

jrista

Member
Joined
Aug 12, 2021
Messages
2,241
Location
Colorado

A veritable cornucopia of information! Any recommendations on a beginner-ish camera for yonder product photography?

Any kind of interchangeable lens cameras (ILC) will do, although there are many "point and shoot" cameras with adjustable lens focal lengths and stoppable apertures. You don't necessarily need an expensive one, and, there are new cameras released every year so I'm not sure I could recommend one...as I do landscapes, birds/wildlife, and stuff like that, I use fairly high end cameras. In my case I've used the Canon 7D, 5D III, Sony a6000 series, Sony a7R III, and recently purchased a Canon EOS R5 (their new mirrorless.) The Sony s6000 series is actually quite good, and more reasonably priced, and would certainly do, but, even that may be overkill for a first camera. I would check sites like DPReview, DXO, etc. for some of the latest info on the best entry level cameras. Personally, I'd recommend an ILC, as they will over the longer term give you far more versatility, and allow you to pick and choose lenses that will best fit the kind of photos you want to take. But its not strictly necesary.

For an ILC, you can get either a mirrorless or DSLR. DSLRs are, I think, starting to get phased out, very very slowly. The hot thing these days is a mirrorless camera, like the Sony a6000. As long as you get a camera that can accept multiple lenses, then you are guaranteed to be able to change the aperture. You will eventually want to change out the lenses for different focal lenghts/fields of view, and you can get some very nice lenses, including purpose-built macro lenses (macro photography is roughly what you are doing with the ring photos there...very close up, highly detailed.) Non-macro lenses tend to have limits on how close you can get, and still achieve focus...a lot of phone cameras, being as tiny as they are, actually allow macro photography, but macro (very close up) photography with other cameras usually requires a macro lens.
 

WoodaCoulda

Member
Joined
Oct 15, 2021
Messages
23
Location
Texas
Any kind of interchangeable lens cameras (ILC) will do, although there are many "point and shoot" cameras with adjustable lens focal lengths and stoppable apertures. You don't necessarily need an expensive one, and, there are new cameras released every year so I'm not sure I could recommend one...as I do landscapes, birds/wildlife, and stuff like that, I use fairly high end cameras. In my case I've used the Canon 7D, 5D III, Sony a6000 series, Sony a7R III, and recently purchased a Canon EOS R5 (their new mirrorless.) The Sony s6000 series is actually quite good, and more reasonably priced, and would certainly do, but, even that may be overkill for a first camera. I would check sites like DPReview, DXO, etc. for some of the latest info on the best entry level cameras. Personally, I'd recommend an ILC, as they will over the longer term give you far more versatility, and allow you to pick and choose lenses that will best fit the kind of photos you want to take. But its not strictly necesary.

For an ILC, you can get either a mirrorless or DSLR. DSLRs are, I think, starting to get phased out, very very slowly. The hot thing these days is a mirrorless camera, like the Sony a6000. As long as you get a camera that can accept multiple lenses, then you are guaranteed to be able to change the aperture. You will eventually want to change out the lenses for different focal lenghts/fields of view, and you can get some very nice lenses, including purpose-built macro lenses (macro photography is roughly what you are doing with the ring photos there...very close up, highly detailed.) Non-macro lenses tend to have limits on how close you can get, and still achieve focus...a lot of phone cameras, being as tiny as they are, actually allow macro photography, but macro (very close up) photography with other cameras usually requires a macro lens.
One of my bucket list items it's to get a really nice digital camera, take a photography and in-depth Photoshop class and take that puppy on an Alaskan Cruise. Until then, I'll keep tuning in here! Thanks again! 🙂🪵💍
 

Ironwood

Member
Joined
May 31, 2010
Messages
1,228
Location
Mackay. Australia
One of my bucket list items it's to get a really nice digital camera, take a photography and in-depth Photoshop class and take that puppy on an Alaskan Cruise. Until then, I'll keep tuning in here! Thanks again! 🙂🪵💍
Not sure if you have noticed, but at the very bottom of threads, there is a list of similar threads.
If you look at the very bottom of this page you will see a number of threads by Sylvanite on photography basics, they are some of the ones I mentioned in your other thread.
 

Sylvanite

Member
Joined
Jul 18, 2006
Messages
3,113
Location
Hillsborough, North Carolina, USA.
You don't need an expensive camera to take good pen photos. What's behind the camera is much more important than what's inside it. You do need to be able to control the camera settings, but you don't need a DSLR or mirrorless camera with interchangeable lenses. See "Pen Photography Myths" for more on that (and other things that people commonly recommend but you don't really need).

For additional information on how to use a light tent effectively, see "Pen Photography - Putting Concept into Practice" and "Polarization and Glare", starting at post 46, "Managing direct reflection part 1: large light". Note that I use a translucent tent and illuminate it from the exterior, not an opaque cube with internal lights.

I hope that helps,
Eric
 

Sylvanite

Member
Joined
Jul 18, 2006
Messages
3,113
Location
Hillsborough, North Carolina, USA.
Diffusing the light more, which is what clouds or a tent do...
Don't confuse "diffuse" light with "large" light. Light tents are not intended for producing diffuse light (light that shines in a wide range of angles), but for producing large light (light that comes from a wide range of angles).

Large light will illuminate curved metal surfaces (such as pen components) evenly, even if it is direct light. Small light will not, even if it is diffuse. That's why you still need to cover the face of a light tent (leaving a hole for the camera lens to see through). The light inside may be from a diffuse source, but you still need to provide illumination over the range of angles from the front.

I hope that helps,
Eric
 

jrista

Member
Joined
Aug 12, 2021
Messages
2,241
Location
Colorado
Don't confuse "diffuse" light with "large" light. Light tents are not intended for producing diffuse light (light that shines in a wide range of angles), but for producing large light (light that comes from a wide range of angles).

Large light will illuminate curved metal surfaces (such as pen components) evenly, even if it is direct light. Small light will not, even if it is diffuse. That's why you still need to cover the face of a light tent (leaving a hole for the camera lens to see through). The light inside may be from a diffuse source, but you still need to provide illumination over the range of angles from the front.

I hope that helps,
Eric

Diffuse means to spread out over a large area...so, I think the term is correct. Diffusion does scatter the light, but it also has the effect of making the light source large.

Diffusion changes the harshness of the light as well, which softens shadows and spreads out highlights.
 

Sylvanite

Member
Joined
Jul 18, 2006
Messages
3,113
Location
Hillsborough, North Carolina, USA.
Diffusion does scatter the light, but it also has the effect of making the light source large.
Sorry, but that is incorrect. You can put a diffuser over a light and make it spread out, but that does not turn it into a large light source. To illustrate, here is a pen photo lit with two 6" reflector lights with diffusers installed (you can see their reflections in the clip ball):

noglarebyangle-jpg.138602


Note that there are distinct shadows present, a harsh glare line on the nosecone, and largely unlit sections on the nosecone and the clip. Although the lights have been "diffused" (spread out), they are still not "large" (coming from a wide range of angles).

Now here is a photo of the pen taken with it inside a light tent, and with the same two lights placed close to the tent walls so that only small regions of the tent were illuminated (small, diffused lights):

penintent1-jpg.139225


And the following photo was taken with the same two lights placed farther away from the tent so that they illuminated a larger portion of the tent walls (a large light source):

penintent2-jpg.139228


These two photos feature lights that are equally diffused, but of unequal size, producing quite different results.

So, I hope you can see that a diffused light source and a large light source are two very different things.

I hope that helps,
Eric
 

jrista

Member
Joined
Aug 12, 2021
Messages
2,241
Location
Colorado
Sorry, but that is incorrect. You can put a diffuser over a light and make it spread out, but that does not turn it into a large light source. To illustrate, here is a pen photo lit with two 6" reflector lights with diffusers installed (you can see their reflections in the clip ball):

noglarebyangle-jpg.138602


Note that there are distinct shadows present, a harsh glare line on the nosecone, and largely unlit sections on the nosecone and the clip. Although the lights have been "diffused" (spread out), they are still not "large" (coming from a wide range of angles).

Now here is a photo of the pen taken with it inside a light tent, and with the same two lights placed close to the tent walls so that only small regions of the tent were illuminated (small, diffused lights):

penintent1-jpg.139225


And the following photo was taken with the same two lights placed farther away from the tent so that they illuminated a larger portion of the tent walls (a large light source):

penintent2-jpg.139228


These two photos feature lights that are equally diffused, but of unequal size, producing quite different results.

So, I hope you can see that a diffused light source and a large light source are two very different things.

I hope that helps,
Eric

Alright, fair points. I guess it depends on just how large we are talking about. Diffusion does enlarge the overall light source (a close diffused source is larger than just the source itself at the same distance), but there are certainly different scales of "large." LARGE lights are certainly different than just diffused lights.
 

egnald

Member
Joined
Jun 9, 2017
Messages
3,105
Location
Columbus, Nebraska, USA
Light Tents are much easier to carry deep into the woods than Heavy Tents.
Sorry, I was just trying to Lighten the conversation - things were getting a little Tense.
Too much? Sorry, It's been a long day and I'm a little punchy. - Dave 🤪
 

magpens

Member
Joined
Feb 2, 2011
Messages
15,912
Location
Canada
@Sylvanite

Thanks for the example photos above. . They effectively illustrate the points you make.

But since I have never excelled at photography, I, too, do have some trouble grasping the difference between "large" and "diffuse".

I'll have to "study into" it !! . . . :rolleyes: . . . and try a few experiments !
 

Sylvanite

Member
Joined
Jul 18, 2006
Messages
3,113
Location
Hillsborough, North Carolina, USA.
I, too, do have some trouble grasping the difference between "large" and "diffuse".
The term "diffuse" can be confusing, because it has different meanings in different contexts - and the context is not necessarily clear to most people. Diffuse light, and diffuse reflection are two different things. Large light vs. small light can also be problematic, because the terms are relative and light size changes with scale and distance.

When photographers talk about diffusing light, they mean putting a modifier that spreads out the light in between the light source and the subject being photographed. That's all, A diffuser simply makes the light cover a broader region. For example, a light with a parabolic reflector will cast a cone of light not much bigger in diameter than the reflector, and that cone will have a pretty sharp border. If you put a disk of diffusing material over the reflector, then the cone of light cast will be wider and its border will be softer. I like to think of diffusers from the perspective of the light source - that is, the diffuser modifies how the light is cast.

When photographers talk about light size, however, they are commenting from the perspective of the object being photographed. It's not about the range of angles that the source light illuminates, but rather the range of angles from which the subject is illuminated. If that range is narrow, then the light is small. If it is wide, then the light is large. If you put a diffuser right over the reflector of a lamp, that does not increase the range of angles from which the subject is illuminated. In other words, it does not change the size of the light. If instead, you place a diffuser close to the subject (farther away from the light source), that does increase the range of angles from which the subject is illuminated. I.e. the light is larger.

Although traditional light tents are made of diffusing material, diffusion is not their actual purpose. The tent is not there to "spread the light out". It's purpose is to provide illumination from all around the subject - a.k.a. "large light".

I hope that helps,
Eric
 

jrista

Member
Joined
Aug 12, 2021
Messages
2,241
Location
Colorado
@Sylvanite Is there any chance you could show some photos of your setup? I've been experimenting with my light tents and lights, and so far I have been unable to replicate the total elimination of the reflections like in your third photo. I can dim it, bit it remains, and the reflections on the metallic parts of my pens are still quite strong.

I suspect it may be the material of my tents, which may not be diffusing as much as they could (the material is very loose, almost net-like, fabric, and it creates a diffraction effect for any light source, even very large lights that have their own diffusers.) I've tried moving the lights farther away, which in turn just seems to increase the falloff of light requiring longer exposures, which brightens the reflections more. Move the lights too far, and then suddenly you have a smaller light source again, rather than a nice large light source.
 

Sylvanite

Member
Joined
Jul 18, 2006
Messages
3,113
Location
Hillsborough, North Carolina, USA.
Is there any chance you could show some photos of your setup?
This is how the lights were arranged for the photo above where I said the lights were close to the tent:

lighttent1-jpg.139224


And this is the position of the lights for the shot where I said the lights were farther from the tent walls:

lighttent2-jpg.139227


And this picture shows that I taped some bits of mat-board to the tent walls to control the shape of the light:

lighttent3-jpg.139229


Which produced the following pen photo:

penintent3-jpg.139231


I hope that helps,
Eric
 

jrista

Member
Joined
Aug 12, 2021
Messages
2,241
Location
Colorado
Which produced the following pen photo:

penintent3-jpg.139231


I hope that helps,
Eric

Ok...that is more what I am getting myself. I was curious how you were able to completely eliminate the reflections in your third photo from the other post...I've been trying to do that with my own lights and tents, but so far, the best I've been able to achieve is like your photo here. There is some reflection, although I am able to reduce its intensity, but I cannot completely eliminate the reflection.
 

Sylvanite

Member
Joined
Jul 18, 2006
Messages
3,113
Location
Hillsborough, North Carolina, USA.
I was curious how you were able to completely eliminate the reflections in your third photo from the other post...I've been trying to do that with my own lights and tents...
If you don't want any specular highlight (a.k.a. "shine line") on your pen barrel, you have a couple of options:
  1. Provide even lighting from all around the pen. If there are no bright areas in your light source, then there will be no specular highlights. You can do that by lighting your tent walls evenly all around. That may mean adding lights, or pulling your lights farther away from the tent.
  2. Move your lights to positions that do not create a glare line in the first place. This can be done even without a light tent. See "Eliminating glare by moving lights - Polarization and Glare, post #45" for an example. Try moving your light forward or backward and watch the result through your camera viewfinder. See if you can find an angle that doesn't produce a specular highlight on the pen barrel.
That said, however, I generally DO want some amount of specular highlight in my pen photos. Completely even lighting tends to produce a photo that looks "flat". Specular highlights give round objects a sense of shape, and add depth to a photo. A nice (but not too harsh) "shine line" on a pen barrel also shows off a gloss finish. To my eye, a thin, harsh, blown-out line of glare on a pen is bad, but a wider, subtle, shine line that preserves the color and detail of the blank looks good. That's why I block part of the light on the tent wall. By controlling the size, shape, and relative intensity of the bright spot on the tent, I control the width, shape, and intensity of the shine line on the pen barrel.

I hope that helps,
Eric
 

RGVPens

Member
Joined
Oct 4, 2021
Messages
408
Location
Mission TX
Crap...another hobby to master.... 🤣

I got into the whole photography thing when I was stationed in Germany. From shooting the picture to dark room to taking parts of one photo and putting them in another. No Photoshop back then...no computers either. But that was over 45 years ago, and was mostly scenery and some people...well mostly good looking German girls...:p These days I'm relegated to my iPhone for pictures. Heck, I don't even do the Photoshop thing, although I should learn something to take signs and utility poles out of my pictures.

Glad you folks brought this up. I need to "relearn" some of it to help me in pen pictures as well as pictures of my scroll saw work for the website.
 

jrista

Member
Joined
Aug 12, 2021
Messages
2,241
Location
Colorado
If you don't want any specular highlight (a.k.a. "shine line") on your pen barrel, you have a couple of options:
  1. Provide even lighting from all around the pen. If there are no bright areas in your light source, then there will be no specular highlights. You can do that by lighting your tent walls evenly all around. That may mean adding lights, or pulling your lights farther away from the tent.
  2. Move your lights to positions that do not create a glare line in the first place. This can be done even without a light tent. See "Eliminating glare by moving lights - Polarization and Glare, post #45" for an example. Try moving your light forward or backward and watch the result through your camera viewfinder. See if you can find an angle that doesn't produce a specular highlight on the pen barrel.
That said, however, I generally DO want some amount of specular highlight in my pen photos. Completely even lighting tends to produce a photo that looks "flat". Specular highlights give round objects a sense of shape, and add depth to a photo. A nice (but not too harsh) "shine line" on a pen barrel also shows off a gloss finish. To my eye, a thin, harsh, blown-out line of glare on a pen is bad, but a wider, subtle, shine line that preserves the color and detail of the blank looks good. That's why I block part of the light on the tent wall. By controlling the size, shape, and relative intensity of the bright spot on the tent, I control the width, shape, and intensity of the shine line on the pen barrel.

I hope that helps,
Eric

Thanks, Eric. I was largely just trying to replicate the experiment and see how largeness played into things. I think some of it may have to do with tent material. The tents I have have relatively thin net-like fabric that I suspect are not diffusing as much as your tent is. When I look at my fairly large light sources through the side of my tents, it is not quite diffusing in the manner I would like...I'm getting more of a rough + shape, which I think is due to diffraction of the light as it passes through the netting. I can actually put one tent inside of another, and I'm going to experiment with that.

The main thing I'm trying to achieve actually is the reduction of highlights on the metal parts. The way the metal parts of your pen looks in the third photo of your first reply is really nice. I agree with you, a highlight on the turned parts of the pen are good to show off the finish, assuming they are softer, wider, and less intense. I seem to still get pretty bright, harsh highlights on my metal parts, though...even with the actual light sources quite far away (such that inverse square falloff really kicks in and I have to jack up my exposures or my ISO), so I still need to do some experimenting to figure that out I think.
 

jrista

Member
Joined
Aug 12, 2021
Messages
2,241
Location
Colorado
Ok. Played around a bit more. This is definitely an art all on its own. I was able to mitigate the reflections on the blanks, but still wasn't really able to minimize them on the metal parts. If I increased the reflection on the blanks, so that you could tell they were actually shiny (most of these were in fact glass-like shiny, very nice, especially the katalox ones, but you just cannot tell with these photos), then the metal parts had blown out highlights.

Sierra-style Plating and Wood Examples-1.jpg


Sierra-style Plating and Wood Examples-2.jpg


Sierra-style Plating and Wood Examples-3.jpg


Sierra-style Plating and Wood Examples-4.jpg


Sierra-style Plating and Wood Examples-5.jpg


This last one is blue mahoe, which just didn't sand down or finish as shiny as the others. I think if I spent a bit more time on each grit, and maybe sanded with the lathe going both directions as well as along the blank, I might be able to smooth it out more. This is a very interesting wood, ranging in color from yellow through yellow green, green, green-blue, to blueish-gray and even a darker purplish-blue. I really like it with these chrome kits, but it so far just hasn't taken a shine like the rest.

Anyway...I think these are better than my past photos, but I'm still not quite getting the proper balance of visible but not dominating highlights on the blanks, and mitigated highlights on the metal kit parts. I may need to get some different lights I guess, as the ones I have are pretty large and diffused themselves...maybe smaller point source lights are better when working with a tent?
 

magpens

Member
Joined
Feb 2, 2011
Messages
15,912
Location
Canada
I really like these latest pictures of yours, Jon !!!

If I could achieve what you have achieved, I would be very happy.
 

Curly

Member
Joined
Nov 20, 2010
Messages
4,841
Location
Saskatoon SK., Canada.
I'll preface with I have no expertise in photography but had a thought. Studio photographers often use flash units that face away from the subject into umbrellas that bounce the light back towards the subject. Would turning the lights away from the tent towards wrinkled kitchen foil on a large stiff sheet of cardboard or umbrella modify the light in a more favourable way?
 

jrista

Member
Joined
Aug 12, 2021
Messages
2,241
Location
Colorado
I'll preface with I have no expertise in photography but had a thought. Studio photographers often use flash units that face away from the subject into umbrellas that bounce the light back towards the subject. Would turning the lights away from the tent towards wrinkled kitchen foil on a large stiff sheet of cardboard or umbrella modify the light in a more favourable way?
The lights I have, have umbrellas around them with foiled interiors. But they also have these diffuser covers for the front. I'm wondering if I take off the diffusers on the lights themselves, and leave it to just the tent to diffuse, if that would help... I'm going to give it a whirl with the next few pens here, and I'll share the results.
 

jrista

Member
Joined
Aug 12, 2021
Messages
2,241
Location
Colorado
I really like these latest pictures of yours, Jon !!!

If I could achieve what you have achieved, I would be very happy.
☝️ What Mal said X2 !!!

Thanks, guys! :) I guess I'm lucky in a sense, as I've been doing photography of one kind or another since around 2008, so most of the core concepts I understand very well. Lighting itself, controlling it and getting it to do what you want...that's a new art to me! :p

I did play around a bit more, and now I fully understand why @Sylvanite will purposely try to add some shadow to the light. With just the diffused light, you get a soft bar on anything that is not explicitly the very high specular shine like the metallic parts of a kit. You need some "structure" in the light source to show off the specular highlights in something like the wood or resin, and demonstrate that it is, indeed, "shiny".

I also see why he shades his light source with those matboard. It puts a harsher edge to the light source that is passing through the diffuser, so instead of a soft bar of light being reflected on the blank from all around (that's what the tent does, expands the area around the subject that light comes from...i.e. as @Sylvanite called it, makes the light "LARGE"), the pen is reflecting a narrow bar of light...still diffused by the tent, but not light coming from everywhere, just light coming from a specific direction (and, thus, a more notable but still softer and manageable reflection.)
 
Signed-In Members Don't See This Ad

Sylvanite

Member
Joined
Jul 18, 2006
Messages
3,113
Location
Hillsborough, North Carolina, USA.
Pretend for a moment, that there is no such thing as "diffuse light", and that there is only "light". Forget everything you know about the term "diffuse" with respect to light modifiers. I want to use the word "diffuse" in a completely different sense - that is, in the context of reflection.

There is but one law of reflection in physics:
angle of incidence = angle of reflection
but photographers often differentiate between:
  • direct reflection, and
  • diffuse reflection.
Direct reflection occurs when a surface is smooth enough to reflect incident light all in the same direction (per the formula above). Diffuse reflection occurs when the surface is irregular, and incident light is reflected off in a wide variety of angles. Imagine you're in a black room containing a single light bulb and you're holding a small mirror. As you rotate the mirror around, it will appear black unless you happen to catch the right angle that reflects the bulb. That is an example of direct reflection. Try the same experiment with a piece of white paper, however, and you'll get the opposite result. It will look evenly white no matter what angle you hold it. That's diffuse reflection. Some surfaces produce nearly all direct or diffuse reflection, but most exhibit a combination of the two.

If you look at this thread's first post and compare the two photos shown there, you'll see that the portions of the pen that are made out of wood and turquoise truestone appear the same in both. The portions that are made out of metal (the aluminum segments and the kit components), on the other hand, look very different. That is because the wood and truestone produce primarily diffuse reflection but the polished metal produces primarily direct reflection. It doesn't show in these two samples, but a glossy finish produces a primarily direct reflection as well.

To take a good photo of a pen, you have to understand how the different materials reflect light differently and how to manage the lighting in order to effectively illuminate them all. Diffuse reflections are pretty much insensitive to the direction or size of the light source, even if the surface is curved. As long as they are not in shadow, they will reflect the source light towards the camera lens. Direct reflections, on the other hand, are critically dependent on the direction of the light source:

curvedreflection2-gif.138632


Note that the light that reaches a camera (the target of the arrows) after direct reflecting off a curved surface must come from a wide range of angles in order to be seen. To illuminate the surface evenly, the light source must be "large".

A light tent is pretty much useless for surfaces that exhibit diffuse reflection, but very, very effective for lighting curved surfaces that exhibit direct reflection. Controlling the size of the light is key to illuminating the metallic pen parts, creating a "shine line" to show off a glossy finish, and providing shadows/specular highlights that give the pen dimensionality.

If one were able to provide perfectly even lighting from all source angles, then there would be no dark spots, no specular highlights, and no shadows. This is known as "flat lighting", because it produces images that look, well - flat. In practice, we want lighting that has some variation because we want enough variation in the direct reflection to yield specular highlights, but not enough to produce glare.

THAT is why I tape pieces of mat-board to my light tent walls. They create a bright spot on the tent wall that doesn't affect the diffuse reflections, but shows up in the direct reflections. I place them carefully to achieve two things:
  1. To create a wide, subtle shine line on the pen barrel that shows off the gloss finish, and
  2. To block excess light that reflects off the metallic components and presents as glare.
The size, shape, position, and relative brightness of that spot are key to getting a nice shine line without glare. If you place your lights outside your tent such that you get a highlight on your pen barrel, you can then experiment by shading part of the tent with your hand as you look at the image through your camera. You'll find the angles that create glare on the pen nosecone, finial, nib, etc. and then you can block them without affecting the direct reflection off the barrel.

If you see any dark spots in your direct reflections (such as those coming from the front of the tent), you can place reflectors at those angles. This can be as simple as draping a piece of paper (with a hole cut in it for the camera lens to see through) over the open front of your tent.

I hope that explanation makes sense, and you see that it has absolutely nothing to do with "diffuse light".

Eric
 
Top Bottom