Photography Basics - Depth of Field

Signed-In Members Don't See This Ad

Sylvanite

Member
Joined
Jul 18, 2006
Messages
3,113
Location
Hillsborough, North Carolina, USA.
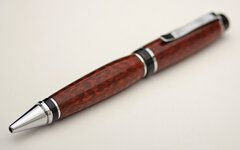
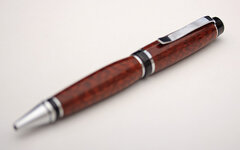
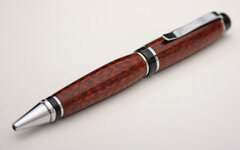
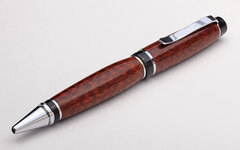
Have you ever taken a picture of your latest pen, only to find that you can't get the whole thing in focus? You focus on the nib, centerband, or clip, but can't get all three sharp at the same time? If so, you've fallen victim to shallow "depth-of-field".

What is "depth-of-field" (DOF)?
Simply put, it is the distance between the closest point and the farthest point in a photo that are both in focus. The greater that distance is, the deeper the depth-of-field.

There is no single correct depth-of-field, but the traditional approach is to keep the photograph's subject in focus - and nothing else. That helps draws the viewer's attention where you want it. In landscape photography, one often wants very deep DOF, so the entire scene is in focus. In portrait photography, one often wants shallow DOF, so that only the subject's eyes are in perfect focus. For pen photographs, one typically wants the depth-of-field to encompass the entire pen - but not much more.

I've often seen people recommend you place the pen parallel to the camera body. That's an attempt to get the whole pen in focus within a shallow depth of field. Unfortunately, that means compromising your photo composition to match your camera settings. A better solution is to compose your photo for visual impact and set your camera controls for the desired depth of field.

Depth-of-Field is a function of three things:
  1. Distance. The farther away from the camera, the greater the DOF. You can't get very far away from a pen though, so increasing distance isn't very useful in pen photography.
  2. Focal length. The shorter the lens' focal length, the greater the DOF. Shorter focal lengths, however, also yield wider field-of-view. That means you have to get closer to frame your shot, which negates much of the depth-of-field advantage (as well as changing the photo perspective). Therefore, focal length isn't the right tool for controlling DOF in pen photography either.
  3. Aperture. The smaller the aperture (higher f/stop value), the greater the DOF. This is the correct way to control depth-of-field.
About "sharpness"
In photographic terms, "sharpness" really means lens resolution. That is, does the lens produce a blurry image, or one with crisp details?. Some lenses are definitely better than others, but none are perfect. They all produce sharper results in the middle of the frame, and less sharp in the corners. They are sharper at moderate apertures (typically around f/8) than at minimum or maximum f-stop. Zoom lenses are generally sharpest at their midrange, and fall off at the extremes.

Don't let sharpness claims concern you too much though. The effects are minimal - especially if you are taking pictures to post in the internet. Almost all modern camera lenses have much greater resolution (sharpness) than needed for that.

In conclusion:
Compose your photo; place the camera at the location that yields the desired perspective; select a lens focal length to frame the shot; and set the aperture to give a DOF that encompasses the entire pen. Then choose an ISO setting and shutter speed for correct exposure.

Remember that depth-of-field increases with distance. That means depth-of-field will extend roughly twice as far beyond the point of focus than in front. Therefore, you should focus about 1/3 of the way back. Many cameras have a "DOF Preview" function that will allow you to check depth-of-field before taking the picture, or you can just shoot, view the result, and change the f/stop if necessary.

I hope that helps,
Eric
 
Signed-In Members Don't See This Ad

Sylvanite

Member
Joined
Jul 18, 2006
Messages
3,113
Location
Hillsborough, North Carolina, USA.
Let me expand on a couple of things

Camera features related to depth-of-field
  • Depth-of-field preview. Cameras generally focus (or let you focus) with the lens aperture wide-open. That is when DOF is shortest and the image is at its brightest, making it easier to see where the focal point really lies. That does not, however, show you how your photo will actually turn out. To see that, some cameras have a "DOF preview" function. You push a button and the lens aperture "stops down" to the shot setting. Then you can view the final depth-of-field. When switching to a smaller aperture, the image will be darker (although some camera displays correct for that) as well.
  • Depth-of-field scale. Many lenses (especially interchangeable ones) have a DOF scale printed right on the top. As you turn the focus ring, the focus distance indicator changes. Right above that are markings that show what the depth-of-field will be for various f/stops.
Camera settings to control aperture
  • Manual exposure. This mode allows you to set the specific aperture and shutter speed you want. I generally shoot pen photos in manual mode.
  • Aperture priority. In aperture priority mode, you choose the aperture and the camera's light meter picks the shutter speed. If light conditions are changing, or if you simply aren't comfortable using full manual mode, you might want to select aperture priority exposure.
  • Depth-of-field mode. Some cameras have a feature where you center the viewfinder on the nearest object you want it focus, press a button, point at the furthest object, press a button, then recompose and take the picture. The camera selects an aperture that yields the desired depth-of-field and a shutter speed for correct exposure.
  • Landscape mode. If your camera doesn't have any of the above modes, you can probably still pick "landscape" (look for a mountain icon). Landscape mode will favor small apertures - thereby maximizing the depth-of-field.
How to focus

In my initial post, I said that you need to focus about 1/3 of the way back from the nearest point of the pen. Well, your camera may or may not make that easy for you. Here are some options:
  • Using the shutter release button. Most digital cameras will focus and calculate exposure when you press the shutter release button halfway down. So, you can center the viewfinder (or display) on a spot 1/3 of the way back, press (and hold) the button halfway down, recompose the photo, and then press the rest of the way. The camera will take the picture with the focus in the right spot.
  • Manual focus. Many cameras have a switch to turn off auto-focus. You can switch it off and focus the lens yourself.
  • Selectable focus point. High-end cameras have multiple focus sensors and some allow you to pick a particular one to use. Select one that lies about 1/3 of the way down the pen and have the camera focus there.
  • Manual override. This is also known as "full time manual focus". Some camera lenses allow you to manually change the focus even if autofocus is switched on. If your lens supports it, you can press the shutter release halfway, let the camera autofocus, and then change the focus before taking the shot.
Regarding sharpness

My goal in describing sharpness above, was to tell you not to worry about it. Lens technology has come a long way since Willard Van Dyke and Ansel Adams founded "Group f/64". They chose that name because their photographic style favored extremely deep depth-of-field, which they achieved by choosing the smallest aperture on their cameras (f/64). They didn't let sharpness dropoff bother them, and neither should you.

So, to reiterate
  1. First, compose your photo. Arrange your pen, props, and lights how you like them.
  2. Position your camera. Move to a distance that gives you the perspective you want.
  3. Frame the image. Choose a lens (or zoom in) so that the pen fills the camera viewfinder (or display).
  4. Set the aperture. Select an f/stop that gives you a depth-of-field that encompasses the entire pen.
  5. Set the exposure. Select a shutter speed and ISO setting (or exposure mode) for correct exposure.
  6. Focus. 1/3 of the way between the closest and farthest points of the pen.
  7. Then take the photo. That will give you a picture with a pen that is in focus from end to end.
I hope that helps,
Eric
 

Brian G

Member
Joined
Jul 2, 2013
Messages
1,571
Location
Bloomington, MN
I sure hope that lack of responses doesn't cause you to stop posting these. I'm a photography dolt, and having things boiled down to the essentials is helpful to me. I like to think I have self-directed intelligence, but with some topics I don't have the patience to study them carefully.

Thank you for doing these. :)
 

walshjp17

Member
Joined
Jul 29, 2012
Messages
3,418
Location
Weddington, NC
Eric,

Thanks for these short tutorials; they are so helpful. I am compiling them in a Evernote folder for continual reference.
 

skiprat

Passed Away Mar 22, 2022
In Memoriam
Joined
Oct 19, 2006
Messages
7,812
Location
In a Skip in Wales
Eric, I like many others really appreciate these photo posts. As winter sets in, it's an ideal time for many of us picture taking Philistines to brush up.

Now here is a daft question that I hope I'm not the only one that needs answering.

All of the sections of your tutorial are like the parts of a jigsaw puzzle, once they are all together, they create a great picture.
But as we learn, we are unlikely to get all of them correct at the same time.
For us to see progress with our pics, where is the best part of the circle to start playing?

Is there one element that is essential before the next step would make any improvement?

I imagine that sufficient lighting is the starting point? :confused:

Thanks again for all your efforts. :biggrin:
 

Sylvanite

Member
Joined
Jul 18, 2006
Messages
3,113
Location
Hillsborough, North Carolina, USA.

Well, yes - my goal is to make a library article (or series) from these mini-tutorials. I have about 6 or 8 topics in mind, including:
  • Exposure
  • Field of View
  • Depth of Field
  • White Balance
  • Perspective
  • Composition
And maybe more, depending on what else comes up. I'd like to present them as forum topics first, so I can get some feedback and address problems before committing the information to library format.

So, if there's something you (and by "you" I mean anybody) think I missed, glossed-over, need to explain better - or just flat out got wrong, please let me know. For example, I hadn't thought to have a separate topic on "ISO setting", but if you'd like it, I can do one.

I also think some of the explanations could use demonstrative pictures, so I'll try to come up with a few and post them.

Keep the questions and suggestions coming!

Regards,
Eric
 

Sylvanite

Member
Joined
Jul 18, 2006
Messages
3,113
Location
Hillsborough, North Carolina, USA.
For us to see progress with our pics, where is the best part of the circle to start playing?

Is there one element that is essential before the next step would make any improvement?

I imagine that sufficient lighting is the starting point?
Here's kind of where I'm coming from: Imagine that you've been taking photos of your pens with a point-and-shoot (or phone) camera and are disappointed with the results. So, following the advice flying around (without necessarily understanding it), you've decided to step up to (or have already acquired) a more sophisticated camera. You're looking at something with a bunch of baffling knobs, buttons, and menus, and you ask "now what"?

I'm trying to address that question with more than just a recipe. I'd like to explain the concepts underlying the controls, so you'll understand not only what to do, but why you need to do it (as well as what you don't have to worry about).

Unfortunately, I'm not covering the most useful information first. My order of presentation is more from concept to practice. I need to explain the fundamentals of photography before launching into their application. As a case in point, "Depth of Field" is my third topic, but the first one that I think will practically help anybody. Even then, I've had to borrow a little from future topics (such as perspective).

On the plus side, DOF is a tutorial I think will be useful, along with "white balance", which I plan to do next. I'm not sure there is a final picture at the end of this puzzle, but I hope that the pieces may prove instructive (or at least interesting) along the way. There's no set order to improving one's skills. After all, photography as an art form is about you constructing your own images. Go ahead and start experimenting even before I finish.

Regards,
Eric
 

Sylvanite

Member
Joined
Jul 18, 2006
Messages
3,113
Location
Hillsborough, North Carolina, USA.
Here are some pictures that I hope are illustrative The first three photos have a short depth-of-field. This one was focused on the pen's nosecone:

attachment.php


Here's another focused on the finial:

attachment.php


And this picture is focused near the centerband:

attachment.php


All three were shot with a wide aperture (in this case, f/2.8). As you can see, no matter where I focused, most of the pen is blurry. Changing to a smaller aperture (f/16) with the same focal point as the photo above, however, yielded this:

attachment.php


The entire pen is in focus. In other words, the depth-of-field fully encompasses the pen.

I hope that helps,
Eric
 

Attachments

  • DOF1.jpg
    DOF1.jpg
    57.3 KB · Views: 471
  • DOF2.jpg
    DOF2.jpg
    49.3 KB · Views: 481
  • DOF3.jpg
    DOF3.jpg
    56.8 KB · Views: 478
  • DOF4.jpg
    DOF4.jpg
    73.7 KB · Views: 469

eliasbboy

Member
Joined
Sep 2, 2012
Messages
357
Location
Manhattan, IL
I can't thank you enough for this. I'm constantly amazed at how much time and effort is taken at this site to help others.

This was the first time technical aspects of photography were explained in a manner that didn't make me think "Ah, screw it. I'll put it on 'Auto'."

Very much appreciated.
 

ladycop322

Member
Joined
Dec 21, 2013
Messages
961
Location
South Florida
Thank you for posting....I am a professional photographer (when I'm not upholding the law or making pens) and I feel this post will definitely help those who wish to get better results with their pens!

Thank you again for the beautiful blank at the MAPG...it was a pleasure meeting you :)

Michelle
 
Top Bottom