Photo help

Signed-In Members Don't See This Ad

rjwolfe3

Member
Joined
Feb 12, 2008
Messages
8,352
Location
Mansfield, Ohio, USA.
I have been trying to figure out my new (to me) DSLR. It is a Nikon D100. I am including a photo that I have not touched up other than to resize to 800x600. I have tried to keep the camera on all auto settings. Can anyone give me some pointers? I know I can fix the photo with software but I really want to take better photos without needing to do much with software. I have not cropped the photo yet. And that is supposed to be a white background. It was taken in a photo tent with 2 lights on the side and one over it. Let me know if you need any other info about the camera or the photo. TIA:biggrin:
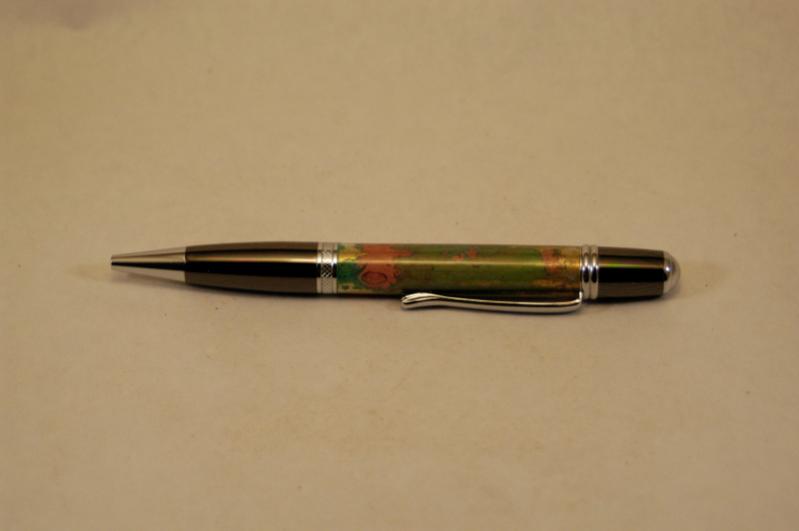
attachment.php


More info:
Couple of things I forgot in the original post. I am using a tripod. I am using the lights that came with the tent as well as one of the silver clamp lights (that one is on top).

My main thing is the focus but I guess I can try the manual focus.

I have the white balance set on auto so I will try manual on that as well.

My main problem is that this is a 6 megapixel. I was hoping it would take a better photo then my 3.1 megapixel Kodak point and shoot with the same tent and light setup.

Even more info:

F-stop: f/6.3
Exposure time: 1/160 sec.
Exposure bias: 0 step
Focal length: 80 mm
Max aperture: 5
Metering mode: Pattern
Flash mode: No flash
35mm focal length: 120
White balance: Auto
 

Attachments

  • 018rs.jpg
    018rs.jpg
    18.4 KB · Views: 463
Last edited:
Signed-In Members Don't See This Ad
Man, I so understand the issue. I struggled for over a year and a half trying to get pics that I felt were good enough to share with the good folks here. When I finally got fed up enough I got out the owners manual for the camera and a cup of coffee and turned off the TV and put the camera on my lap and read and practiced. I learned a lot and made notes so that I could replicate what I had figured out and put the notes in the owners manual for reference. I ordered the photo box (the white fabric type) from eBay for around $30 and found a small tabletop tripod at the Goodwill store for $2. I read the tutorial on how to photograph pens here on the IAP site and went to Lowes and got the recommended light bulbs. I had some cheap aluminum work lights and switched out the bulbs. Using some scrap wood I devised a couple of stands to hold the clamp on work lights and set it all up in the shop. It took "forever" but I finally got some really decent pics with the Cannon 520 point and shoot I bought new for $140 several years ago. Then I went through weeks figuring out how to get the pics on here. Whew, all that was worth it cause now I"M A XPERT! The other xperts will chime in soon and you will get better advise from them I'm sure. Good luck
 
You'll probably need to try in on manual instead of auto. If you don't want to touch up with software, the first thing I would suggest is letting more light in through your lens. This can be done by either opening the aperture up more (selecting a SMALLER aperture number) or keeping the shutter open longer. If you have a tripod, I would use that and change the shutter speed instead of using a larger aperture. A large aperture will give you a shorter "depth of field" and not as much detail... a smaller aperture will allow for a sharper picture. Also keep the ISO as LOW as possible for less grain and a sharper image. Does that help any?
 
Last edited:
Oh, if you're into reading, look for a book called "Understanding Exposure". It's a very good photography book that simplifies things and explains every detail of shutter speed, aperture, ISO, etc.
 
Are you using the lights that came with the tent? If so, and they are like the tents I've seen. you'll do better with 3 flashlights and a handfull of AA batteries (i.e. the lights they sell with the tent don't put out much light. I'm almost certain that some of them actually make the room darker...)

You can gain a HUGE amount of light and flexibility by scrounging up some cheap brighter lights. The D-100 is a great camera, and it will adjust well to nearly any light source, just be sure to use all the SAME types of lights (i.e don't mix florescent tubes with compact florescent and standard light bulbs and halogen spotlights and a couple candles left over from Christmas and that guy down the street with all the bright ideas...) You can go a long way with a couple of those "Clamp" type lights that come with the silver dishes at Harbor Freight, Home Depo, Lowes, the Dollar Store, etc. 3 of those with 100W bulbs in them will help greatly. You could also take your tent outside on a bright day, or grab a couple of old junk Aquarium Florescent fixtures. Just about anything that plugs into the wall and DID NOT COME WITH A PHOTO TENT will increase the amount of light you can play with. Those cheap 500W halogen work lamps would work great also. You won't want to take photos inside with them in the summer time, but in the winter they'll keep your shop a few degrees colder, and they are SUPER bright. Again, the main thing is whatever you use, use all the same.

After that, the other suggestions, Manual exposure, brighten things up. Read the manual to learn how to use the meter and how to make adjustments to it (there is a setting where you can tell the camera to under/overexpose everything. use this setting with the automatic mode to get the best of both worlds, mine is typically set to overexpose by a full stop or so.

Play with moving the lights around also, You'll find that by backing them away from the tent, or bringing them right up to it, will change the reflections/highlights and shadow transfer area.
 
Have you tried different white balance settings and changing you EV settings. MY first bet would to check and see what your White balance is set at.
 
I have been learning and practicing for quite some time on how to takes pics of pens.

I sat in a photo demo at the AAW symposium and got an idea to try - take longer exposures. The longer shutter time allows more light. My most recent photos were taken around 1/6 sec. at F22. They are actually a little too bright and over exposed c. I need to tweak it some. The standard windows photo program's "auto correct" function did a okay job darkening things up for me.

I agree with those above that say the lower the F number the more light you let in. However, if you go too low, your depth of field become razor thin, and unless you have the camera back pretty far, parts of the pen can be out of focus. This is especially true if you take any kind of angled shots.

One more thing. No matter what lights you use, I find that using the custom white balance helps. Just make sure that you are only using a consistent light temperature - not a mix.
 
Rob, there's a great tutorial on photography by Gerry Rhodes and its on the home page right side.. Looks like your white balance needs to be set. I know it sounds strange but buy yourself a Grey card to set the white balance, second as was said throw away the bulbs that came with the tent. Go to Lowe's and buy "Brite" 26watt florescence bulbs, and those smaller aluminum reflectors. Next just play with the camera, being digital no film lost and you'll gain lots of experience on "your" camera.
 
Wow lots of great advice here. Thanks for the quick responses.

Couple of things I forgot in the original post. I am using a tripod. I am using the lights that came with the tent as well as one of the silver clamp lights (that one is on top).

My main thing is the focus but I guess I can try the manual focus.

I have the white balance set on auto so I will try manual on that as well.

My main problem is that this is a 6 megapixel. I was hoping it would take a better photo then my 3.1 megapixel Kodak point and shoot with the same tent and light setup.
 
Okay more info:

F-stop: f/6.3
Exposure time: 1/160 sec.
Exposure bias: 0 step
Focal length: 80 mm
Max aperture: 5
Metering mode: Pattern
Flash mode: No flash
35mm focal length: 120
White balance: Auto
 
IF you are using different types of light sources, ie the ones that came with the set up, a different type in the clamp and different ambient light your camera will give you bad results. I and my wife both use Nikons. I use Piccasa 3 which is a free software program and she uses the Latest Nikon software. Mine will do most of what she paid 175.00 for. There are differences however. Get 1 type of light source and set your white balance, even with the camera set on auto it will make a difference. 6megapixles is more than enough my wife prints her pictures at 13x19 however you want to shoot all your pictures in RAW (NEF) and then edit them and then save them in JPEG.
 
Rob,

I have owned the D100, D200 and currently the D300s. The greatest and the worse thing about all of these cameras (and the similar Canons) is that there are so many options.

First of all, since I assume this is a used camera, be sure all of the default settings have been reset to factory setting. You don't have any idea what the previous owner has tweaked regarding tone controls, white balance, color space, etc. Sorry, I can't tell you exactly how to do this, I sold my D100 several years ago. Once this is done, the biggest problem I see is your white balance (color temperature). Try changing the setting to daylight, or cloudy. Even try tungsten. As someone else mentioned, set the ISO at the lowest setting (100, I believe for the D100). You might also increase the sharpening setting. The D100 is inherently soft with its processing).

These are just some suggested settings to try. BUT, you must read the manual and acquire a good reference book for the D100. You might try Ebay, since it has been a while since the D100 production.

You have a fine camera, it will just take some time to learn to use all it's features to get the best photos. Once you get the procedure down, you will not want to ever go back to a point and shoot, except for a carry camera.

Practice, Practice, Practice....

Good luck.
 
To reset the camera, try going to Menu -> Custom Setting Menu -> Reset Custom Settings.

At least this is where it is on my D300s :)
 
Rob,
If the camera has a custom white balance setting try using that... with my camera I put it in manual mode and then point the camera at a white piece of paper till it fills the viewfinder, then pressing a button "saves" that white balance setting (which should be reset for each change in lighting conditions. I'm not familiar enough with your camera to know how to tell you to do it. :frown:
Software wise, if you had Photoshop it's a matter of adjusting levels.
If you don't I reccomend you get Picasa. It's free and has an easy way to adjust that pic to make the background White (and the rest of the colors correct in the proccess) Simply open up the photo in Picasa's editor, chose the tuning tab, select the neutral color picker (eyedropper) and click on a part of the picture that should be white.
Hope that helps. Feel free to pm me if you have any questions or need help with Picasa (or Photoshop)

found this ... maybe it will help ...
http://www.earthboundlight.com/phototips/preset-white-balance.html
 
Last edited:
I'm more than a bit confused.
The "ISO" setting controls sensitivity to light. The higher the number, the more sensitive - meaning you can get equivalent images with the same exposure in less light. It is a holdover from film cameras. Different films are more or less sensitive and had different ISO ratings. As a general rule, the "faster" (higher ISO) films produce grainier photos. Digital cameras typically have adjustable ISO settings to mimic using different types of photographic film.

The D100 has an adjustable ISO range of 200 to 1600. Each time you double the ISO value, you make the camera twice as sensitive to light (and can therefore halve the exposure time, or increase the aperture by one full stop). I.e., ISO 400 is twice as sensitive as 200. ISO 800 is twice as sensitive as 400, and so on.

The cost of increased sensitivity is increased noise. The camera's sensor doesn't really become more sensitive, the software just tries to make do with less light. With fewer photons to sample, smooth areas come out more pixelated.

According to test results I've seen, the Nikon D100 is noisier than many other cameras, but is still pretty good at ISO 200. It's ok at ISO 400. The digital noise becomes apparent at 800 and is quite noticable at 1600.

Since you have a tripod, I'd suggest shooting at ISO 200, choose a higher f-stop, and use a slower shutter speed. The lower ISO will reduce noise. The higher f-stop (smaller aperture) will yield greater depth of field. Adjust the shutter speed to achieve the desired exposure. To avoid camera shake, use the timer to take the picture - not the shutter release button.

Manual focus would probably help also (the camera will often pick the wrong focal point). Better (and brighter) lights and the correct white balance will make a difference. Also, the D100 is known for soft images, so you'll probably wind up sharpening your photos in post-processing anyway.

I hope that helps,
Eric
 
Last edited:
I'm more than a bit confused.:hypnotized:

I'm guessing the first was just a typo... ISO is just the same as film... Smaller number = "slower", but less grainy. On something like this, locking the camera at low iso (100) is best. (oops .. or 200 in this cameras case since it doesn't have a 100)
 
Last edited:
I'm more than a bit confused.:hypnotized:

He's right, it should be lower. Most SLRs will have ISO settings from 200 to 1600, some with a broader range. An ISO of 200 will give you a better quality image. I call that a high ISO, even though it's not, it's the lower ISO. Sort of like a smaller aperture number (f-stop) means the aperture is opened LARGER... don't worry, it's ALL confusing!
 
Another few points on Aperture (or f-stop):

Smaller number = larger opening = more light hitting sensor = less depth of field (range of distance in front and behind the point of focus that still looks in focus)

By contrast:

Larger Number = smaller opening, less light hitting sensor = greater depth of field

All this holds true, until you get into the limits of both the lens design and the behavior of light. What this means is that with most lenses, at their maximum aperture (smallest number, largest opening) NOTHING is sharp. This is caused by variations or imperfections in the lens elements and he light traveling through those elements getting a bit scattered, and nothing in the shot, no matter how critical you focus, will be sharp. For any given lens, there is a minimum aperture that will overcome the majority of these imperfections, and as a general rule that is about 2 stops below the maximum aperture

On the other end, the smallest aperture (largest number, smallest opening) should have the greatest depth of field (and technically it does), and more focused light to overcome the softness caused by the lens imperfections, however, the very small apertures cause light diffraction, and while your depth of field will increase, your overall sharpness will decrease (if you really play with this, you will see the difference between out of FOCUS areas and out of SHARPNESS areas...) and again you are back to an image that has nothing sharp in it.

Short story long: don't just dial up the largest number aperture and assume everything is going to be perfect. Each lens has an ideal aperture where the sharpness and depth of field are in balance, and ideally you should be around that point (and it is usually in the middle of the range).

This concludes today's unwanted optics discussion, I'll hijack another thread sometime soon to go off on some more long winded explanations of questions that nobody asked...
 
Also, what lens are you using? And the megapixels doesn't really matter. That might have a bearing on whether or not you can make large prints of your image, but won't determine the image quality.
 
Also, what lens are you using? And the megapixels doesn't really matter. That might have a bearing on whether or not you can make large prints of your image, but won't determine the image quality.

Tamaron I think that is how you spell it. I will have to get the exact model number when I get downstairs. In between mowing breaks right now. Man it is too hot to be doing this right now, lol.
 
I have been trying to figure out my new (to me) DSLR. It is a Nikon D100. I am including a photo that I have not touched up other than to resize to 800x600. I have tried to keep the camera on all auto settings. Can anyone give me some pointers? I know I can fix the photo with software but I really want to take better photos without needing to do much with software. I have not cropped the photo yet. And that is supposed to be a white background. It was taken in a photo tent with 2 lights on the side and one over it. Let me know if you need any other info about the camera or the photo. TIA:biggrin:


Couple of things I forgot in the original post. I am using a tripod. I am using the lights that came with the tent as well as one of the silver clamp lights (that one is on top).

My main thing is the focus but I guess I can try the manual focus.

I have the white balance set on auto so I will try manual on that as well.

My main problem is that this is a 6 megapixel. I was hoping it would take a better photo then my 3.1 megapixel Kodak point and shoot with the same tent and light setup.

Even more info:

F-stop: f/6.3
Exposure time: 1/160 sec.
Exposure bias: 0 step
Focal length: 80 mm
Max aperture: 5
Metering mode: Pattern
Flash mode: No flash
35mm focal length: 120
White balance: Auto


I have never met a Digital camera that will do very well in auto mode for Micro Photography. The auto setting are pre set for average photos, which means family pictures.

Set white balance to incandescent. Back the camera up some it will help clear up the focus. it means you have to crop smaller but your mega pixels will allow that.

biggest tip is to work on just one thing at a time. so say play with just the focus until you get it down. then move to the white balance. After that you can play with lighting or whatever. Keeping it to just one thing at a time you don't get confused and you also get a much better feel how each thing effects the final photo. The main thing I am seeing in your photo is white balance and focus though.

Low ISO for macro, you are shooting for details like the fuzz on a peach type detail. higher ISO gives you faster shutter speeds at the expense of detail and in some cases color rendition.

Post your progress. it is helpful for all of us to see the differences as well.

Oh yeah, set the metering to center. and then put the pen at the center of the frame. set camera back and zoom in. Focus will be troublesome this way so you can only zoom so far. If you have manual focus, use it.
 
Last edited:
OK, Photography 101.

1. Digital cameras do not produce "grainess" it's called "noise" and it really is two different things.

2. Increasing the ISO on a digital camera does not increase the sensitivity of the sensor. It amplifies the signal (turns up the volume) coming from the sensor. When you increase the ISO on a digital camera you are amplifying the signal. Just like turning up the volume (increasing the signal) on radio causes louder static, hissing, and crackling (background noise). The same thing happens when up turn up the volume (increase ISO) on a digital camera.

3. Lower ISOs tend to produce the best picture (all other things being equal) because the signal to noise ration is high so very little noise in the dark areas.

4. Small apertures produce the sharpest image up to about f/11 - f/16 and then it sharpness tends to fall off as you go higher. Shooting pen pictures you don't really need to worry about that. Just shoot between +1 EV (exposure value) above wide open and f/11 - 16. Shoot with your pen horizontal and it'll really help with the depth of field (DOF) problem. If you shoot with the pen more in a vertical direction then you really will need to get the aperture number higher so you have more DOF. Look closely at your lens and see what the minimum focus distance for it is. It's usually printed somewhere on the side of it. Get inside that distance and your picture WILL be out of focus.

5. Shoot in Av mode and let the camera set the shutter speed to get the correct exposure and then use a tripod if the speed is slow. This is where we can take advantge of the fact that our subject does not move.
Still, use a tripod anyway.

6. Use auto white balance as long as it works. If, as in the picture above you know the background is supposed to be white and it isn't then you'll need to either change to a white balance that will give you the correct color or shoot raw and correct with software. I can explain that more to anyone that wishes to know. There typically isn't a solid correct answer for which white balance to use, only guidlines. The reason is because the color temperature for light sources often change as the light source gets older. Florescent bulbs are particularly bad about this. This problem is compounded if you have a mixed assortment of lights.

Hope this helps a little. Feel free to ask more questions.
 
Last edited:
And if your lights are flourescent, let them "warm up" for 5 or 10 minutes before shooting... Tamron makes good lenses, I'm assuming that it's not a primary lens? A primary lens is fixed and does not zoom...
 
And if your lights are flourescent, let them "warm up" for 5 or 10 minutes before shooting... Tamron makes good lenses, I'm assuming that it's not a primary lens? A primary lens is fixed and does not zoom...

It does zoom so it must not be primary. See, I am learning all sorts of interesting stuff today. I have not had a chance to play more with it but hopefully tom I will.
 
A lens of fixed focal length is a "prime" lens. If it has variable focal length it's a "zoom" lens.
 
I'm now blind. After Roy's suggestion on light's, I drove over to Lowe's. Bought 3 work lights with the aluminum reflectors on them. Also purchased a 4 pack of Bright Effects, Bright White, 26W bulbs. These baby's put out 1750 lumens per light. After I set my tent up in the shop I turned them on at once. It was like a solar eclipse in there. I now only see stars everywhere. Will attempt to take some photo's later tonight when I get home from work.
 
Someone had suggested some follow up photos so here is one. I have still not fixed the lighting yet but will hopefully in the next few days. I will be getting a gray card too. I do have Gimp 2 to edit my photos but I want to take better photos without needing to edit too much. I also changed the background back to a gray. I do thank each and everyone of you that has given me advice on this.

attachment.php


F-stop: f5.6
Exposure time: 1/8 sec.
ISO: 200
Tripod: yes
Timer: yes
I went with the incandescent white balance.

Any other info needed let me know!
Will post more as I play with different settings.

Also would switching to a black background help or hurt my photos?
 

Attachments

  • 008rs.JPG
    008rs.JPG
    12.8 KB · Views: 235
Back
Top Bottom