
Ed McDonnell
Member
I had originally planned on an all metal totally custom pen for my advanced entry. After two weeks of design effort I was ready to begin the "making". I've never done a totally metal custom pen and I'm not very far up the learning curve in metalworking. It didn't take long to realize that translating my all metal design to reality wasn't going to happen for this Bash.
The thing I enjoy most about making pens is the design work and artistic creativity that is required before I actually go to the shop to start the "making". So, I decided to enjoy designing something less ambitious in resin. After a week of design and a couple days in the shop I decided I had a winner. But only if they brought back the Ugly Pen Contest. What was I thinking? Back to the drawing board. After countless iterations I finished the design that I used for my advanced contest pen.
I decided to execute my design in darkish red resin with gold leaf inlay. My technique for gold leafing is to apply a very slow drying varnish to the inlay area. After it reaches just the right amount of tack (1 to 6 hours) I apply the gold leaf. It then needs to sit a couple days to allow the varnish to dry before I can cast the final clear coat.
When I cast my clear coat (rotocast) I wasn't careful enough and ended up with an embedded bubble on the cap section next to where it abuts the coupler. The good news is that I was able to turn the bubble away. The bad news is that the cap blank was just slightly undersized where it meets the coupler by the time I got rid of the bubble. It probably wouldn't have shown up in a picture, but it was there. I didn't feel right submitting a picture of a pen with flaws (visible or not).
At this point it was about 24 hours before the contest closed for entries. Redoing the clear coat can work, but it's not a sure thing. I didn't have enough time to do another gold leaf version. I decided instead to do a resin. A resin inlay doesn't have the dimensionality of a the gold leaf inlay (which doesn't fill the ~0.01" carved areas), but the use of pearl effects in the inlay resin can give very attractive results. It's also a much quicker process. I didn't have any more red material ready, so I grabbed a dark blue blank from my "I'll use it for something someday" bucket. With less than 24 hours to go I carved it, filled the carved areas with the inlay resin, cast everything in clear resin and turned to size. I still had a couple hours left, so I designed and made the custom cap finial (no clearcoat, just resin inlay). It was exciting pulling the pen together in such a short time, but I'm not sure I would want to repeat the experience.
Here's pictures of the red reject next to the blue one I submitted.
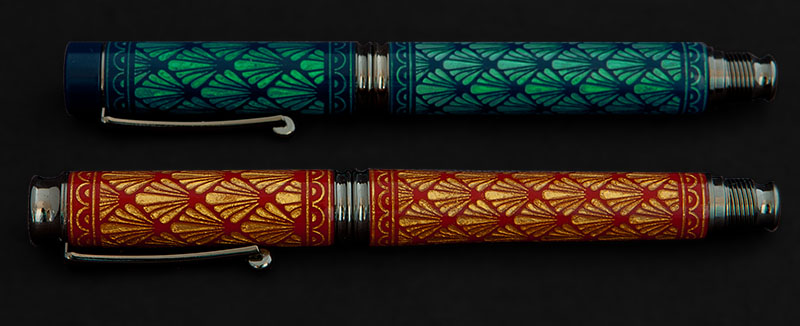
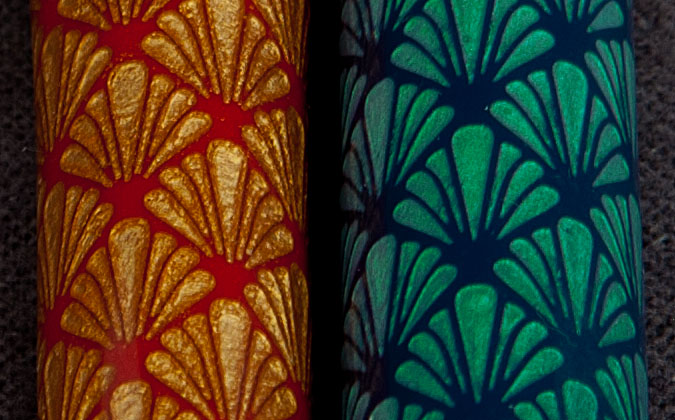
Here's some detail that may (or may not) show the difference in the "dimensionality" of the two different treatments for the inlay. Of course you would need to be looking with a magnifying glass to see anything like this. To the naked eye it is a lot subtler.
Ed
The thing I enjoy most about making pens is the design work and artistic creativity that is required before I actually go to the shop to start the "making". So, I decided to enjoy designing something less ambitious in resin. After a week of design and a couple days in the shop I decided I had a winner. But only if they brought back the Ugly Pen Contest. What was I thinking? Back to the drawing board. After countless iterations I finished the design that I used for my advanced contest pen.
I decided to execute my design in darkish red resin with gold leaf inlay. My technique for gold leafing is to apply a very slow drying varnish to the inlay area. After it reaches just the right amount of tack (1 to 6 hours) I apply the gold leaf. It then needs to sit a couple days to allow the varnish to dry before I can cast the final clear coat.
When I cast my clear coat (rotocast) I wasn't careful enough and ended up with an embedded bubble on the cap section next to where it abuts the coupler. The good news is that I was able to turn the bubble away. The bad news is that the cap blank was just slightly undersized where it meets the coupler by the time I got rid of the bubble. It probably wouldn't have shown up in a picture, but it was there. I didn't feel right submitting a picture of a pen with flaws (visible or not).
At this point it was about 24 hours before the contest closed for entries. Redoing the clear coat can work, but it's not a sure thing. I didn't have enough time to do another gold leaf version. I decided instead to do a resin. A resin inlay doesn't have the dimensionality of a the gold leaf inlay (which doesn't fill the ~0.01" carved areas), but the use of pearl effects in the inlay resin can give very attractive results. It's also a much quicker process. I didn't have any more red material ready, so I grabbed a dark blue blank from my "I'll use it for something someday" bucket. With less than 24 hours to go I carved it, filled the carved areas with the inlay resin, cast everything in clear resin and turned to size. I still had a couple hours left, so I designed and made the custom cap finial (no clearcoat, just resin inlay). It was exciting pulling the pen together in such a short time, but I'm not sure I would want to repeat the experience.
Here's pictures of the red reject next to the blue one I submitted.
Here's some detail that may (or may not) show the difference in the "dimensionality" of the two different treatments for the inlay. Of course you would need to be looking with a magnifying glass to see anything like this. To the naked eye it is a lot subtler.
Ed
