Pattern tracing attachment for my metal mini lathe

Signed-In Members Don't See This Ad

More4dan

Member
Joined
Mar 17, 2016
Messages
2,102
Location
Katy, TX
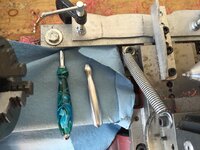
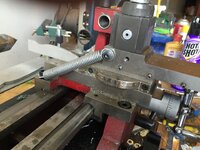
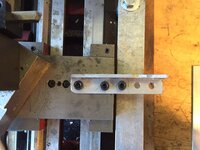
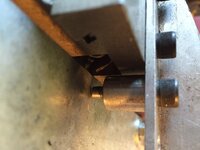
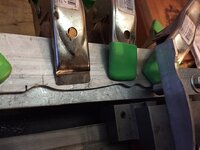
I've been toying with the idea of making a taper attachment for my lathe and then thought that a pattern tracer would be more versital. Here is my version made with materials i could find in my shop and the local Ace Hardware. I have spent about 7 hours figuring and fabricating and drilling the cast iron frame. If there is interest I will do a write up after testing it this weekend. To make it trace the pattern you remove the threaded block from the cross slide and push the crossmslide against the pattern. With the compound set parallel to the cross slide, you set the depth of cut using the compound. It allows the use of the power feed or manual feed. I may rig a spring to hold the cross slide against the pattern. I plan to bump my bit to the bushing and move the pattern to the tracer and clamp that side. Then move to the other bushing and repeat. Back to the first and adjust. Works with about 2 checks on each end quick and easy to index. I am still working on the clamps i will use for the pattern. Likely small c clamps. Let me know what you think.
 

Attachments

  • IMG_0462.jpg
    IMG_0462.jpg
    252 KB · Views: 1,301
  • IMG_0460.jpg
    IMG_0460.jpg
    211.7 KB · Views: 1,153
  • IMG_0461.jpg
    IMG_0461.jpg
    225 KB · Views: 875
  • IMG_0463.jpg
    IMG_0463.jpg
    165.4 KB · Views: 813
  • IMG_0469.jpg
    IMG_0469.jpg
    206.8 KB · Views: 1,083
Last edited:
Signed-In Members Don't See This Ad

KBs Pensnmore

Member
Joined
Oct 16, 2010
Messages
834
Location
Murray Bridge 5253 Australia
Nice set up, instead of using clamps, I'd be inclined to cut/mill a 5/16" slot at each end, to allow for different length patterns, and bolt them down as it would be more secure. To remove the nut, do you just undo the 2 socket heads and leave it there? How do you plan to mount the spring?
I wouldn't mind reading your article on it, please.
Thanks for posting.
Kryn
 
Last edited:

More4dan

Member
Joined
Mar 17, 2016
Messages
2,102
Location
Katy, TX
Nice set up, instead of using clamps, I'd be inclined to cut/mill a 5/16" slot at each end, to allow for different length patterns, and bolt them down as it would be more secure. To remove the nut, do you just undo the 2 socket heads and leave it there? How do you plan to mount the spring?
I wouldn't mind reading your article on it, please.
Thanks for posting.
Kryn

To remove the cross slide nut, I crank it all the way inward, loosen the screws and remove it. I thought of just taking out the screws but feared being able to realign the threaded block to reattach it to the cross. I plan to put it through it's paces this weekend and make necessary tweaks. I'll write up how I did afterwards. Thanks for the interest and suggestions.

Danny
 

mredburn

IAP Activities Manager
Staff member
Joined
Jul 5, 2009
Messages
8,752
Location
Fort Myers FL
You could also cut your patterns out of Aluminum angle stock since you can find it with sharp inside corners rather than the rounded one in stock steel angle. That would allow you to clamp it on the side rather than the top. Or you could space 1/4 bolts on the side of the steel angle to hold the patterned Aluminum angle stock
 

More4dan

Member
Joined
Mar 17, 2016
Messages
2,102
Location
Katy, TX
Danny, I just remove the screws from the nut and put a couple of plugs in the holes to prevent ingress of swarf etc. when I go to setup my taper turning attachment.
Kryn

Thanks I will try that. With the block removed, the handle flops around and can jam the compound slide. Maybe the block will hold it in place.

Testing done and after adding a stronger spring and 1" C clamps it works like a charm. First test was acrylic for a seam ripper and then the real test. Made an aluminum version after smoothing the pattern some.

Made a pattern for the Gatspy Kit in about 10 min. and turned one in about 10 more. I'm liking making curves again.

Danny
 

Attachments

  • image.jpg
    image.jpg
    269.1 KB · Views: 786

More4dan

Member
Joined
Mar 17, 2016
Messages
2,102
Location
Katy, TX
Nice set up, instead of using clamps, I'd be inclined to cut/mill a 5/16" slot at each end, to allow for different length patterns, and bolt them down as it would be more secure. To remove the nut, do you just undo the 2 socket heads and leave it there? How do you plan to mount the spring?
I wouldn't mind reading your article on it, please.
Thanks for posting.
Kryn

C clamps were very solid and made it very easy to position the pattern. Once clamped on each end I could get it to budge short of smacking with a hammer.

To attach the spring I replaced the forward set screw on the cross saddle that doesn't do anything with a cap screw. Then added a cap screw to the compound where the plastic guard goes to deflect chips. One of the first things I removed. Always in the way.
 

Attachments

  • image.jpg
    image.jpg
    253.7 KB · Views: 1,235
Last edited:

Paul in OKC

Member
Joined
Jul 26, 2004
Messages
3,089
Location
Oklahoma City, OK, USA.
Nice! I built a bar for a cue maker some time ago for a full size lathe so he could do the taper in shafts. Same concept. Only difference is I put a bearing on it to run against the pattern. Probably overkill for the small lathe. Good work!
 

farmer

Member
Joined
Jun 16, 2012
Messages
807
Location
NV
Off set tail stock

You can buy a live off set tail stock adaptor !
https://www.cuesmith.com/off-setting-live-center-2-or-3-morse-taper.html

Three of my lathes the tail stock is adjustable from side to side, making conical tapering fairly easy .

For my pool cue shafts I have a taper bar (Compound taper )
But I also mounted a lathe on top of my CNC Router and cut the taper my cue shafts on my CNC .

Most of my cuts are long cuts, X axis and when I am tapering I use live a cutter.
 
Top Bottom