
Wmcullen
Member
I'm not sure if this process is right or wrong; unique or common. But it works for me and I want to share in case it's interesting. |
14: Overlapping Center Band
last post: 13: Miter touch

The crowns worn by the Doges (Dukes) of Venice served as loose inspiration for this center band shape.

The Problemlast post: 13: Miter touch
The crowns worn by the Doges (Dukes) of Venice served as loose inspiration for this center band shape.
I wanted a center band to curve around part of the bottom section of a pen. I wanted the bottom to turn inside the center band. I also needed to drill two different sized holes into the center wood.
My Process
(Not rocket surgery, just how I did it.)
1. I picked contrasting wood colors: dark rosewood and hard maple.
2. Using the chop saw I cut two slabs of maple at different thicknesses (top-0.2"; bottom- 0.45").
I drilled 1/4" holes into the thinner top piece and 3/8" holes into the bottom.
3. Precision isn't always my strong suit and I decided the alignment of these two pieces had to be perfect.
I made a "centering guide" using my 3D printer consisting of a 1/4" dowel on top of a 3/8" dowel (pictured in white).
While there must be an easier, better, smarter way to do this I stopped looking when the 3D print option worked so well.
4. The pieces were wood glued together in perfect alignment and clamped.
(I'm proud of myself for remembering to remove the centering guide before the glue dried!
") )
)5. After it dried, I cut an angle on the bandsaw.
6. The center band's large hole is 3/8" in diameter and 0.45" deep. Using calipers and checking often I carved the top of one of the segments to fit.
7. And then I shaped the rest of the rosewood.
8. The upper part of the center band with a 1/4" hole slid onto the mandrel...
... and the lower part with the 3/8" hole held the pen's bottom segment perfectly.
9. Rough shaping.
10. The center band was angular. I wanted it curvier and decided to try something new.
I took an unfinished blank and wrapped masking tape around it a few times before attaching a few inches of sandpaper.
11. I put this between my pen segments to make a mini-spindle sander.
12. But unlike a spindle sander the "tail" of the sandpaper slapped as it went around smoothing the upper edge. Holding it wasn't comfortable but didn't hurt. I'm not advocating anyone else do this, just sharing what I did.
(I turned off my dust collection system for this step because I just know what would have happened otherwise!
)13. I sanded and finished everything in stages.
Summary
I've been sketching and pondering this design since last summer. It's nice to finally see it.
Thanks for looking!
- Cullen
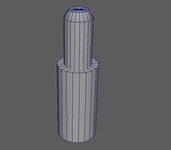
Centering Guide
CenterFlueBrace1.zip contains an *.obj file.
This is super simple geometry but, as always, I'm happy to share in case it's useful.
I'm fairly certain 2 minutes after posting this I'll find an 8 cent piece of hardware at HD that accomplishes the same thing.
Don't be bashful about volunteering a better substitute if you know one.

")
