Newbie dumb question on casting

Signed-In Members Don't See This Ad

DennisM

Member
Joined
Apr 30, 2009
Messages
636
Location
Northern Illinois
Ok thought I'd try my hand at casting.

Made a couple 3.5 in. pvc molds, sealed the bottom with tape. Then mixed up 3oz of resin, added coloring and hardener. Ok pretty straight forward so far.

Set aside and let the magic happen.

The while doing some evening reading like i do, read that the pr will not set at temps below 60, and well my shop is outside and only partially heated when i am in it, and right now high today was 51, so that tells you night time temp.

So thought Hey I better bring that in.

Well lost 2.5 of the molds to leakage, (I know Ed but hey One stayed in), and when you are told it stinks, IT STINKS!

So my question (about time right?) is, can I wrap it in a lose bag of some sort to slow down the stinking of the house?

I do plan on making a curing chamber tomorrow, small box, sealed, vent in the back connected to a dryer vent hose leading outside, and vent holes in the front. But what do i do with this small batch? I know its only one good blank will maybe come out of it, but the coloring looks really cool! Would hate to have to throw away my first attempt.. :)

Thanks
Dennis
 
Last edited:
Signed-In Members Don't See This Ad
Dennis,

I do believe PR will cure in cold temperatures but you need to add extra MEKP or just let it sit a lot longer.

My shop is not heated but it doesn't get quite as cold here.

BTW, I don't use tape on the bottom of the tubes because I had the same leakage. I use PVC caps and just have to cut off the extra tab that is created on the bottom.
 
Thanks,

I ended up putting them back out in the shop cause didn't want the house smelling like it all night.

Now I have read that post curing can be done in a toaster oven. Would that help with my situation at all? leave them out say overnight to pre-cure then in the morning, throw them in the toaster over?

I imagine that using the toaster oven to cure them will make them stink even more correct?

I have more then enough PVC to make some more, and have four caps for the bottom. Thinking to aid in removal of the cap to wrap the bottom with plastic wrap then add the cap.

Also picked up a few plastic rectangle containers yesterday, made sure to have the 5 in the recycle symbol. Will try one of those as well.
 
Ok,

well took the toaster oven outside to the shop, and post cured the two that were able to be blanks,

Took em out after about 35 mins, they are now nice and hard, and not tacky.

Trimmed the ends smooth and attempted to drill one, drilled a little hard, but still drilled, blew out the end of it. It wasnt long enough to be saved, only made a 3in pour to test.

So mounted between centers and turned, It turned rather nice, I guess a little hard though, no nice ribbions like I am used too. Will get pics up in a bit.

Do you think being hard to turn and slightly brittle I used to much MEKP?

Also would this work for a cast..

pour the mold as normal, but right at the beginning stages of gel, place slices of another pr blank in it? Thinking while it is just gelling it will hold the other pieces up right in there.

Thanks, now its off to get coffee and batteries for the camera then attempt 2 at casting.

Dennis
 
I use the quart and gallon sized ziplock bags all the time for sealing beakers that I am not going to use today, but will cast 1st tomorrow. The ziplock brand bags are made from Polyproylene or Polyethylene, so will not melt when exposed to PR, MEKp or acetone. I even reuse them.

I also seal the used beakers in bags after casting so I can turn down my exhaust unit, so it will only draw on the fume box not the fume box + the whole workroom.

I buy them bulk at the Sam's and Costco for $8-$9 for 200+ bags in each size.

And yes it will seal in the smell of the resin.
 
Thanks for that info. I will have to go grab some tomorrow then. Also working on the plans for the curing box. Just need to get the wood for it.

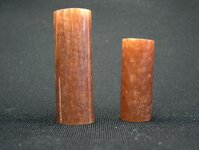
Here is a pic as promised of the first to casts I have done.

The one on the left is straight out of the pvc mold, and the one on the right slightly turned and mm to 12000

Thanks
 

Attachments

  • HPIM0401.jpg
    HPIM0401.jpg
    53.4 KB · Views: 164
Thanks for that info. I will have to go grab some tomorrow then. Also working on the plans for the curing box. Just need to get the wood for it.

Here is a pic as promised of the first to casts I have done.

The one on the left is straight out of the pvc mold, and the one on the right slightly turned and mm to 12000

Thanks

Your curing box or fume control box can be a simple as a cardboard box that has your ducted (motorised) venting hose taped onto it, and one of the sides cut so it will flap open, but can be pushed closed and the negative pressure will hold it closed.

1_fume_control_box_and_vent_002_-_r.jpg


the ducting is 6" flex available from Woodcraft, Rockler, or Craftsupplies, and 2 bigmouth scoops and an in-line shutter/gate.
1_fume_control_box_and_vent_003_-_r.jpg


The fan in the wall is an attic exhaust fan with a speed controller switch added.
1_fume_control_box_and_vent_005_-_r.jpg
 
Back
Top Bottom