
You are using an out of date browser. It may not display this or other websites correctly.
You should upgrade or use an alternative browser.
You should upgrade or use an alternative browser.
New one
- Thread starter Hubert H
- Start date
Signed-In Members Don't See This Ad
See more from Hubert H


Thanks for the explanation. Great idea and nice to see the thinking outside the box. Looks great. Thanks for showing.


So this all took about 45 seconds, right? Just kidding!!!
Smoly crap dude! That process is pertty neat. Never though to consider turning a round 'hole' in the side of the blank going to opposite direction! And nicely sanded too, can't see any 'bleed over' from one wood to the other!
Did you happen to get any tearout with the grain being 'crosscut' in the 'hole' while turning the entire blank?
Scott (this is on my 'tuit list') B


Signed-In Members Don't See This Ad
asyler
Local Chapter Leader
nice use of contrast wood!!
jttheclockman
Member
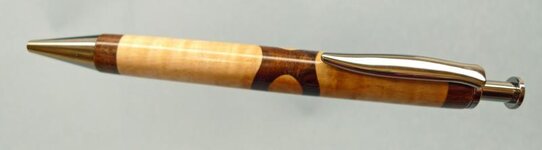
Nice pen. Are you willing to tell us how you did the accent piece???
Hubert H
Member
John, I'll try - I drilled a 3/8" hole in a Rosewood pen blank. Than I Turned a piece of Maple to a 3/8" dowel and glued about a 2" piece into the Rosewood blank. I cut off about 1 1/2 inch piece. I centered the 3/8 inch dowel that I had glued into the piece of Rosewood between centers on the lathe and turn the whole thing down to three-quarter inches. Then I took my Maple blank and glued some pine scabs on the edges. Now I was able to drill a three-quarter inch hole in the very center of my Maple blank. Now I glued the 3/4" Rosewood dowel with a maple center into the 3/4" hole I had in the maple blank. After the glued in piece had cured I trimmed off the pine scabs and you have seen the results after it was turned. The difficult part is keeping everything centered. Have fun.
jttheclockman
Member
John, I'll try - I drilled a 3/8" hole in a Rosewood pen blank. Than I Turned a piece of Maple to a 3/8" dowel and glued about a 2" piece into the Rosewood blank. I cut off about 1 1/2 inch piece. I centered the 3/8 inch dowel that I had glued into the piece of Rosewood between centers on the lathe and turn the whole thing down to three-quarter inches. Then I took my Maple blank and glued some pine scabs on the edges. Now I was able to drill a three-quarter inch hole in the very center of my Maple blank. Now I glued the 3/4" Rosewood dowel with a maple center into the 3/4" hole I had in the maple blank. After the glued in piece had cured I trimmed off the pine scabs and you have seen the results after it was turned. The difficult part is keeping everything centered. Have fun.
Thanks for the explanation. Great idea and nice to see the thinking outside the box. Looks great. Thanks for showing.
Tom T
Member
Wow, very well done. Very classy. Great wood, color contrast.
Great work. Wow again.
Great work. Wow again.
Dalepenkala
Member
Hubert nice looking pen! I like it!
Fishinbo
Member
Looks great with the rosewood accent, compliments really well with maple. Great job!
_______________________
-www.sawblade.com
_______________________
-www.sawblade.com
dozer
Member
Really nice color contrast, great looking pen.
All round nice!! Great choice in contrasting woods, great fit and finish, good picture and especially well done on the spacing of your segments. It's attention to detail like yours that make it stand out. Well done!!:wink:
SDB777
Member
John, I'll try - I drilled a 3/8" hole in a Rosewood pen blank. Than I Turned a piece of Maple to a 3/8" dowel and glued about a 2" piece into the Rosewood blank. I cut off about 1 1/2 inch piece. I centered the 3/8 inch dowel that I had glued into the piece of Rosewood between centers on the lathe and turn the whole thing down to three-quarter inches. Then I took my Maple blank and glued some pine scabs on the edges. Now I was able to drill a three-quarter inch hole in the very center of my Maple blank. Now I glued the 3/4" Rosewood dowel with a maple center into the 3/4" hole I had in the maple blank. After the glued in piece had cured I trimmed off the pine scabs and you have seen the results after it was turned. The difficult part is keeping everything centered. Have fun.
So this all took about 45 seconds, right? Just kidding!!!
Smoly crap dude! That process is pertty neat. Never though to consider turning a round 'hole' in the side of the blank going to opposite direction! And nicely sanded too, can't see any 'bleed over' from one wood to the other!
Did you happen to get any tearout with the grain being 'crosscut' in the 'hole' while turning the entire blank?
Scott (this is on my 'tuit list') B
BSea
Member
Very cool blank, and on one of my favorite kits too. I think I'll have to read your explaination a few times before I figure it out. (If I ever do)
Russknan
Member
Beautiful pen! Problem is, now I'm probably going to wake up in the middle of the night in terror after dreaming that, somehow, I was required to do the kind of precision drilling you pulled off so magnificently. I've stayed away from the long clickers for that reason. But YOU added at least several magnitudes of difficulty to that - and made it look easy. Congratulations! Wish I could take some lessons from you. Russ
Hubert H
Member
Tearout - very sharp tool and going slow. Yes tearout would be a problem if you try to go fast.
Thanks for the kind words all.
Thanks for the kind words all.
BSea
Member
Ok, I think I understand this a little better now. I thought that you curved the ends of the middle part in. Sort of concave. But based on your description, I'm now guessing (I do a lot of guessing) that it looks that way because you tapered in the center section. Right?
Hubert H
Member
Right, it is just a circle in the blank. As you turn it the curve developes. Have some fun.