robutacion
Member
Hi everyone,
I will be having a number of threads that will be all connected with my new recent treasures find location, here I will try to link them all as I go so that you can follow a little easier.
So, the very first day I got the truck unloaded wood in my storage paddock, I grabbed some pieces that I decided to become my own (for now) and take them to my lathe and get chips flying.
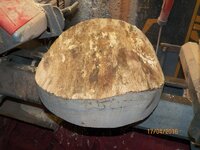
Only one blank was dry wood, the rest was green wood, some I knew some I didn't.
Anyway, just mounting some of these blanks was a nightmare, the fist one I call the "dark brown wood" was extremely heavy that alone was a problem but, I managed it in the end.
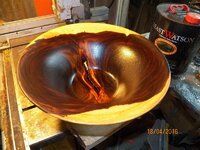
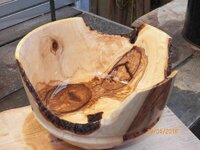
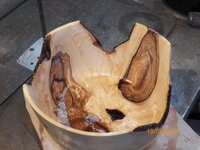
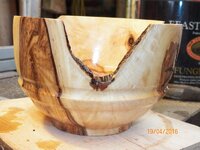
There were 5 pieces that I took to the lathe room and that, I wanted to create something out of them however, I wanted to finish them in one go, there is, the green stuff would be turned to the finish thickness and soaked in the Fungishield product that I have use for years to treat green wood to prevent excessive cracking/movement.
After that they would be photographed and put aside to dry on they own accord, I don't really care what happen to them, like so many pieces I created, pics is all I've got so, I'm Ok with that.
Coming from such a long period of thickness, I was really craving for some wood chips flying on my lathe, this was the right opportunity to satisfy my cravings.
Only 3 of the 5 blanks were done, after spending 2 afternoons making shavings, the floor was raising up with wood chips and my head was starting to be too close to the roof (most of you have seen my lathe room, the roof is about 1' above my head, and I'm 171cm tall
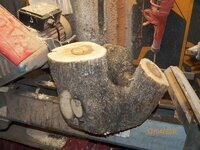
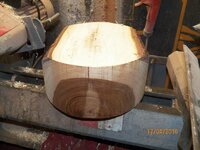
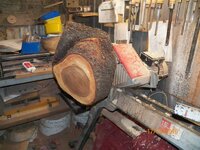
I will first show the 5 pieces/blanks I had before they were turned, and ask for anyone to identify the wood species if you can, I will then show the pieces after finished and coated with the Fungishield.
Have a look;
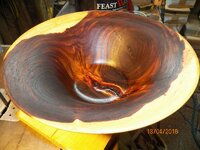
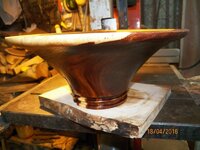
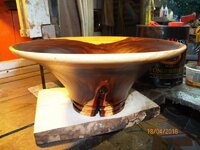
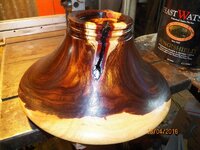
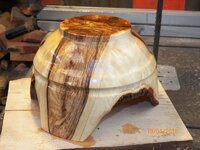
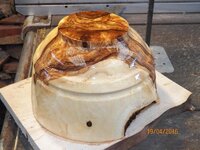
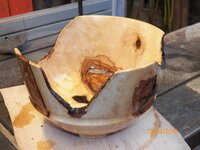
PS: Pics 1 and 4 are from the new "dark brown" wood, pics 2 and 5 are Silky-Oak and pic in the middle is Olive wood.
Cheers
George
I will be having a number of threads that will be all connected with my new recent treasures find location, here I will try to link them all as I go so that you can follow a little easier.
So, the very first day I got the truck unloaded wood in my storage paddock, I grabbed some pieces that I decided to become my own (for now) and take them to my lathe and get chips flying.
Only one blank was dry wood, the rest was green wood, some I knew some I didn't.
Anyway, just mounting some of these blanks was a nightmare, the fist one I call the "dark brown wood" was extremely heavy that alone was a problem but, I managed it in the end.
There were 5 pieces that I took to the lathe room and that, I wanted to create something out of them however, I wanted to finish them in one go, there is, the green stuff would be turned to the finish thickness and soaked in the Fungishield product that I have use for years to treat green wood to prevent excessive cracking/movement.
After that they would be photographed and put aside to dry on they own accord, I don't really care what happen to them, like so many pieces I created, pics is all I've got so, I'm Ok with that.
Coming from such a long period of thickness, I was really craving for some wood chips flying on my lathe, this was the right opportunity to satisfy my cravings.
Only 3 of the 5 blanks were done, after spending 2 afternoons making shavings, the floor was raising up with wood chips and my head was starting to be too close to the roof (most of you have seen my lathe room, the roof is about 1' above my head, and I'm 171cm tall
I will first show the 5 pieces/blanks I had before they were turned, and ask for anyone to identify the wood species if you can, I will then show the pieces after finished and coated with the Fungishield.
Have a look;
PS: Pics 1 and 4 are from the new "dark brown" wood, pics 2 and 5 are Silky-Oak and pic in the middle is Olive wood.
Cheers
George
Attachments

Last edited:


 :biggrin: