
darrin1200
Member
I thought I would throw up a little more info on my Freestyle entry.
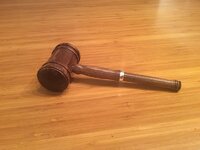
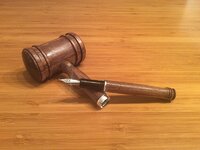
I was asked to make a gavel for use by the president of the Ottawa Fountain Pen Society. The walnut for the gavel was provided by the outgoing president.
I started by making the head block, and turning it down to rough dimension. This allowed me to postiton the handle hole to the best grain advantage. I then went to the drill press, to put in a 1/2" hole dead center, halfway through the block. I decided to wait, until the pen/handle was finished, to shape the head.
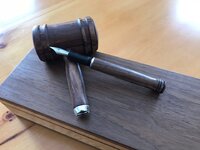
The only kit pieces I planned on using, were the metal and plastic coupler from a silver ElToro kit. However, since I had them, I decided to add the sterling plated accent pieces as well. The tubes from the kit were not long enough for what I wanted, so I went to my scrap tube box and starte measuring until I found longer tubes with a very close I.D. The brass tubes and metal coupler, strengthen the joint so it doesn't break when the gavel is hammered on the table.
I turned the blank for the pen/handle portion down to 18mm dia, to fit my ER32 collet. I made two blanks, one for the cap and one for the body, drilled blind holes in each and glued in the appropriate tube. The depth of the blind holes is critical, so that in the cap there is room for the pen nib without bottoming out, as well as not going to deep and creating a weak point in the handle. The body hole had to be deep enough to take a converter, and I need to know exactly where it ended so that I wouldn't cut into it when turned off the end.
The cap portion, I left long enough that I could mount in the collet chuck and turn a tenon that would go into the gavel head. Then I shaped it, sanded to 400, and applied about 3 coats of Drs Woodfinish.
The body was a little trickier, because I needed a way to hold onto one end that would let me finish the whole piece before taking off the lathe. I was going to make a pin chuck, but on a whim, I checked the diameter of the Baron closed end mandrel. It was very close, within about .016". Luckily I have some .002 shim stock, and I made a few pieces to build it up until it gripped. I tried using one piece and wrapping it around 4 times, but the friction wouldn't let it expand sufficiently to grab the brass tube. 4 separate pieces worked perfectly. With it chucked up, I shaped it and also applied 3 coats of finish.
With the handle portion done, I started on the head. I waited, because I wanted to be able to use the handle to properly proportion the head. The head also got the Drs. Woodfinish.
****Edit***
I forgot to mention, that the section for the nib is custom, made of ebonite, with a #6 Jowo nib. For my kitless pens, the section uses a 10x.5mm coupling thread and it turns out that the ElToro section uses the same thread. Made it much easier, since I dislike the kit sections.
***End Edit***
This was all done just in time to enter the Freestyle contest, which took first place. Thank you to everyone that voted.
The next part of the job was a box to carry the gavel in. I new I couldn't get it finished in time to enter into the pen box contest.
The box was more of a design on the fly. In other words I changed the plan a few times during the build.
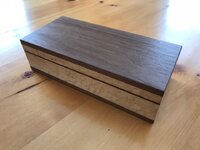
First up I made a miter joined box shape from Birdseye maple. I went a little large on the dimensions, because if the inside was to big, it would still hold the gavel. If to small, well #@$$#&#@. I then glued oversized walnut panels to the top and bottoms of the box. When everything was dry, I used a flush trim router bit to remove the excess walnut, then hand planes to bring them in perfectly smooth. I then used the table saw to cut the lid off of the box. Enter the first design opportunity.
I set the blade for a depth to not quite cut through the Birdseye. For some reason, my tablesaw fence was off about 1/32" front to back. When I finished cutting, all the cuts were slightly offset to each other. No problem, I have great handplanes. I shaved each edge until they were square and flat. However, now the inside of the box was not deep enough for the gavel by about 1/32. Wonderful, this lets me add a walnut strip around the edge of the bottom section of the box. I used a melamine sled to in my planer to get strips 1/16" thick, then hand mitered and fit them to the box. Now the gavel fit without touching the lid of the box.
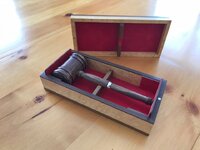
Next was to make a rest in the middle of the box for the handle. To do this I just made a walnut piece to fit the inner dimensions, then drilled a 3/4" hole at the correct height and finally split the piece on the bandsaw. Voila, an upper and lower piece to hold an support the handle. I positioned it so it was just at the end of the cap portion. Uh Oh. Design opportunity two.
Remember, I made the inner dimensions a little large to ensure the gavel would fit. Well, now it is held in the center by the rest, while the head flops back and forth. I decided to put 1/8" walnut fillers in at the ends, too take up the slack. I made them taller, because I decided not to use hinges, but a friction fit. The rest held it side to side, and these end pieces would align it lengthwise. All worked well, except that there was still some head movement of the gavel side to side. I stilll had some pieces from the end fillers, so add them in just where the gavel head sits. It was at this time, that I realized that the rest was almost perfectly centered, and that the gavel could be put in either direction. So I put in fillers at both ends. Turned out to look rather good, and there was a good friction fit between the top and the bottom.
I decided to line the box with red Suede Tex. (I love this stuff). I put it anywhere that the gavel would touch. The red is also an excellent accent to the walnut.
Everything fits an its beautiful. Time for the finish. I finish sanded to 400. I then laid down to coats of 1lb cut shellac using the pad method. I then sanded the shellac with 600 and rubbed on three coats of Drs. Walnut wax. The whole thing buffed up beautifully.
#$@#%%$#$*&#@ Design opportunity 3.
I "had" a perfect friction fit between the top and bottom. So perfect, when I applied the was finish, the lid just slid easily off. Damn. My solution was to add 1/4" rare earth magnets at either end. Some quick drilling with a Forstner, a dot of epoxy and its all finished.
I delivered the finished project to the club last night to rave reviews. I am very happy with the final design.
Moral of the story? There are no mistakes, just Design Opportunities.
Thanks again to everyone who voted in the contest.
I was asked to make a gavel for use by the president of the Ottawa Fountain Pen Society. The walnut for the gavel was provided by the outgoing president.
I started by making the head block, and turning it down to rough dimension. This allowed me to postiton the handle hole to the best grain advantage. I then went to the drill press, to put in a 1/2" hole dead center, halfway through the block. I decided to wait, until the pen/handle was finished, to shape the head.
The only kit pieces I planned on using, were the metal and plastic coupler from a silver ElToro kit. However, since I had them, I decided to add the sterling plated accent pieces as well. The tubes from the kit were not long enough for what I wanted, so I went to my scrap tube box and starte measuring until I found longer tubes with a very close I.D. The brass tubes and metal coupler, strengthen the joint so it doesn't break when the gavel is hammered on the table.
I turned the blank for the pen/handle portion down to 18mm dia, to fit my ER32 collet. I made two blanks, one for the cap and one for the body, drilled blind holes in each and glued in the appropriate tube. The depth of the blind holes is critical, so that in the cap there is room for the pen nib without bottoming out, as well as not going to deep and creating a weak point in the handle. The body hole had to be deep enough to take a converter, and I need to know exactly where it ended so that I wouldn't cut into it when turned off the end.
The cap portion, I left long enough that I could mount in the collet chuck and turn a tenon that would go into the gavel head. Then I shaped it, sanded to 400, and applied about 3 coats of Drs Woodfinish.
The body was a little trickier, because I needed a way to hold onto one end that would let me finish the whole piece before taking off the lathe. I was going to make a pin chuck, but on a whim, I checked the diameter of the Baron closed end mandrel. It was very close, within about .016". Luckily I have some .002 shim stock, and I made a few pieces to build it up until it gripped. I tried using one piece and wrapping it around 4 times, but the friction wouldn't let it expand sufficiently to grab the brass tube. 4 separate pieces worked perfectly. With it chucked up, I shaped it and also applied 3 coats of finish.
With the handle portion done, I started on the head. I waited, because I wanted to be able to use the handle to properly proportion the head. The head also got the Drs. Woodfinish.
****Edit***
I forgot to mention, that the section for the nib is custom, made of ebonite, with a #6 Jowo nib. For my kitless pens, the section uses a 10x.5mm coupling thread and it turns out that the ElToro section uses the same thread. Made it much easier, since I dislike the kit sections.
***End Edit***
This was all done just in time to enter the Freestyle contest, which took first place. Thank you to everyone that voted.
The next part of the job was a box to carry the gavel in. I new I couldn't get it finished in time to enter into the pen box contest.
The box was more of a design on the fly. In other words I changed the plan a few times during the build.
First up I made a miter joined box shape from Birdseye maple. I went a little large on the dimensions, because if the inside was to big, it would still hold the gavel. If to small, well #@$$#&#@. I then glued oversized walnut panels to the top and bottoms of the box. When everything was dry, I used a flush trim router bit to remove the excess walnut, then hand planes to bring them in perfectly smooth. I then used the table saw to cut the lid off of the box. Enter the first design opportunity.
I set the blade for a depth to not quite cut through the Birdseye. For some reason, my tablesaw fence was off about 1/32" front to back. When I finished cutting, all the cuts were slightly offset to each other. No problem, I have great handplanes. I shaved each edge until they were square and flat. However, now the inside of the box was not deep enough for the gavel by about 1/32. Wonderful, this lets me add a walnut strip around the edge of the bottom section of the box. I used a melamine sled to in my planer to get strips 1/16" thick, then hand mitered and fit them to the box. Now the gavel fit without touching the lid of the box.
Next was to make a rest in the middle of the box for the handle. To do this I just made a walnut piece to fit the inner dimensions, then drilled a 3/4" hole at the correct height and finally split the piece on the bandsaw. Voila, an upper and lower piece to hold an support the handle. I positioned it so it was just at the end of the cap portion. Uh Oh. Design opportunity two.
Remember, I made the inner dimensions a little large to ensure the gavel would fit. Well, now it is held in the center by the rest, while the head flops back and forth. I decided to put 1/8" walnut fillers in at the ends, too take up the slack. I made them taller, because I decided not to use hinges, but a friction fit. The rest held it side to side, and these end pieces would align it lengthwise. All worked well, except that there was still some head movement of the gavel side to side. I stilll had some pieces from the end fillers, so add them in just where the gavel head sits. It was at this time, that I realized that the rest was almost perfectly centered, and that the gavel could be put in either direction. So I put in fillers at both ends. Turned out to look rather good, and there was a good friction fit between the top and the bottom.
I decided to line the box with red Suede Tex. (I love this stuff). I put it anywhere that the gavel would touch. The red is also an excellent accent to the walnut.
Everything fits an its beautiful. Time for the finish. I finish sanded to 400. I then laid down to coats of 1lb cut shellac using the pad method. I then sanded the shellac with 600 and rubbed on three coats of Drs. Walnut wax. The whole thing buffed up beautifully.
#$@#%%$#$*&#@ Design opportunity 3.
I "had" a perfect friction fit between the top and bottom. So perfect, when I applied the was finish, the lid just slid easily off. Damn. My solution was to add 1/4" rare earth magnets at either end. Some quick drilling with a Forstner, a dot of epoxy and its all finished.
I delivered the finished project to the club last night to rave reviews. I am very happy with the final design.
Moral of the story? There are no mistakes, just Design Opportunities.
Thanks again to everyone who voted in the contest.
Attachments
-
 0213AB2D-4E3B-4EEF-A326-26B4F87859C8.jpg182.8 KB · Views: 372
 -
 52ECB296-3D5A-449A-85DE-5E9C8C882915.jpg176.7 KB · Views: 436
 -
 C94B6F98-1C69-44BA-9991-83DA1F02E181.jpg201.3 KB · Views: 365
 -
 C7CDCCB6-D644-4C2C-90C7-EB03B9064D9D.jpeg109.9 KB · Views: 345
 -
 09E98157-5F42-45D7-90C9-C3C031A1ADCC.jpeg119.8 KB · Views: 401
Last edited:

")