
Rich L
Member
I'm sure there's a discussion somewhere on this forum about this but I'm too lazy to look very far and, well, anyway, here goes...
I had been reading on another forum about some individual techniques a few knowledgeable folks had developed to do onesy-twosy nib grinds and adjustments and I finally got up the courage to try it myself on a particularly "skippy" italic medium Bock nib I had. The nib was new.
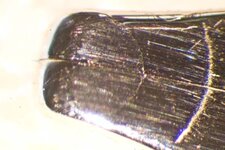
There is virtually no space between the tines right at the tip but it is wet with ink and the pen will write immediately with the pen held vertically so that tells me that the foot geometry at that angle is good and ink is flowing, however, it skips initially at a more comfortable 45º angle and upon inspection with the microscope the "45º" foot looks a bit concave. I thought I'd use some 2500 grit paper to just lightly grind a "rounded" 45º angle to make the foot and then brush that up with some 3µm paper. I wanted it just a touch convex so the slit touches the paper with some margin of positional error.
The close-up of the underside of the nib shows kind of a ratty surface - unlike what I expected from a new nib. If it looks ratty it probably writes ratty - yep!
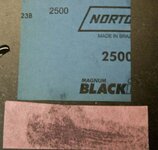
So, I bit the bullet and did it. I used Norton Black Ice 2500 grit paper (silicon dioxide) for light material removal by just using the weight of the pen against it and using back and forth motions in the direction of the slit with a little rock side to side to keep away any edges I might produce. I essentially did this at my writing angle plus and minus about 20º. For the finish I used a 3M 3µm grit and all grinding was done with the nib in the pen and with a little water on the paper. The 3M pink stuff is a very light fiber back material with little spots of 3µm aluminum oxide scattered on one side - very porous. I spread the tines a little (oh, so little) by pressing on the shoulders of the nib. The finish, or polish, could be improved easily by using some 2µm and 1µm paper or by buffing. I did prove that I can do this kind of minor improvement without any power tools.
Pictures before and after and the papers I used. The nib works like it's supposed to, now.
Cheers,
Rich
I had been reading on another forum about some individual techniques a few knowledgeable folks had developed to do onesy-twosy nib grinds and adjustments and I finally got up the courage to try it myself on a particularly "skippy" italic medium Bock nib I had. The nib was new.
There is virtually no space between the tines right at the tip but it is wet with ink and the pen will write immediately with the pen held vertically so that tells me that the foot geometry at that angle is good and ink is flowing, however, it skips initially at a more comfortable 45º angle and upon inspection with the microscope the "45º" foot looks a bit concave. I thought I'd use some 2500 grit paper to just lightly grind a "rounded" 45º angle to make the foot and then brush that up with some 3µm paper. I wanted it just a touch convex so the slit touches the paper with some margin of positional error.
The close-up of the underside of the nib shows kind of a ratty surface - unlike what I expected from a new nib. If it looks ratty it probably writes ratty - yep!
So, I bit the bullet and did it. I used Norton Black Ice 2500 grit paper (silicon dioxide) for light material removal by just using the weight of the pen against it and using back and forth motions in the direction of the slit with a little rock side to side to keep away any edges I might produce. I essentially did this at my writing angle plus and minus about 20º. For the finish I used a 3M 3µm grit and all grinding was done with the nib in the pen and with a little water on the paper. The 3M pink stuff is a very light fiber back material with little spots of 3µm aluminum oxide scattered on one side - very porous. I spread the tines a little (oh, so little) by pressing on the shoulders of the nib. The finish, or polish, could be improved easily by using some 2µm and 1µm paper or by buffing. I did prove that I can do this kind of minor improvement without any power tools.
Pictures before and after and the papers I used. The nib works like it's supposed to, now.
Cheers,
Rich

")