My first experiment

Signed-In Members Don't See This Ad
See more from NGLJ

NGLJ

Member
Joined
Sep 15, 2021
Messages
301
Location
Surrey BC, Canada
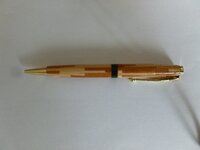
For me experimenting in woodworking is a large part of the fun and I am sure that is true for all here. Although I am very new to pen turning (a few weeks) it soon became clear that the opportunities to experiment/personalize are endless with pen turning. So I offer my first experiment for feedback from those far more knowledgeable than me. Please provide the good, the bad and even the ugly if that is supported by constructive input. Without feedback we cannot improve and who doesn't want to get better! The light colored wood is maple, the darker wood is cherry and the center band is ebony. It is based on a slimline kit.
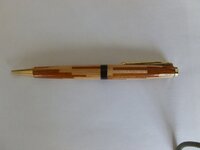
 

Attachments

  • P1010304.jpg
    P1010304.jpg
    194.1 KB · Views: 206
  • P1010305.jpg
    P1010305.jpg
    184.1 KB · Views: 204
Signed-In Members Don't See This Ad

Alan Morrison

Member
Joined
Jan 15, 2019
Messages
3,062
Location
N Ireland
Graham, there's not a lot of negatives with your pen.
Well done on segmenting a slimline. There are kits that have a lot more meat to play with. If you like slimlines maybe try Streamlines.
If it was me I would'nt have picked black for the centre band as it gives too much of a contrast.

Alan
 

KenB259

Member
Joined
Dec 24, 2017
Messages
3,537
Location
Michigan
There's a lot more to this pen that is immediately obvious. Each of the small strips are either wedges or inserted at , what I would guess is, a 45 degree angle.. The slim platform adds another degree of difficulty. I like it a lot, good job on the finish too.
 

sorcerertd

Member
Joined
Sep 30, 2019
Messages
2,657
Location
North Carolina, USA
I like the "plank" look of it. Kudos for making a custom center band to begin with. I would have wanted at least some contrast there, but that's a bit too contrasting for my taste. Maybe walnut? Again, that's just my taste. The only other thing is that the tip looks a bit proud of the nib. After putting all that effort on the barrels, I'd probably find it worth disassembling and evening that up. Maybe that's just the angle of the picture, though? I definitely am a fan of the somewhat less subtle taper on the top end. Hope you find this constructive. Nice work overall.
 

NGLJ

Member
Joined
Sep 15, 2021
Messages
301
Location
Surrey BC, Canada
Thanks for all of the useful comments :). I have to agree about the center band. It kind of hit me once I saw the finished product. I think the walnut suggestion would be good. I guess the tip could be a little thinner. I am just getting used to turning down close to the bushings. Practice makes perfect! The angle of the photo has exaggerated it. Your input has encouraged me to try other things.
 

leehljp

Member Liaison
Joined
Feb 6, 2005
Messages
9,314
Location
Tunica, Mississippi,
I immediately saw what Ken saw in that pen. If you don't mind me asking: 1. What bevel angles are you using? And what tool are you using to keep such consistency with such small parts. I may be a long time pen turner and even longer woodworker, but I am still a learner!

There is a lot to that pen that doesn't show on the surface.

My inquisitiveness was really brought out by that pen! It requires some extra skill sets!

OR, are my eyes playing tricks on me? Is that layered - or is it strips? On some, it seems like strips, but a couple of areas, it looks like it could be excellent layering.
 

mark james

IAP Collection, Curator
Joined
Sep 6, 2012
Messages
12,720
Location
Medina, Ohio
Very nice work Graham. While I suspect it is tight layers rather than staves, I really like the visual. Unique and very appealing. Thanks for sharing! đź‘Ť đź‘Ť
 

magpens

Member
Joined
Feb 2, 2011
Messages
15,913
Location
Canada
@NGLJ

Very nicely done, Graham !!!!
I love intricate work like you show here !!

Hop across the Pt. Mann sometime and let's meet at Lee Valley, KMS, or wherever, and then go for a snack / coffee nearby.
I'd love to get to know about your interests, your work, and yourself.
 

NGLJ

Member
Joined
Sep 15, 2021
Messages
301
Location
Surrey BC, Canada
@NGLJ

Very nicely done, Graham !!!!
I love intricate work like you show here !!

Hop across the Pt. Mann sometime and let's meet at Lee Valley, KMS, or wherever, and then go for a snack / coffee nearby.
I'd love to get to know about your interests, your work, and yourself.
Thanks. Sure I would love to meet. I visit KMS in Coquitlam fairly often and I used to work at Lee Valley, Coquitlam. You can email me ngljones@shaw.ca - Graham is my name.
 

NGLJ

Member
Joined
Sep 15, 2021
Messages
301
Location
Surrey BC, Canada
The positive comments are much appreciated. So far nobody has guessed how I did it :). Layering is kind of on the right track. Shortly, I will describe the process so that hopefully others can try if they wish.
 

NGLJ

Member
Joined
Sep 15, 2021
Messages
301
Location
Surrey BC, Canada
The process starts by making banding (see attached photo). I won't get into how to make banding because most of you probably know anyway and in any case there are many places to find out. Making the banding is the time consuming part and requires great care in stock prep and when doing the glue-up since it tends to want to slide out of shape! I chose only 2 colors but you could of course choose whatever you wish and the design that you wish. The banding needs to be at least 3/4" in width (one side of the blank) and sufficiently long to cut enough pieces into 5" lengths. The thickness of the banding will determine how many strips you need to make up 3/4" (the other side of the blank) when glued together. Thinner is better and I use my drum sander to create thin pieces of a consistent thickness. The pieces are glued back together by alternating each strip end for end, which creates something of a random effect when turned. Although I chose a chevron pattern I might try making banding that is more random in appearance and see how that turns out. I might also try some purchased banding which is not too expensive. The combination of wood colors and banding design provides a wide range of options. I truly did this as an experiment since I already had the banding that I made for a box project. It turned out way better than I could have expected proving the value of "try and see how it turns out". I hope my explanation is clear. If not I am sure I will hear about it :).
 

Attachments

  • P1010306.JPG
    P1010306.JPG
    178.8 KB · Views: 89
Top Bottom