My first attempt at Polymer Clay

Signed-In Members Don't See This Ad
See more from KMCloonan

KMCloonan

Member
Joined
Jun 13, 2017
Messages
1,502
Location
Round Lake, Illinois
After watching numerous YouTube videos, I decided to jump into the polymer clay pool. Warning: This pool only has a deep end... The last time I worked with clay was when I was a little kid with Play-Doh, and all I remember about it was that it was salty (I tried to eat a lot of things in my formative years).

Anyway, working with polymer clay is different than anything I have done before, but I am looking forward to trying a variety of techniques I have seen, encouraged by my first attempt. Thanks to Ken (@KenB259) for some great tips and advice.

006.JPG


007.JPG


008.JPG


010.JPG
 
Signed-In Members Don't See This Ad

jttheclockman

Member
Joined
Feb 22, 2005
Messages
19,158
Location
NJ, USA.
Nice job. I want to play in that pool too. What brand clay and what do I need to heat it?? I think Ken said we need a noodle flattener or something like that. Any other tools needed?? I might as well just jump into this too. I am so about trying so many new things this past winter I might as well keep it going. If I do not explode from work overload at least let me have some more fun. Thanks.
 

KMCloonan

Member
Joined
Jun 13, 2017
Messages
1,502
Location
Round Lake, Illinois
Nice job. I want to play in that pool too. What brand clay and what do I need to heat it?? I think Ken said we need a noodle flattener or something like that. Any other tools needed??
Thanks John. I just bought clay from Michael's. You need to be sure to buy Oven-Bake Clay, Vs Air Dry clay. Sculpy is a big brand, but I just started with the local stuff, There are many many brands and grades of clay.

As for tools, I suggest checking out PSI, as I saw a YouTube video by them, and they demonstrated many of their tools, including cutters that are sized for the most common pen tube sizes. Also, when I went to PSI, the stuff was crazy cheap - I don't know if they are closing the stuff out, or what, but I got a tempered glass cutting board (for rolling out the clay on, for $5.95, The tube cutter set mentioned above for $1.48 for the set, and a bunch of premade canes for about $1.50 to $2.50. They also sell a lot of PolyClay, so they can be your one stop shop I think. You also need an acrylic roller (like a small rolling pin), and a flexible cutter. And, yes, as Ken mentioned, you should have a pasta machine - I got mine at Goodwill for $5, but you can pick one up at Hobby Lobby or Michaels for about $25-$30.

Come on in! The water's great!!!
 

KMCloonan

Member
Joined
Jun 13, 2017
Messages
1,502
Location
Round Lake, Illinois
It looks a bit like agate.
My wife compared it to Geodes...It's actually a rolled up strip of clay with a color gradient - it's white at one end, and gray at the other. I rolled it up with the white inside, and the gray outside, then wrapped the roll in a sheet of black. Then cut the black-wrapped roll into slices. You can roll the roll smaller and smaller, which makes it longer and longer. You then cut slices of the small diameter tube and mix it in with the larger diameter slices. I made a big mistake when I thought I would put the partially assembled sheet into the pasta machine to flatten it. Well, the machine did flatten the sheet - it also stretched it out, which was not something I wanted. Oh well. Here's a couple more photos.

001.JPG


002.JPG


003.JPG


004.JPG


005.JPG
 

KenB259

Member
Joined
Dec 24, 2017
Messages
3,582
Location
Michigan
Awesome job. How was your turning experience ? You're doing a completely different technique than I tried. Looks like many avenues to take this.
 

KMCloonan

Member
Joined
Jun 13, 2017
Messages
1,502
Location
Round Lake, Illinois
How was your turning experience ?
Well, before I wrote to you I decided to flatten the clay sheet to 0.030", which was the difference between the tube diameter and the bushing diameter. My plan was to place the sheet onto the tube and it would be flush with the bushings. I had no idea you could actually turn the clay. When I got your note back, I had already popped the tube in the oven. I am glad you told me about turning the clay, because I still needed to sand the clay when it came out of the oven, as it was a bit bumpy, and a bit proud at the bushings. I also was glad you told me you used CA, so I just went ahead as if it were a normal pen.

My next try I will do as you have, just making sure the clay is thicker than the bushings, and then turn it like a normal pen. Thanks again for the tips.
 

sorcerertd

Member
Joined
Sep 30, 2019
Messages
2,726
Location
North Carolina, USA
I know a lot about working with poly clay in general. My wife started working with it several years ago, but hasn't done much. There's crap loads of clay and tools around here. One of these days...
 

sorcerertd

Member
Joined
Sep 30, 2019
Messages
2,726
Location
North Carolina, USA
I did not. In hindsight, I totally forgot, as I was totally focused on not screwing up putting the clay on the tube. Fortunately, the clay was opaque enough to not let the brass show through. I will likely paint the next tube just in case.
I would imagine it usually won't show through unless you get pretty thin or use a more translucent clay. Next up, metal clay?
 

jttheclockman

Member
Joined
Feb 22, 2005
Messages
19,158
Location
NJ, USA.
I ordered some clay from PSI. Do I have to store it in a particular way for not sure when I will get to using it. ??
 

jrista

Member
Joined
Aug 12, 2021
Messages
2,241
Location
Colorado
Very interesting! Hadn'tconsidered that you could use polymer clay for more abstract designs. I usually see floral designs, maybe something with masks, or animals. Usually quite good, for sure, but its nice to see something more abstract like this. Kind of looks a bit like shells in a sense, to me.
 

KenB259

Member
Joined
Dec 24, 2017
Messages
3,582
Location
Michigan
Well, before I wrote to you I decided to flatten the clay sheet to 0.030", which was the difference between the tube diameter and the bushing diameter. My plan was to place the sheet onto the tube and it would be flush with the bushings. I had no idea you could actually turn the clay. When I got your note back, I had already popped the tube in the oven. I am glad you told me about turning the clay, because I still needed to sand the clay when it came out of the oven, as it was a bit bumpy, and a bit proud at the bushings. I also was glad you told me you used CA, so I just went ahead as if it were a normal pen.

My next try I will do as you have, just making sure the clay is thicker than the bushings, and then turn it like a normal pen. Thanks again for the tips.
You're welcome. I have no idea if I'm doing it correctly, but it works for me. The pens I have made are approximately a month old. Still look good, no cracking. I have turned all of them sanded all and put on a CA finish.
 

KMCloonan

Member
Joined
Jun 13, 2017
Messages
1,502
Location
Round Lake, Illinois
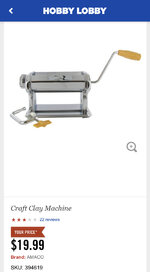
What does the pasta machine look like
Ken posted a photo of his. Here is a photo of the one they sell at Michaels. Mine is very similar.

Pasta Machine.jpg

One thing I am going to fix immediately is how unstable the pasta machine is. It's really top heavy, which is why most of them come with a clamp to allow you to clamp it to a table edge - You can see the clamp in Ken's photo. My Goodwill machine did not have a clamp. I plan instead to mount it to a larger board, so it is stable without a clamp.

Another flaw that I consider to be a design flaw is that the crank handle is too long, so that it hits the table top as you are cranking. You need to orient the machine at the edge of your table so that the handle can freely rotate without hitting the table. Placing the pasta machine on a board should raise the machine and take care of this issue as well.
 

jttheclockman

Member
Joined
Feb 22, 2005
Messages
19,158
Location
NJ, USA.
Thanks Ken and Kevin. I did see that one that Ken posted yesterday and probably will get that. Could be an interesting journey.
 

KMCloonan

Member
Joined
Jun 13, 2017
Messages
1,502
Location
Round Lake, Illinois
You're doing a completely different technique than I tried. Looks like many avenues to take this.
If anyone would like to see the source video where I saw this technique, go to this YouTube video, and advance it to the 3:09 minute mark:


Mine did not turn out quite as nice. Also, you can stop watching at about 8:48, as the person in the video goes on to make Jewelry with the clay she was working.
 
Top Bottom