My first acrylic pen

Signed-In Members Don't See This Ad

LOIBLB

Member
Joined
Jul 12, 2016
Messages
68
Location
kennedale, Texas
My first acrylic pen. The acrylic looked smooth till I put the second CA coat on. It now looks I missed a step. My wood pen came out better but not great.
How many coats is normal and what do I need to sand CA on the last coats?
Thanks
 

Attachments

  • 20161026_165356_resized.jpg
    20161026_165356_resized.jpg
    53.9 KB · Views: 223
  • 20161026_165329_resized.jpg
    20161026_165329_resized.jpg
    52.5 KB · Views: 195
Signed-In Members Don't See This Ad

mecompco

Member
Joined
Apr 24, 2015
Messages
1,607
Location
Fairfield, Maine
My first acrylic pen. The acrylic looked smooth till I put the second CA coat on. It now looks I missed a step. My wood pen came out better but not great.
How many coats is normal and what do I need to sand CA on the last coats?
Thanks

WHY! are you putting CA on an acrylic blank? That's one of the reasons I love acrylic blanks--go through the wet sanding w/MM pads, hit it with the buffer, and you've got a flawless finish without the mess and hassle of CA.

Regards,
Michael

PS Welcome! Oh, and I'd think about slimming those pens down a bit. Just MHO, but "pregnant" pens turn me right off.
 
Last edited:

tomas

Member
Joined
Jul 12, 2010
Messages
482
Location
Rio Rancho, NM
Ditto to what the others said. I keep my MM in a closeable plastic container of water. I don't use anything but MM on acrylic. On wood I use 16 coats of medium CA with accelerator spritzes between coats. Be sure not to spend more than a couple of seconds with the paper towel during each coat. If you start to feel friction, it's too long.

Good Luck,
Tomas
 

magpens

Member
Joined
Feb 2, 2011
Messages
15,911
Location
Canada
That usually happens with CA. . The first coat is usually fairly smooth but subsequent coats are not so smooth.

And, as others have already pointed out, you don't need CA on top of acrylic. . You *can* apply CA but it is not the usual thing to do unless you are trying to build up the thickness of the acrylic or fill cavities in the acrylic surface.

I have done several hundred pens with CA. . I have never been able to go directly to micromesh (MM) without first sanding.

After applying several coats of CA, I sand the blank lengthwise with the lathe motor off. . I sand first with 220 grit sandpaper, until there are no shiny spots on the surface of the CA, turning the blank by hand and frequently wiping off the dust with a rag. When there are no shiny spots, I move up to 320 grit (finer), then 400, 600, 800 1000 grit. . Depending on the particular pen, I may apply a few more coats of CA and repeat the process.

Between coats of CA, I spritz the blank with accelerator, as mentioned above.

When I am happy with the sanded result, I then use the micromesh (MM) sequence up to the maximum number (I think it is 12000 ... the grit sizes of MM are on a different scale than the sandpaper grit sizes), and then use a plastic polish (I use Novus 3 followed by Novus 2 ... some people use Hut Plastic Polish, others use Mequiar's PlastX).

Please don't get discouraged with CA. . It takes quite a bit of experience to get the process right. . Remember that you do need to sand it carefully with 220 grit until the shiny spots are gone, and then move up to a finer grit paper. . You have to spend a while getting rid of all the shiny spots, but then you can proceed through the progression of finer grit papers fairly quickly, doing 20-40 lengthwise strokes with each grade of paper as you rotate the lathe-mounted blank by hand. . Hopefully you don't sand through the CA down to the base material (wood, or, if you insist, acrylic). . If that happens stop sanding, clean off all the white dust, and then apply more CA with the lathe spindle turning *very* slowly.
 
Last edited:

Skie_M

Member
Joined
Aug 7, 2015
Messages
2,737
Location
Lawton, Ok
These days I generally prep my blank before finishing by sanding up to 1000 grit dry. I do the finer grits at the lowest speed my lathe can spin at, but when sanding an acrylic or stone blank, I do start using water earlier, at around 400 grit and up, but I still go to 1000 grit.

At that point, I thoroughly clean my blank with 90% isopropyl alcohol or acetone, and then apply my CA finish, if it's required for my item. I've found that acrylic doesn't need it, unless it has pits or voids that need filling. Some types of stone don't like CA and can just be polished up and left bare. Some people prefer their antler left bare as well... But generally with wood, I apply Minwax Stain and Seal (natural wood color ... it's a light amber), followed by the first of several coats of CA.

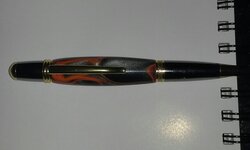
Depending on the item, I generally put between 6 and 15 coats of CA on the item .... small items like a small turned box for my own desk got the 6 coats ... items that will see keys and a pocket, like a keychain, get 15 ... my pens usually get 9 - 12. I DO NOT USE ANY ACCELERATOR. I just wait the 15 - 20 seconds it takes each coat to dry ... usually by applying a coat and sitting down at my nearby computer to watch more anime or whatever TV show I'm watching (currently, SHIELD season 4)... then get up to apply another coat. I generally also end up letting it cure overnight before I take it off the lathe and put the pen together, but before that point, I do my finish sanding and polishing on the lathe.

I'll start with 1000 grit and wet sand all the way through to 12,000 grit micro-mesh. I get my micromesh pads from Hobby Lobby, they typically last me 20 - 30 pens per set.


Once I feel that my blank is as good as it's going to get with sanding, I dry the blank off and then hit it with 1 or 2 doses of Meguair's Plast-X, which is an automotive polishing compound, with the lathe spinning at MAX SPEED. I hear that the grit in this stuff is made to break down into finer and finer stuff as it works, going from about 10,000 grit up to over 30,000 grit. I clean all the Plast-X off with a dry part of the paper towel I applied it with, and then grab a fresh one for the Turtle Wax Hard Surface application. I apply, again with the lathe spinning at MAX SPEED, and give it a nice clear glossy coat. I again make sure there is no excess left over anywhere near the blank, and then turn the lathe off to admire the gleaming gem staring back at me... even common woods are catching eyes, when they look this good!
 
Top Bottom