My BASH 2018 Kitless Pen Entry

Signed-In Members Don't See This Ad
See more from magpens

magpens

Member
Joined
Feb 2, 2011
Messages
15,913
Location
Canada
Although I have been remiss about posting photos of my work, I thoroughly enjoy this hobby and participating on this great website. . I have made some great friends who have shared all I have requested and more. . Without their kindness I would still be in the backwaters. . With their help I have been able to advance my skills to a point where I get great satisfaction out of making pens, pens, and more pens !

Some of you may have missed my entry in this year's BASH Kitless Contest. . Some of you may have recognized my work. . Some of you, maybe not. . Some of you may recognize your influence on this work even if you were unable to identify it as "my" work. . Thank you to ALL ! . Your contributions to my enjoyment of the hobby are GREATLY APPRECIATED !! . Thanks again and again !

Anyway, for what it is worth - a gratifying Third Prize as it turned out - here it is for the record.

***** A Novel Kitless Ballpoint Pen Design *****

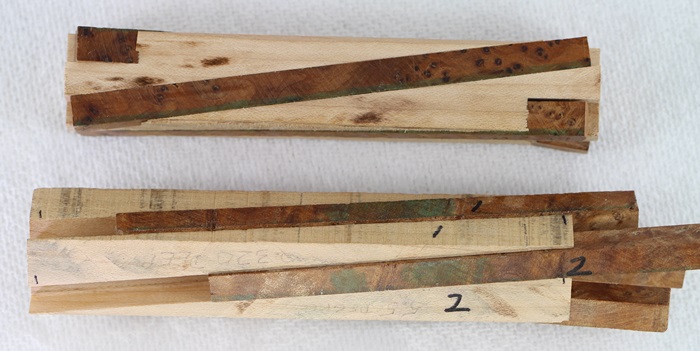
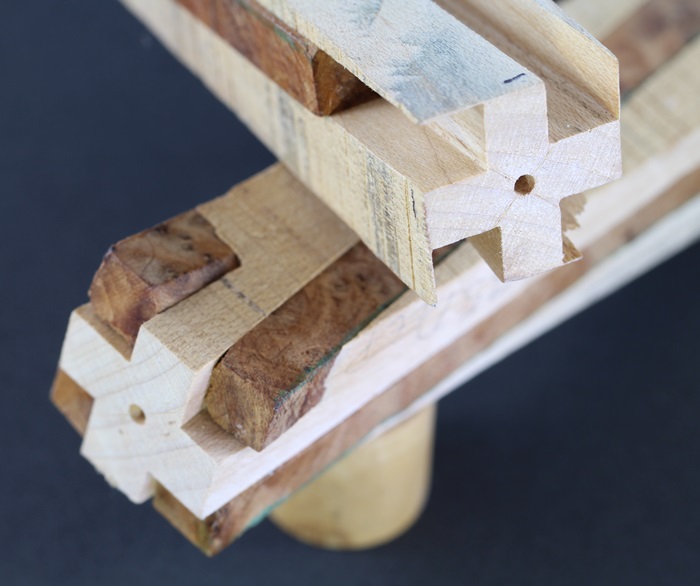
Nothing twisted about this one ... 5 straight bars of wood and 4 straight grooves, then glue and turning.
The center bar is hard maple and the others are Thuya Burl. All parts were made by me except the spring,
refill, and the internal click mechanism. All hardware is brass, shaped on my metal lathe and mill.
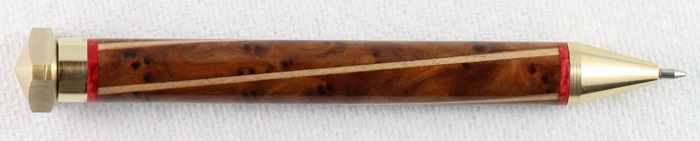
The pushbutton top is oversized and milled "square" so that it acts as a roll stop. No clip as this is
intended to be a desktop pen. The red ends on the barrel are dyed and stabilized maple burl. CA finish.

The large pushbutton is machined with conical top and bottom surfaces; squared edges appear "elliptical".

One picture shows the refill retracted; one picture extended; both pics show pushbutton in normal position.
The third picture shows the pushbutton held in the pushed down position; refill is extended beyond normal.
In the down position, the button lower cone fits in a concave depression machined in the pen's top finial.


Last edited:
Signed-In Members Don't See This Ad

magpens

Member
Joined
Feb 2, 2011
Messages
15,913
Location
Canada
Thanks, Cody, Peter, Earl, Mark, Dale, and Hank.

I intend to post, later today, a couple of further in-process pics, including what Dale asked for.
 

magpens

Member
Joined
Feb 2, 2011
Messages
15,913
Location
Canada
Pre-Turning Photos

These photos are of different blanks made during the design/experiment stage when I was "playing with" the angle between Thuya rod inserts and the axis of the main Maple blank, as well as optimizing the depth of the milled square grooves.

The final blank chosen for the Entry was close to the Bottom blank in pic1, which is the same as the Top blank in pic 2.

Milling of grooves was done on a Sieg Mini-Mill similar to what HF and Grizzly sell. The main Maple blank was securely clamped between two same-size blanks in a milling vise that could be rotated fairly accurately after clamping to the mill table. Lengthwise cranked moving of the mill table allowed the long cuts for those not familiar with mill operation. Mill cutter was 1/4" end mill . Hope you get the idea. . In my case, the relevant angle setting of the mill vise was 5.5* between the Maple blank center line and the direction of motion of the mill table.

It is of the utmost importance to start with a "perfectly" square Maple blank ( ~0.9" each side) because it needs to be unclamped, rotated, realigned, and reclamped before each of the four groove cuts. Also extremely important to have the Maple blank ends accurately squared, center-marked and center-drilled before the milling is done. Each milled groove was done in a single pass. After milling, the Maple "skeleton" is extremely fragile and the Thuya rods have to be carefully inserted and glued to get back to a strong blank for turning. . You have to calculate (which is not hard) the allowable depth of the milling so that the grooves do not break through to each other where they cross in the middle. . This can also be done by trial and error, but it will brush up your trigonometry and algebra to do the calculations and force yourself to believe them ! . In my case, the material clearance between grooves where they cross in the middle is about 0.030".

Some tweaking of the insert thicknesses may be necessary after milling the grooves and cutting the inserts on a mini table saw (Byrnes). For this purpose, I slide the inserts along a superior quality mill bastard file with milled cuts on it ($50 item). It is hard to adjust the grooves without distorting their inside surfaces and shape, so tweaking the inserts is the best way to get a good fit.

Suggestions, questions and comments kindly accepted. . I am quite sure that there are variations on this technique that would produce some interesting results. . Please feel free to offer YOUR ideas that MINE have sparked. I might be able to try them out fairly quickly and give you some feedback with counter suggestions and pictures.

How about doing this with some chevrons from Mark ? ... my next, major, project (I have hundreds of minor ones needed to be done first !! ... many of these relate to learning and experimenting with Mark's chevron techniques !!). . Another "easy" one is replacing the Thuya rods with stiped laminations of veneers of various colors and thickness.

Of course, you can play around with the shape and contours of the hardware pieces, also. What I have shown is pretty basic and straightforward. . It might be worth noting that the push-button shaft was machined from a larger diameter brass rod to get the sizing as large as I could to match the minimum diameter holes for inserting the click mechanism ... minimizing the "slop". . This shaft end is threaded to fit into a tapped hole in the "squarish", cone-surfaced actual pushbutton. Conical shaping of pushbutton was done after the tapping.

Has anyone tried to make a click mechanism from scratch ?

Pic 1


Pic 2

 
Last edited:
Joined
Aug 13, 2016
Messages
1,460
Location
Surprise, Arizona
Great looking pen Mal. I was trying to figure out how you made the blank for several minutes before scrolling down. Thanks for sharing your technique, although I went from thinking I *might* be able to do it to being absolutely certain I don't stand a chance!
 

magpens

Member
Joined
Feb 2, 2011
Messages
15,913
Location
Canada
Thanks, Bob and Jay.

Jay ... of course you can do it if you want to. A milling machine sure helped me get there but I think there are other techniques that would work. Maybe even a router properly set up, but I think that would pose more risks to life and limb.

I bought the metal lathe and mini mill about 10 years ago not know what I would do with them, but also knowing I wanted to do SOMETHING with them. I had learned to use a metal lathe many years earlier, loved using it, and wanted to do more. Finally, after a couple years I discovered a few Berea pen kits at my local Lee Valley store ... they have retail stores in Canada ... (but not in the US if I am correct, just online).
I don't need to tell you what happened after that. But the mill ? I didn't really have much of a use for it except the occasional sizing of towel rails and stuff like that. But now that I have developed this technique I will be using it a lot.
 
Joined
Aug 13, 2016
Messages
1,460
Location
Surprise, Arizona
I have a router but I agree, it seems a bit dangerous especially on something that small and intricate. I'll be happy to keep all my fingers and just ogle over yours for now.
 

Yankee Remedy

Member
Joined
Feb 20, 2018
Messages
42
Location
Winsted CT
Looks Tough to Do!

So that's the kitless you were talking about. It looks like fun, but that twist seems like it might be tough to do. I think I would like to try it, but probably not for awhile. I need to get proficient at the regular kit pens before I attempt something like that. Great Work Mal!

Gary
 

magpens

Member
Joined
Feb 2, 2011
Messages
15,913
Location
Canada
Thanks, Gary !

Conceiving the idea and getting all the details right was the time-consuming part and the key to it. . After that it was easy, IMO. . Of course, having appropriate tools helps and not everyone has access to a milling machine, although, as I said, I think there is more than one way to do it.

Now that I know how to do it I will be pursuing other ramifications and I don't expect them to take long to implement.
 
Top Bottom