My 1st & 3rd 360 Herringbone Pens

Signed-In Members Don't See This Ad
See more from LarryDNJR

LarryDNJR

Member
Joined
Feb 28, 2010
Messages
912
Location
Columbus, OH
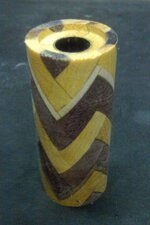
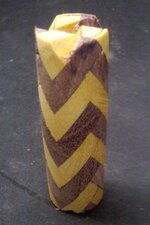
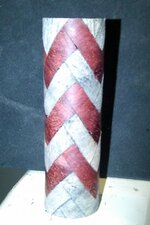
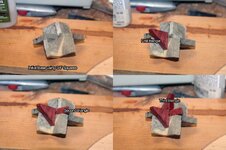
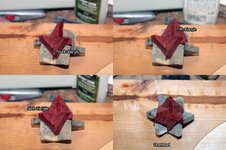
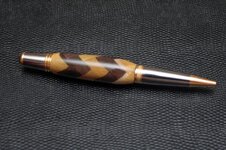
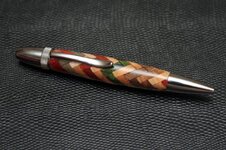
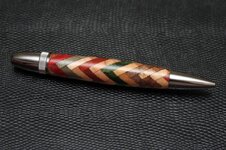
I finally started working on the 360 Herringbones last week. I've done 5 so far. These two posted are my 1st and 3rd attempts.

1st one has Purpleheart/Yellowheart/Walnut/Maple

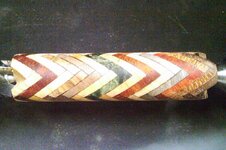
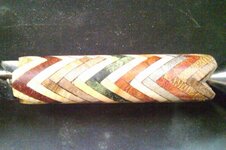
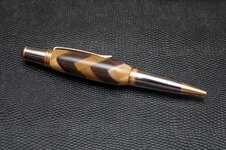
2nd one has I believe and I could be slightly wrong because going from memory.

Mahogany
Lacewood
Redheart
Buckeye Burl
Hollyberry
Dyed Orange Curly Maple
Cherry
Dyed Green Buckeye Burl
Birch
Walnut
Zebrawood
Hickory
Bloodwood
Ash

and not necessarily in that order. :)
 

Attachments

  • 360 Herringbone_Sierra_Black Titanium Gold Trim_01.jpg
    360 Herringbone_Sierra_Black Titanium Gold Trim_01.jpg
    87.3 KB · Views: 223
  • 360 Herringbone_Sierra_Black Titanium Gold Trim_02.jpg
    360 Herringbone_Sierra_Black Titanium Gold Trim_02.jpg
    79.8 KB · Views: 176
  • 360 Herringbone_Atlas_Black Titanium_01.jpg
    360 Herringbone_Atlas_Black Titanium_01.jpg
    77.5 KB · Views: 237
  • 360 Herringbone_Atlas_Black Titanium_02.jpg
    360 Herringbone_Atlas_Black Titanium_02.jpg
    75 KB · Views: 231
Last edited:
Signed-In Members Don't See This Ad

LarryDNJR

Member
Joined
Feb 28, 2010
Messages
912
Location
Columbus, OH
Wow... great job. i have started playing with the herringbone too. looks like you have worked out a good way of doing the glue up.

keep up the good work
Erik

Thanks!

I follow Darrin's tutorial for the 1st one. I found that if I use squares and do the initial base then use triangles with a 90 degree corner and glue each piece on separately it works for me.
 

cnccutter

Member
Joined
Feb 18, 2010
Messages
356
Location
Dorena, Oregon, 97434, USA
Larry i saw your glue up method in another post. its brilliant! i have been working on a jig to glue up each of the layers, but your idea is just to simple. another reason the K.I.S.S. idea is the right way.

Erik


Thanks!

I follow Darrin's tutorial for the 1st one. I found that if I use squares and do the initial base then use triangles with a 90 degree corner and glue each piece on separately it works for me.
 

LarryDNJR

Member
Joined
Feb 28, 2010
Messages
912
Location
Columbus, OH
Larry i saw your glue up method in another post. its brilliant! i have been working on a jig to glue up each of the layers, but your idea is just to simple. another reason the K.I.S.S. idea is the right way.

Erik


Thanks. I like it a-lot. As long as my pieces are cut true and same thickness. starting with a 3/4" square and cutting it into 2 triangles I maximize my work pieces and reduce the amount of waste and I think the glue up stays fairly simple with these pieces and doing it one at a time. I can keep it nice and straight for the most part.
 

LarryDNJR

Member
Joined
Feb 28, 2010
Messages
912
Location
Columbus, OH
Here are the 1st 4 360 Herringbones I've done.
 

Attachments

  • 360_HB_01.jpg
    360_HB_01.jpg
    27.3 KB · Views: 148
  • 360_HB_02.jpg
    360_HB_02.jpg
    28.2 KB · Views: 155
  • 360_HB_03_A.jpg
    360_HB_03_A.jpg
    70.1 KB · Views: 157
  • 360_HB_03_B.jpg
    360_HB_03_B.jpg
    69.4 KB · Views: 127
  • 360_HB_04.jpg
    360_HB_04.jpg
    30.3 KB · Views: 132

JeremyJ

Member
Joined
Dec 1, 2009
Messages
101
Location
Erie IL
Do you have any pics of your glue up, I'm having trouble seeing the base & triangle method. I see Erik mentioned it before.

Thanks
 

cschimmel

Member
Joined
Dec 29, 2009
Messages
359
Location
Gilbert Arizona
The pens look great, I have been working on 360's myself and I also use triangles. I would love to see the glue up jig if you can post it here or a link to it elsewhere. Thanks for sharing looks great.
 

ToddMR

Member
Joined
May 3, 2010
Messages
1,715
Location
Columbus, OH
I am not sure if Larry uses a jig. I think he just holds it in place. Correct me if I am wrong Larry. He has showed me his progress etc the last week or two when I have stopped over. The pens have looked really good imo. He always impresses me with stuff he gets done. My wife wants to start trying to make the blanks now, and then have me turn them I think. I do not know if I have the calmness to attempt it myself lol.
 

cnccutter

Member
Joined
Feb 18, 2010
Messages
356
Location
Dorena, Oregon, 97434, USA
Todd right. gluing a Herringbone together is a lesson in patience. the first one I did I had wood glued to each finger and one on my forehead. I have only done 6 so far, but each one gets a little better and the process easier. if you look at the blanks that come up around here you can tell how good the turner is by the lack of glue joints showing. Larry is well on his way to being a master.

if you try this never do it in a rush. plan to sit and relax an putter on it.

Erik
 

LarryDNJR

Member
Joined
Feb 28, 2010
Messages
912
Location
Columbus, OH
Do you have any pics of your glue up, I'm having trouble seeing the base & triangle method. I see Erik mentioned it before.

Thanks

I will work some pictures here in the next few days. There is a particular order I do the triangle glue ups in, heck even the squares for that matter.
 

LarryDNJR

Member
Joined
Feb 28, 2010
Messages
912
Location
Columbus, OH
The pens look great, I have been working on 360's myself and I also use triangles. I would love to see the glue up jig if you can post it here or a link to it elsewhere. Thanks for sharing looks great.

Dont really use a jig except maybe I might line them initial base pieces up against a t-square or flat piece of wood while on top of a small plastic cutting board. Then from there after the 1st base level is done I glue each piece in a certain order to make sure I have alignment correct.
 

LarryDNJR

Member
Joined
Feb 28, 2010
Messages
912
Location
Columbus, OH
Todd right. gluing a Herringbone together is a lesson in patience. the first one I did I had wood glued to each finger and one on my forehead. I have only done 6 so far, but each one gets a little better and the process easier. if you look at the blanks that come up around here you can tell how good the turner is by the lack of glue joints showing. Larry is well on his way to being a master.

if you try this never do it in a rush. plan to sit and relax an putter on it.

Erik


Thanks Erik! Master I wish. lol I agree each one gets easier. I keep learning as I go. The first few I did were blanks cut using my bandsaw before the blade broke and the pieces weren't that uniformed. I moved over to my miter saw with a little table setup in place to handle cutting. For the most part all the pieces are uniform, but occasionally I get some that get thrown by the blade and chewed up some, but then cutting into triangles anyways I usually can salvage the piece.


I'm going to try and get some photos done soon, maybe even a little video possibly.


Also I admit, I have glued my fingers together doing this, I've had wood pieces glued to my finger tips. I find doing this is easier without gloves and just let the glue buildup on your fingers, eventually it wont stick as bad or if it does it won't burn :)
 

LarryDNJR

Member
Joined
Feb 28, 2010
Messages
912
Location
Columbus, OH
Here are some photos that might help with the glue up I was discussing.
 

Attachments

  • LarryDNJR_360 HB_Initial Glueup_Group_01.jpg
    LarryDNJR_360 HB_Initial Glueup_Group_01.jpg
    60.8 KB · Views: 124
  • LarryDNJR_360 HB_Initial Glueup_Group_02.jpg
    LarryDNJR_360 HB_Initial Glueup_Group_02.jpg
    61.6 KB · Views: 119
Top Bottom