Musings about a Hexagonal Pen

Signed-In Members Don't See This Ad
See more from Valleyboy

Valleyboy

Member
Joined
Jul 2, 2019
Messages
341
Location
Wales
Hi all

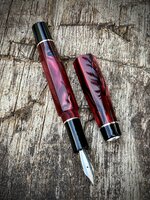
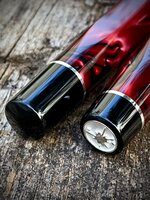
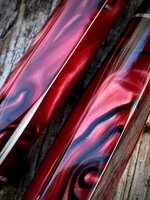
I've tried to make the most of my time in the workshop recently, after a period away. This is one of my Hex shaped pens that I made today.

In terms of my process the principle is the same as a normal pen however there are additional steps which add quite a bit of time.

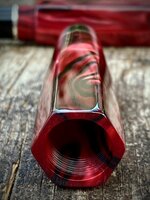
I've mentioned before that I achieve the facets using a vertical mill. I don't have a cnc or a power feed on the mill so it's a lot of winding the table back and forth. This takes forever as I take several passes to get down to the correct size. I have ways I can speed this up but it needs a bit of extra work up front.

I then remount on the lathe to create the tapered, cylindrical ends. It's quite important to retain concentricity which, in itself, adds a few minutes of dialling in to get it back on an accurate centre.

Then the facets are all individually sanded through several grits and then all individually buffed. So I reckon it takes about an additional 2 - 2.5 hours to make this model. I like the outcome but it does make it a little dearer than usual.

Pen details:
Acrylic and sterling silver.
13mm triple lead cap threads.
Barrel and cap are around 14 and 16 mm across flats. Pen is around 135mm closed.
Jowo no 6 nib fed by c/c.

Cheers
Ash
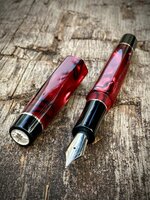
71694A2E-A7F7-4EE7-9F38-004FE8CB9306.jpeg785F432D-6E87-41E3-A478-02C67077DE34.jpeg308874D2-4C3D-4A24-84FB-3D399B28BBA3.jpegB7D390FC-4783-4D3B-BEC0-6894854EFBC4.jpeg8C5C51A7-08E6-4F21-829C-43B252C829AA.jpegD8178987-02DB-4CF4-A9E2-2B85FEA7803B.jpeg
 
Signed-In Members Don't See This Ad

magpens

Member
Joined
Feb 2, 2011
Messages
15,913
Location
Canada
BEAUTIFUL concept, workmanship and resulting pen ! ! !

Achieving alignment of the facets of the body and cap, when capped, must require some VERY careful construction techniques.
 

jttheclockman

Member
Joined
Feb 22, 2005
Messages
19,082
Location
NJ, USA.
This idea is on my long list of things I need to try. Have seen a few members here do pens like this including my old friend who I miss, Skiprat. He took one of my old time favorite pens I made and added his touch and it so happened to be facets. I need to replicate that in his honor.
 

mark james

IAP Collection, Curator
Joined
Sep 6, 2012
Messages
12,720
Location
Medina, Ohio
All elements are superb, Ash. Blank, form, transitions, finish, cabochon... As I have said previously, you are one who I regard as elite. I love seeing your artistry. Thank you for sharing. 👏 👏 👏
 

dogcatcher

Member
Joined
Jul 4, 2007
Messages
2,359
Location
TX, NM or on the road
Search YouTube for "circular saw cross cut jig"
Except make it to mount on your lathe so that the router bit cuts left to right or vice versa at spindle level.
Use an indexer to set the rotation of your blank.

John, your router set up might be able to do the same by cutting the sides of the blank using a wide flat bit.
 

dogcatcher

Member
Joined
Jul 4, 2007
Messages
2,359
Location
TX, NM or on the road
Look at this one.
The aluminum angle tracks will be the guide for the router. Years ago I made hexagon chisel handles using a set up like this. You can even put a taper on them by angling the jig
 

jttheclockman

Member
Joined
Feb 22, 2005
Messages
19,082
Location
NJ, USA.
Search YouTube for "circular saw cross cut jig"
Except make it to mount on your lathe so that the router bit cuts left to right or vice versa at spindle level.
Use an indexer to set the rotation of your blank.

John, your router set up might be able to do the same by cutting the sides of the blank using a wide flat bit.
That is exactly what I will try. With an indexing wheel it should work well. The work to me is in the polishing. Ash did it very well with his.
 

Valleyboy

Member
Joined
Jul 2, 2019
Messages
341
Location
Wales
A beautiful pen Ash.
When you mill the facets are you using the end of the cutter or the side?
Thanks Pete. I use the end but only because I've been a bit lazy and only added a DRO to the z axis so that's the most accurate. I have the DRO kit for x and y too but it's on the to do list.
 

duncsuss

Member
Joined
Jun 29, 2012
Messages
2,151
Location
Wilmington, MA
Thanks Pete. I use the end but only because I've been a bit lazy and only added a DRO to the z axis so that's the most accurate. I have the DRO kit for x and y too but it's on the to do list.
Hi Ash,

I use a laminate trim router in a sliding jig to make facets. I found using the end left more ridges (swirl marks) than when I set the jig higher and ran the side of the cutters across the top of the barrel. It greatly reduced the amount of sanding I had to do afterwards - huge bonus in my case, as I normally do 12 facets rather than 6 😂
 

Valleyboy

Member
Joined
Jul 2, 2019
Messages
341
Location
Wales
You will find that side milling may give you a better surface. No swirls to remove.
Thanks Pete. You're probably right but I don't find it too bad in terms of finish as I take a final
pass at 0.05mm and with the right speed and feed it's really very smooth with barely any marks at all. The time consuming bit with the sanding and buffing is more to do with doing it accurately so I don't round over the edges of the facets too much.
 

Abdulla

Member
Joined
Feb 13, 2022
Messages
5
Location
Bahrain
Hi all

I've tried to make the most of my time in the workshop recently, after a period away. This is one of my Hex shaped pens that I made today.

In terms of my process the principle is the same as a normal pen however there are additional steps which add quite a bit of time.

I've mentioned before that I achieve the facets using a vertical mill. I don't have a cnc or a power feed on the mill so it's a lot of winding the table back and forth. This takes forever as I take several passes to get down to the correct size. I have ways I can speed this up but it needs a bit of extra work up front.

I then remount on the lathe to create the tapered, cylindrical ends. It's quite important to retain concentricity which, in itself, adds a few minutes of dialling in to get it back on an accurate centre.

Then the facets are all individually sanded through several grits and then all individually buffed. So I reckon it takes about an additional 2 - 2.5 hours to make this model. I like the outcome but it does make it a little dearer than usual.

Pen details:
Acrylic and sterling silver.
13mm triple lead cap threads.
Barrel and cap are around 14 and 16 mm across flats. Pen is around 135mm closed.
Jowo no 6 nib fed by c/c.

Cheers
Ash
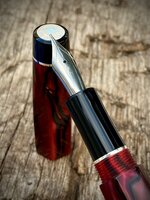
View attachment 343959View attachment 343960View attachment 343961View attachment 343962View attachment 343963View attachment 343964
It's amazing pen, i like it 👌
 
Top Bottom