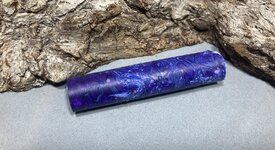
More Drill Worms!!

Signed-In Members Don't See This Ad

KMCloonan

Member
Joined
Jun 13, 2017
Messages
1,485
Location
Round Lake, Illinois
I spent some time this weekend sorting some of my drill worms (from my catch bin under my lathe) into similar colors.

003.JPG


I also found a bag of shredded paper that looked like it could serve the same purpose as the drill worms.
001.JPG


I measured some of the worms into tubes,
002.JPG


Then I mixed up a batch of resin, separated into 5 separate colors, add dye and some mica powder, packed the drill worms into the tubes, poured resin over them, used a large diameter dowel to pack down the worms into the resin, then into the pressure pot for 4 hours.

005.JPG


I'm excited at the results I have so far. We'll see what kind of pens these will make, but I have a good feeling about it.

Thanks for reading!
 
Signed-In Members Don't See This Ad

Todd in PA

Member
Joined
Feb 16, 2021
Messages
659
Location
Port Matilda, PA
Please post a photo when you've completed a pen. I'm excited to see how these turn out.

Another concept is to crush resin into gravel with a hammer and then recast in a contrasting color resin. I've got a fair number of casts that didn't turn out, so I've got some material to work with. 🤪
 

KMCloonan

Member
Joined
Jun 13, 2017
Messages
1,485
Location
Round Lake, Illinois
Well, to paraphrase Thomas Edison, "I have not failed - I just found a bunch of ways this won't work"....

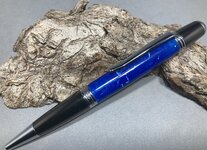
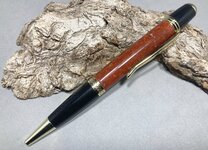
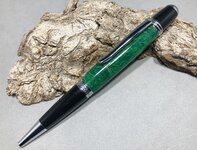
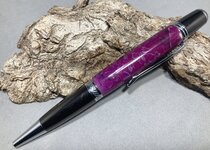
I turned each blank, and the pics/results are below. Spoiler Alert: It's not worth it. All of the blanks had some-to-many voids (likely trapped air bubbles), as well as some discolored spots, no doubt due to foreign matter caught up in the drill worms (I did dig these out of my waste bin after all...).

012.JPG
The purple-ish blank with the accordion paper strips blew up on the lathe twice. I think the paper strips weakened the blank, so as I got down almost to the bushings, twice, pieces of the blank flaked off. All of the other blanks turned ok, but I had to use a lot of medium CA to fill in the voids. The green blank was really the only one with some interesting "figure", but it too had blemishes. Bottom line, I won't likely be adding this to my stock of blank making methods.

004.JPG 006.JPG 014.JPG 015.JPG 013.JPG

If anyone would like these pens as a donation for troops or whomever, you are welcome to them. They are all perfectly good "Classica" Sierra style pens. Just let me know.

Thanks.
 

Todd in PA

Member
Joined
Feb 16, 2021
Messages
659
Location
Port Matilda, PA
It feels to me like there's still something to this. Good effort Kevin!

I didn't let my worms fall in the bin to keep them clean and color separated. I also loosely laid them in a tray to pour the resin over so the air didn't get trapped creating voids. I'd say that I'll continue making them, but I'm constantly onto the next thing and it might be a while before I circle back and pour more. I'll see if any sell over Mother's Day weekend.

I admit that mine aren't overly interesting, visually, because there isn't anything you can identify within the barrel like there is with a pine cone or segment pattern.

I've got a red, white and blue one that I have earmarked for a bolt action pen. Maybe I'll get it built and post a photo next weekend. 😎
 

derekdd

Member
Joined
Jan 29, 2023
Messages
1,080
Location
Wisconsin
Out of curiosity, did you put the blanks in a pressure pot?

I'm wondering if that would get rid of most of the voids.
 

derekdd

Member
Joined
Jan 29, 2023
Messages
1,080
Location
Wisconsin
Yes, I used a pressure pot at 40psi. I may not have pressed the drill worms into the resin thorough enough to squeeze out some larger bubbles.
Hmm, I was hoping that would solve the void problem as it is such a cool idea and they really look good finished.

Too bad.
 

jrista

Member
Joined
Aug 12, 2021
Messages
2,241
Location
Colorado
Kevin, just curious...do you think somehow "washing" the worms might have helped? I wonder if any drilling dust and whatnot, may have limited proper adhesion of the resin to the worms. If it did, I suspect that would indeed increase the brittleness of the final blanks. Perhaps, if you ever tried again, finding some way to gently clean off the worms, before casting them, might help with strength.

I am also curious if there might be a better resin to use for something like this? I see acrylic blanks containing a variety of other materials all the time. I wonder if acrylic (not sure if this is easy to use DIY) or polyester, or something, might make a better "wormy" blank?
 

KMCloonan

Member
Joined
Jun 13, 2017
Messages
1,485
Location
Round Lake, Illinois
I do like the green one. Nice experiment. I believe at the MPG they are taking donations for turning for troops, you could possibly send them to Ed or something
That's an excellent suggestion. I will not be able to attend MPG this year, but a couple of my friends are attending, I can give the pens to them to drop off at the donation table.

Thanks for the suggestion!
 

KMCloonan

Member
Joined
Jun 13, 2017
Messages
1,485
Location
Round Lake, Illinois
Kevin, just curious...do you think somehow "washing" the worms might have helped? I wonder if any drilling dust and whatnot, may have limited proper adhesion of the resin to the worms. If it did, I suspect that would indeed increase the brittleness of the final blanks. Perhaps, if you ever tried again, finding some way to gently clean off the worms, before casting them, might help with strength.

I am also curious if there might be a better resin to use for something like this? I see acrylic blanks containing a variety of other materials all the time. I wonder if acrylic (not sure if this is easy to use DIY) or polyester, or something, might make a better "wormy" blank?
I do think carefully washing the worms would help - there was a lot of random dust on them, as I literally picked them out of my waste bin under my lathe. There is sawdust, resin dust etc. in the bin.

I don't know, maybe someday I'll give this another go.
 

jrista

Member
Joined
Aug 12, 2021
Messages
2,241
Location
Colorado
I do think carefully washing the worms would help - there was a lot of random dust on them, as I literally picked them out of my waste bin under my lathe. There is sawdust, resin dust etc. in the bin.

I don't know, maybe someday I'll give this another go.
I may give this a try myself. I actually really like the look, colors, of the original worms. Before they were cast in colored resin. I wonder...if maybe some kind of...slightly "smokey" largely transparent resin (maybe with a bit of cloudiness to it...so there are some areas more clear others more smokey), might to the trick in showing off those original colors in an interesting way. You would of course, need to carefully pick a hole paint color, but.... I really do like the original colors and look of the worms themselves...

Next time I drill some resin blanks like that, I think I'll play around with this idea. Wondering though.........what would the best thing be, to clean them off? Water? Or some kind of solvent, but something that won't affect the resin itself. DNA? Something else, maybe even lacquer thinner?
 

KMCloonan

Member
Joined
Jun 13, 2017
Messages
1,485
Location
Round Lake, Illinois
I may give this a try myself. I actually really like the look, colors, of the original worms. Before they were cast in colored resin. I wonder...if maybe some kind of...slightly "smokey" largely transparent resin (maybe with a bit of cloudiness to it...so there are some areas more clear others more smokey), might to the trick in showing off those original colors in an interesting way. You would of course, need to carefully pick a hole paint color, but.... I really do like the original colors and look of the worms themselves...

Next time I drill some resin blanks like that, I think I'll play around with this idea. Wondering though.........what would the best thing be, to clean them off? Water? Or some kind of solvent, but something that won't affect the resin itself. DNA? Something else, maybe even lacquer thinner?
Maybe start simple, and wash the worms in warm water, then dry them for a couple days or in a desiccant. Remember, Alumilite does not tolerate any moisture.
 
Top Bottom