
monophoto
Member
When I first got into turning, I made several hand mirrors using 3" diameter beveled glass mirrors. The idea was fine, but I wanted something that was smaller and lighter in weight (more transportable. Several months ago I found some 2" diameter mirrors at AC Moore and decided to try for a different design.
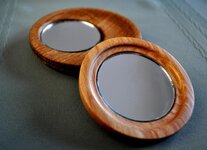
The picture illustrates two versions of the mirror - concentric, and eccentric. The eccentric version is larger and heavier, but it also shows off the wood better. You pays your money and takes your choice.
The process is simple:
1 Mount a blank on a faceplate using double-stick tape, and it turn round. also, cut a tenon on the outboard face (which will become the bottom of the finished mirror).
2. Remount the blank on a chuck using the tenon, true the face, and turn the front edge. If the mirror does not have a beveled edge, make sure that the edge is slightly proud of the eventual plane of the mirror face. This is necessary because if the edge of the glass is not beveled, it is sharp and fragile and you need to protect it contact with fingers or objects that could cause small chips or cracks.
For the concentric design:
3. cut an opening that is very slightly larger than the diameter of the mirror (measure it, don't simply believe what the seller advertised the diameter to be) - the mirror recess must be large enough to allow for wood movement. Make the recess deep enough to completely contain the mirror to protect those edges, and make sure that the bottom of the recess is flat so that the mirror doesn't rock when it is inserted. Sand and finish the face using your preferred finish. The mirror will adhere better if you put some painter's tape in the recess (trim around the opening) to prevent the finish from sealing the surface of the wood where the mirror will eventually be installed.
4. using double-stick tape, mount the mirror on a waste block that has been turned to fit into the mirror recess, and turn away the tenon on the back. Bevel the edge on the back - even better, make the back slightly crowned so that it rocks rather that lies flat when placed on a table. That make is possible to pick up the finished mirror with fat fingers when it is lying on a table. Sand and finish the back to match the front.
5. Cover the back of the mirror with double stick tape, trim the edges, and insert it into the recess on the face. Or you can use silicone adhesive.
For the eccentric version, start with a slightly larger blank and follow steps 1 and 2.
3. rather than cut a concentric recess for the mirror, remount the blank on a faceplate using double-stick tape, and with the tail-stock pin holding the blank about 3/8-1/2" off the actual center of the blank. Check the wood carefully before deciding the direction of that offset. Cut most of the recess with the tailstock in place, and then back the tailstock away to remove the nub in the center of the recess.
4. remounting the blank to finish the blank requires ingenuity. One approach is to use a waste block that is turned to fit into the offset recess on the front, and then turn the blank on that eccentric axis to remove the tenon and finish the back. If this approach is combined with a crowned back, the results can be very attractive. Another approach is to mount the blank in Cole jaws (put some paper towel between the jaws and the finished front of the mirror).
5. install the mirror using double-stick tape or silicone adhesive.
In the picture, the concentric version is made from red birch, while the eccentric version is made from quarter-sawn white oak. h are finished with a shop-made lacquer-based friction polish. I also applied a couple of coats of pure Tung oil on the oak to enhance the grain.
Attachments
Last edited: