Micarta Rainbow Pen

Signed-In Members Don't See This Ad
See more from kludge77

kludge77

Member
Joined
Mar 9, 2009
Messages
644
Location
Santa Rosa Ca
I haven't turned a pen in over 4 years. I really enjoyed getting back into it.

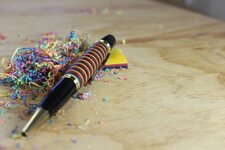
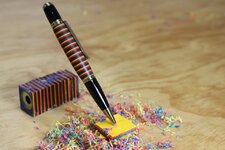
This is a Gatsby kit with a micarta bank (250 sheets of paper and resin)

No finish, just polished with micro mesh up to 12000.

The video is also on YouTube: https://youtu.be/bbnctkW-xLk
 

Attachments

  • completed02.jpg
    completed02.jpg
    155.5 KB · Views: 452
  • Completed01.jpg
    Completed01.jpg
    164.9 KB · Views: 506
Signed-In Members Don't See This Ad

Skie_M

Member
Joined
Aug 7, 2015
Messages
2,737
Location
Lawton, Ok
Micarta is an epoxy resin - typically a slow curing type, you'll see why soon ... with a filler material - typically paper or cloth. I've seen denim micarta, and that stuff looks pretty good too.

They take the epoxy and a prepared container for the construct with a weight of some sort that fits into the same container ... they soak each layer in the epoxy and let it lay down on the bottom one at a time ... and then they put the weight on top (usually clamping it in place for even pressure) until the epoxy has cured ... at least overnight in most cases that I've seen.

As it is most easily made in flat sheets, micarta has been around for knife making as knife scales for quite a while now. One of the best I have seen was where someone alternated 10 sheets each of colored construction paper back and forth ... the patterning on their knife looked like it was some type of wood.
 

Skie_M

Member
Joined
Aug 7, 2015
Messages
2,737
Location
Lawton, Ok
The pen looks great, but I'm more impressed by the anti-gravity pen stand you have...!

At a glance ...


Take blocks of random material or leftover cutoffs, ect .... drill through them at a high angle and embed a thin brass or steel wire small enough to enter the pen tip ... make it at least 2 or 3 inches long, sticking out of the material, to give the pen plenty of support.

Remove the pen's ink refill and put it on the stand .... voila!
 

jttheclockman

Member
Joined
Feb 22, 2005
Messages
19,132
Location
NJ, USA.
The pen looks great, but I'm more impressed by the anti-gravity pen stand you have...!

At a glance ...


Take blocks of random material or leftover cutoffs, ect .... drill through them at a high angle and embed a thin brass or steel wire small enough to enter the pen tip ... make it at least 2 or 3 inches long, sticking out of the material, to give the pen plenty of support.

Remove the pen's ink refill and put it on the stand .... voila!


Little more than that going on there. Why did the small piece of wood not fall over. The weight of the pen would pull it right over.:)
 

Skie_M

Member
Joined
Aug 7, 2015
Messages
2,737
Location
Lawton, Ok
Look more closely ... there are actually 3 cutoff blocks there, 2 of which are hiding under the shavings ... :)

Not to mention that the use of a weight underneath would help to counterbalance as well... I should have mentioned that before, though. :)
 

jttheclockman

Member
Joined
Feb 22, 2005
Messages
19,132
Location
NJ, USA.
Look more closely ... there are actually 3 cutoff blocks there, 2 of which are hiding under the shavings ... :)

Not to mention that the use of a weight underneath would help to counterbalance as well... I should have mentioned that before, though. :)

That is an old trick I understand how it is done. I used it here when I made this many years ago.


There used to be a member here Rudy Vey and use to display alot of his pens using that trick.


http://www.penturners.org/photos/images/58/large/1_IMG_0307.JPG
 

kludge77

Member
Joined
Mar 9, 2009
Messages
644
Location
Santa Rosa Ca
Look more closely ... there are actually 3 cutoff blocks there, 2 of which are hiding under the shavings ... :)

Not to mention that the use of a weight underneath would help to counterbalance as well... I should have mentioned that before, though. :)

Just a 18gage brad nail driven half-way through the blocks. The blocks were then stuck to the bench with turners tape.

remove the ink refill and you're good! :)
 
Top Bottom