Method for achieving graceful and symmetric pen cap and body curve in kitless builds

Signed-In Members Don't See This Ad

FGarbrecht

Member
Joined
Aug 22, 2019
Messages
618
Location
NY
I struggle with translating my nicely curved drawings into reality on the lathe (I'm mostly using the metal lathe for kitless work). One method I have used is to mount the part in a collet chuck and set the cross slide / compound angle at a series of progressively larger angles (2 degrees, 5 degrees, 10 degrees, and finally 20 degrees) to make the end taper on body and cap, and then sand to final shape. This works well overall, but the necessity to back off the cross slide completely for each angle change (to get at the hex bolts) makes my arm really tired and cramp up. I know I can do this freehand except I don't have an appropriate tool rest for the metal lathe, and when I try to free hand it on the wood lathe, it's just not ever 'perfect'; always some little asymmetry or variance between cap and body that ends up looking stupid. How do others do this?
 
Signed-In Members Don't See This Ad

More4dan

Member
Joined
Mar 17, 2016
Messages
2,102
Location
Katy, TX
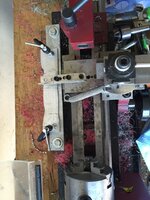
Two methods I use, turn the curves by had using a rest on my metal lathe. And I made a pattern trace modification to my mini lathe that will generate a curved profile in whatever is being turned.

Here are some I did using the pattern tracer.
29670228-4CDA-47AC-9D51-42B0A2AF477F.jpeg


To use the tracer I disconnect the cross slide from the screw by removing the two hold down screws for the threaded block. I set the compound at 90 degrees to the work and use it to advance the depth of cut. I use a spring to pull the cross slide toward the pattern. There is a pin that extends down from angle Bar that is attached to the cross that follows along a pattern to move the cross in and out.

When I turn by hand I turn using a live center in the tailstock. When finished turning I mount in the collet chuck and turn the very end of the cap and body. Sometimes I use a carbide router bit mounted in a boring bar holder to round the ends.

Let me know if you want more info on the pattern tracer mod. Took an afternoon.

Danny
 

Attachments

  • 718942AD-EC39-499C-8AF4-89EDA57734A5.jpeg
    718942AD-EC39-499C-8AF4-89EDA57734A5.jpeg
    122.5 KB · Views: 203

Penultimate

Member
Joined
Aug 22, 2010
Messages
1,099
Location
Bartlett, IL 60103
Frederick
I feel your pain. My father could control the saddle or the cross slide and the compound together to make graceful curves. It was amazing to watch.
I either do what you do or machine tiny steps that approximates the final taper/shape. I then finish with files and sandpaper. It is tedious but it works well. I created a spreadsheet to calculate the steps and offsets.
Good luck.
 

magpens

Member
Joined
Feb 2, 2011
Messages
15,912
Location
Canada
@FGarbrecht

I use the same method as you, Fred, but in fewer "steps", so the profile is initially a rougher approximation to the target.

All my lathe cutting is done with the blank held between centers.

I first calculate (using a bit of easy trigonometry) the angle to get me from the "end hardware diameter" to the "target center diameter" (which may not be at the geometrical center of the blank's length -- depends on the profile I am trying to achieve). . I never actually use this angular setting; it is just a rough starting point . I start my lathe cuts by using about twice this angle for my first cross-slide/compound angle setting and gradually work my way to this "profile" at the first end of the blank being careful to not go below the "end hardware diameter" right at the end (getting to this may take several passes with the cutting tool). . I repeat the cuts (with the blank reversed) at the other end of the blank. . I then reduce the first angle by half and make another two "profile adjustments" but this time I center my cuts on the "high point" of the previous cut. . These are the only two "profile adjustments" that I do with the lathe cutting tool. . The rest of the curve profiling is done by sanding (a little initial rough filing if necessary). . I have found that the actual angular settings for the compound are not critical; I do the calcs to improve my confidence in what I am doing.

In setting the two angles for the cross-slide/compound angle (after loosening the two hold-down hex-cap screws), I use a digital protractor (...www.generaltools.com ... Model 1702). . ... because I do not trust the angle settings pre-marked on the lathe cross-feed. . Using this digital protractor is the only part of my method that differs from the essentials of your method as I understand it.

I agree that doing the angular settings is a bit of a pain, but I only do it twice per blank, so it is not too bad. . The digital protractor is a help, especially with accuracy and reproducibility of the small angle settings that are involved (I feel).

If you want any further details ... in particular related to the trigonometric calcs, just let me know.

I have never done any concave profiling, only convex.

EDIT: I must say that I admire Danny's patience to make a "pattern tracer jig" for each profile that he wants, and working out how to mount and clamp all the pieces that are involved. . I will now work my way through his description of his method which I'm quite sure is superior to mine.
 
Last edited:

bmachin

Member
Joined
Jul 28, 2013
Messages
613
Location
Owensboro, KY
What Penultimate said. At least that's one way of doing things.

The other is to invest some time and some cheap blanks at your wood lathe until you can confidently turn a shape that you envision.

Bill
 

More4dan

Member
Joined
Mar 17, 2016
Messages
2,102
Location
Katy, TX
If interested in the tracer, here is the original post.


Sent from my iPad using Penturners.org mobile app
 

magpens

Member
Joined
Feb 2, 2011
Messages
15,912
Location
Canada
Just etch-a-sketch it with the cross slide and use a file to blend. Calculating measurements and angles is way overkill and completely unnecessary.

LOL ! .... I was expecting someone to say this in response to my post. . John, having it come from you is perfectly acceptable because I have the utmost confidence in your expertise. . However, I DO NOT have confidence in my own unless I can back it up with calcs, so I kinda have to do what I do. . After I do it enough times (already pushing that) I will probably be able to avoid the "overkill and completely unnecessary".

Sincerely though ... thanks for your post. :)
 

jalbert

Member
Joined
May 17, 2015
Messages
993
Location
Louisville, KY
LOL ! .... I was expecting someone to say this in response to my post. . John, having it come from you is perfectly acceptable because I have the utmost confidence in your expertise. . However, I DO NOT have confidence in my own unless I can back it up with calcs, so I kinda have to do what I do. . After I do it enough times (already pushing that) I will probably be able to avoid the "overkill and completely unnecessary".

Sincerely though ... thanks for your post. :)
Ha. That wasn't completely directed at you Mal. That is the way I have always done it, and always gets the job done for me!
 

Bryguy

Member
Joined
Jun 9, 2013
Messages
972
Location
New Hampshire
I've been using the etch a sketch method with varying results. I really like Dan's gizmo. Good to have an engineer on the list!
 

Pierre---

Member
Joined
Jun 10, 2012
Messages
415
Location
France
I shape them on the wood lathe. If I really want to be precise or reproductible (I seldom want it though), I can use a hardboard pattern. But it seems obvious to me that for making good turning, the best way is to learn turning. Turning other stuff than pens is fun and educational. For one year, every day I randomly picked up a shape in this book and turned it quickly without finish. Good school, it trains hands and eyes at low cost. A well-known French woodturning teacher says: "One egg every morning" (he does not mean to eat it). No problem with turning nice or regular or identical curves after six months doing this exercise. Just try one week and you will see a great improvement! šŸ„š
 
Last edited:

More4dan

Member
Joined
Mar 17, 2016
Messages
2,102
Location
Katy, TX
Very tempted to put together Danny's gizmo. The reproducibility is attractive to me.

I bet you could 3D print your patterns. I plan to add a small bearing to my "stylus" in the future to allow a smoother action with more complex shapes. Would also help with a plastic pattern.

What's nice with the attachment is you can use the power feed for the finishing passes. I had an order for 30 seam rippers and was able to knock them out in a fraction of the time.

Let me know if you have any questions.

Danny


Sent from my iPhone using Penturners.org mobile app
 
Top Bottom