BradG
Member
I thought i would post a basic walkthrough of an Americana twist pen made out of aluminium which i plan on finishing by Saturday. As i progress, i will add more pictures to this thread.
For tonight, i have made the bottom half of the pen , Il turn the top half tomorrow night and glue the brass tubes, and leave them overnight to give the glue a chance to settle. On saturday when i get home from work, i will finish the pen off

And so it begins... With a section of 25mm aluminium bar as that's what i had laying around. I add a good inch extra to the length than what i need, which gives me a good base to grip in the chuck. it also gives me a handy offcut to work with on other projects
Once i have turned it down to 10mm, i have run a knurling tool up and down the length advancing 0.1mm as i go, to a total depth of 0.5mm
Be sure to use a dead centre when knurling. you are applying alot of force to the side of the piece. I use a live centre (which revolves with the work) which you really shouldnt use for knurling... but aluminium is a soft metal and can be done. i certainly wouldnt be trying it with mild steel etc.
When using a dead centre, be sure to add a little lube to the center drilled hole... youl get alot of friction otherwise and melt the tip off.

I then drill the piece slowly, using plenty of cutting fluid with a 4mm bit all the way to the length of the brass tube, with a few mm extra to give me room to cut it with a clean hole later on. Take this step slow. the swarf from the metal will choke up, it will get extremely hot and your likely to jam the drill bit into the piece of work. To help avoid this, take little cuts and back out the drill bit to clear the swarf frequently. Generally, 5mm max at a time. naturally this applies more the deeper you go into the piece of metal.
WD40 is a popular choice as a cutting lube when working with Ali.. I find it a little too thin for this process and to be honest usually give it a good shot of 3 in 1 oil down the hole and coat the drill bit.
If the drill bit does get stuck, you may have an issue here as its unlikely you will be able to pull it out just using force alone. I remove the piece from the chuck with the drill bit still lodged obviously, and mount the drillbit in a collet in my mill. I position the vice so that its barely touching the static side, and turn the mill on to around 2200RPM. i then quickly close the vice jamming the piece of work thus stopping it spinning. and with more torque being available on my mill it frees the drill bit instantly and i am able to back out the bit.
Another tip would be to keep touching the part to see how hot is it. if it provokes the "argh" reaction.. let it cool down before continuing.
Once you have done this, swap to the actual diameter drill bit you need for the insertion of your brass tube. This americana requires an 8mm hole. I now find it alot easier to drill all the way through with an 8mm, as its only skimming off as it goes, and will give you very long sharp swarf. be careful.. its like razor wire and the last thing you want is it snagging on a moving part. Dont try and drill the piece out with just an 8mm bit... treat the 4mm as your pilot hole so to speak to take the strain out of your machine.

I decided to take an ST turning tool, and cut some 0.5mm deep grooves (The depth of the knurling) spaced 10mm apart, to add some decoration to the pen.

A parting off tool is used to seperate the part from the base in the chuck, and the edges are deburred.

And one finished bottom half of the pen, ready to have the brass tubes inserted. Pretty rough looking at the moment, but on the final phase it will be lightly sanded down.
-----------------------------------------------------------------------
Friday's work

And so begins the top piece.. again, a generous length is cut to give me a nice piece to grasp in the chuck

I have turned it down to 12.5mm, and the tip to 10mm diameter to a length of 5mm to accomodate the gold ring.

A quick test with the ring to make sure its a good fit. later it will be secured with a dab of CA

Time to Knurl...........

The first pass taking 0.1mm, and then the carriage feed reversed to take another 0.1mm, and back and forth to a total of 0.5mm of knurling.

Once knurled i have used an ST turning tool to cut a groove 0.5mm deep, spaced at 10mm intervals.

I decided that the last groove i cut would be nicer if it was wider, so i switched to a parting off tool, and cut 0.5mm deep with that, and then again 10mm along towards the top of the pen.

With the piece turned, The parting off tool is used to seperate the piece from the stock in the chuck.

And the final product.. well kinda

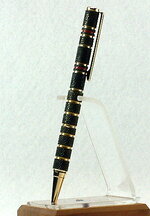
And all of the parts loosely assembled.
Note that no brass tubes have been glued in place at this point, so i can easily slot the pieces together to get a preview of how the pen will look.
I will glue the tubes in tonight, and tomorrow they will be spun on a mandrel and sanded a little to finish them off, before being pressed together. more on that however, then.
For tonight, i have made the bottom half of the pen
, Il turn the top half tomorrow night and glue the brass tubes, and leave them overnight to give the glue a chance to settle. On saturday when i get home from work, i will finish the pen off
And so it begins... With a section of 25mm aluminium bar as that's what i had laying around. I add a good inch extra to the length than what i need, which gives me a good base to grip in the chuck. it also gives me a handy offcut to work with on other projects
Once i have turned it down to 10mm, i have run a knurling tool up and down the length advancing 0.1mm as i go, to a total depth of 0.5mm
Be sure to use a dead centre when knurling. you are applying alot of force to the side of the piece. I use a live centre (which revolves with the work) which you really shouldnt use for knurling... but aluminium is a soft metal and can be done. i certainly wouldnt be trying it with mild steel etc.
When using a dead centre, be sure to add a little lube to the center drilled hole... youl get alot of friction otherwise and melt the tip off.
I then drill the piece slowly, using plenty of cutting fluid with a 4mm bit all the way to the length of the brass tube, with a few mm extra to give me room to cut it with a clean hole later on. Take this step slow. the swarf from the metal will choke up, it will get extremely hot and your likely to jam the drill bit into the piece of work. To help avoid this, take little cuts and back out the drill bit to clear the swarf frequently. Generally, 5mm max at a time. naturally this applies more the deeper you go into the piece of metal.
WD40 is a popular choice as a cutting lube when working with Ali.. I find it a little too thin for this process and to be honest usually give it a good shot of 3 in 1 oil down the hole and coat the drill bit.
If the drill bit does get stuck, you may have an issue here as its unlikely you will be able to pull it out just using force alone. I remove the piece from the chuck with the drill bit still lodged obviously, and mount the drillbit in a collet in my mill. I position the vice so that its barely touching the static side, and turn the mill on to around 2200RPM. i then quickly close the vice jamming the piece of work thus stopping it spinning. and with more torque being available on my mill it frees the drill bit instantly and i am able to back out the bit.
Another tip would be to keep touching the part to see how hot is it. if it provokes the "argh" reaction.. let it cool down before continuing.
Once you have done this, swap to the actual diameter drill bit you need for the insertion of your brass tube. This americana requires an 8mm hole. I now find it alot easier to drill all the way through with an 8mm, as its only skimming off as it goes, and will give you very long sharp swarf. be careful.. its like razor wire and the last thing you want is it snagging on a moving part. Dont try and drill the piece out with just an 8mm bit... treat the 4mm as your pilot hole so to speak to take the strain out of your machine.
I decided to take an ST turning tool, and cut some 0.5mm deep grooves (The depth of the knurling) spaced 10mm apart, to add some decoration to the pen.
A parting off tool is used to seperate the part from the base in the chuck, and the edges are deburred.
And one finished bottom half of the pen, ready to have the brass tubes inserted. Pretty rough looking at the moment, but on the final phase it will be lightly sanded down.
-----------------------------------------------------------------------
Friday's work
And so begins the top piece.. again, a generous length is cut to give me a nice piece to grasp in the chuck
I have turned it down to 12.5mm, and the tip to 10mm diameter to a length of 5mm to accomodate the gold ring.
A quick test with the ring to make sure its a good fit. later it will be secured with a dab of CA
Time to Knurl...........
The first pass taking 0.1mm, and then the carriage feed reversed to take another 0.1mm, and back and forth to a total of 0.5mm of knurling.
Once knurled i have used an ST turning tool to cut a groove 0.5mm deep, spaced at 10mm intervals.
I decided that the last groove i cut would be nicer if it was wider, so i switched to a parting off tool, and cut 0.5mm deep with that, and then again 10mm along towards the top of the pen.
With the piece turned, The parting off tool is used to seperate the piece from the stock in the chuck.
And the final product.. well kinda
And all of the parts loosely assembled.
Note that no brass tubes have been glued in place at this point, so i can easily slot the pieces together to get a preview of how the pen will look.
I will glue the tubes in tonight, and tomorrow they will be spun on a mandrel and sanded a little to finish them off, before being pressed together. more on that however, then.
Last edited: