Metal lathe bits continued

Signed-In Members Don't See This Ad

skiprat

Passed Away Mar 22, 2022
In Memoriam
Joined
Oct 19, 2006
Messages
7,812
Location
In a Skip in Wales
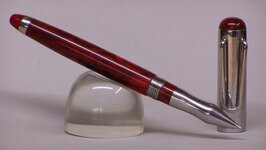
from http://www.penturners.org/forum/showthread.php?t=53114

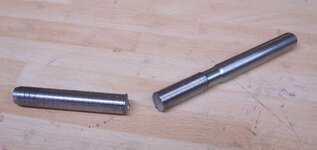
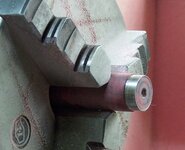
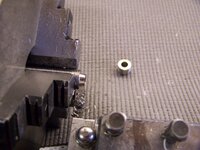
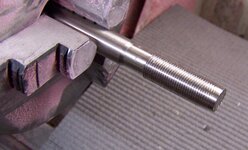
So we've got the threaded rod. A piece of it will be used to make a tap and the rest will be used for pen parts.
I haven't mastered the art of internal 3 start threading yet, so this is the way I do it for now.

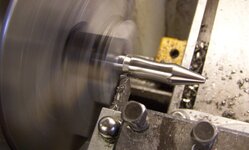
I do have a vertical slide and milling bits, but thought I'd try a new way to make the tap.
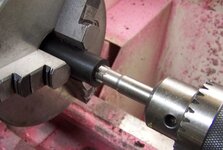
First, turn a taper on the front few thread. I actually increased the taper after this picture.
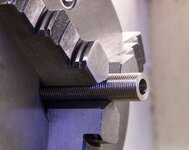
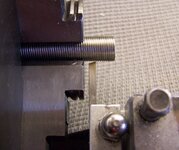
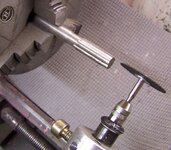
Using a Flexi Dremel type rotary tool, I simply ground six grooves that I indexed using the fixed gear on the headstock. The Dremel tool is held in the toolpost.
In an attempt to get a positive rake, I cut the grooves above the centre line of the tap.


.....more in a minute:wink: Please let me finish before any comments, just so all the pics stay together, thanks:biggrin:
 

Attachments

  • 1.jpg
    1.jpg
    45.4 KB · Views: 363
  • 2.jpg
    2.jpg
    67 KB · Views: 296
  • 3.jpg
    3.jpg
    79.9 KB · Views: 490
Last edited:
Signed-In Members Don't See This Ad

skiprat

Passed Away Mar 22, 2022
In Memoriam
Joined
Oct 19, 2006
Messages
7,812
Location
In a Skip in Wales
The first pic shows how I prep'd the cap with a stainless trim ring over the tru-stone. I just drilled this to suit the tap. Unfortunately the tru-stone is spread over my workshop floor as it didn't like the tap:frown:
I then used a Delrin rod and the tap worked like a charm. Like a hot knife through butter:biggrin:
This Delrin was then turned down as thin as I dared and then sleeved with a stainless blank.

I then cut a small piece of the thread to make the piece that goes on the pen.
I based the pen around a 7mm tube, so drilled the rod to suit ( 6.8mm is best )
You can see how I shaped the parting tool. I am pretty sure that this is NOT the way to bias the tool, but I find it gives me a nice clean surface on the small piece that will be used.


...more in a sec
I did the same to trim the nib that I made earlier.
Parting can be a nightmare especially on a small lathe. My method is to take short but firm stabs at it. But you need to just go for it. Of course, the parting tool must be very sharp and also square to the lathe bed.
 

Attachments

  • 5.jpg
    5.jpg
    77.3 KB · Views: 302
  • 6.jpg
    6.jpg
    69.1 KB · Views: 303
  • 7.jpg
    7.jpg
    72.8 KB · Views: 303
  • 8.jpg
    8.jpg
    65 KB · Views: 315
  • 9.jpg
    9.jpg
    78.9 KB · Views: 295
  • 10.jpg
    10.jpg
    55.9 KB · Views: 801

skiprat

Passed Away Mar 22, 2022
In Memoriam
Joined
Oct 19, 2006
Messages
7,812
Location
In a Skip in Wales
Stainless steel is heavy and I try as much as possible to thin it down.
The small threaded piece weighs 5 grams on it's own with just the 7mm ( 6.8mm ) hole so you can see how I reduced the weight to 3 grams with an extra part on it.

Finally, a finished pen from the parts. I'll add a pic looking inside the cap to this post in a few minutes so you can see how thin it is:biggrin:

This pen weighs a little less than an Elegant Beauty kit
 

Attachments

  • 11.jpg
    11.jpg
    72.8 KB · Views: 252
  • 12.jpg
    12.jpg
    86.1 KB · Views: 267
  • BloodyJasperSS1.jpg
    BloodyJasperSS1.jpg
    44.5 KB · Views: 384
  • 15.jpg
    15.jpg
    41.8 KB · Views: 295
Last edited:

philb

Member
Joined
Sep 1, 2007
Messages
1,561
Location
Midlands, United Kingdom.
Nice work again Steve!

Good tutorial, and will be very helpful for planning out some kitless projects!

Just wondering, how you attached the thread part above the nib, the nib and the red barrel together? Are they all glued to a 7mm tube? If so, im assuming the threaded part in 12.jpg is enlarged so that the red inside is then drilled to 6.8mm?

If they are all glued together how do you change the refill? Or is the nib threaded too?

Cheers PHIL
 

skiprat

Passed Away Mar 22, 2022
In Memoriam
Joined
Oct 19, 2006
Messages
7,812
Location
In a Skip in Wales
Phil, on this one they are all simply glued on a tube and the finial unscrews to replace the refill.
 

Attachments

  • 16.jpg
    16.jpg
    37 KB · Views: 318

bitshird

Member
Joined
Aug 27, 2007
Messages
10,236
Location
Adamsville, TN, USA.
Nice work Sir Rat. Does Her Majesty The Queen realize that you are not as yet Knighted , Not even a meager O.B.E. I mean come on even the Beatles got O.B.E. and you are showing at least as much talent as Ringo. Knighthood for Skiprat !!!!
 

Paul in OKC

Member
Joined
Jul 26, 2004
Messages
3,093
Location
Oklahoma City, OK, USA.
Puckers? :eek:

Nah..he's got a ton of room there. :biggrin:

Yeah, half a mile at least!! Nice info, and awesome work as always, Skippy. The cutoff tool is the way to do it for clean cuts. I have done the same, maybe a little less angle, but same principle.....................................some day I'll try something like this.
 

workinforwood

Member
Joined
Mar 1, 2007
Messages
8,173
Location
Eaton Rapids, Michigan, USA.
Oh crap..I don't know how I missed this, but it's shear genius Steve! I am especially grateful that you did not use a cross slide to mill the bolt into a tap. Your alternate solution is a more likely reality for many of us and shows ingenuity. Thank you so much for the post.
 

Ligget

Member
Joined
Jan 13, 2005
Messages
13,474
Location
Bonnybridge, Scotland.
Fantastic tutorial Steve, I for one am delighted that you take the time to do these as they are a great help to many penturners on this forum including me, keep up the good work my friend!
 

cnirenberg

Member
Joined
Jan 26, 2004
Messages
2,700
Location
Fort Myers, Fl
Steve,
Awesome showing. When making the tap could you mill the thread with a ball end bit or would that muck up the cutting capability? I guess the ball end would have to be able to cut SS....Just wondering.
 

leehljp

Member Liaison
Joined
Feb 6, 2005
Messages
9,331
Location
Tunica, Mississippi,
All of the superlatives that I can think of - are below that! I can only dream of accomplishing something like that. In retirement, that kind of nib end is what I hope to do for custom made one of a kind pens.

You are a patient man and and an artist!
 
Top Bottom