Marks on CA Finish, Anyone Seen This Before?

Signed-In Members Don't See This Ad

GeoWade

Member
Joined
May 25, 2014
Messages
17
Location
Waipahu, Hawaii
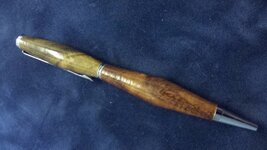
Hello all! I am a relative newbie, having made only about 20 pens, the last half dozen or so have had a CA finish. Take a look at a picture of one I just completed. I am starting to see these ridges on the finished pen. I don't think this is a sanding issue, but I'm not sure. My only guess is that I'm not smoothing the CA enough when I apply it. Has anyone seen this before, and if so, know what causes it?

Here's my process:

1. Sand with oxide sandpaper to 600 grit, both on the lathe and then length wise to remove circular sanding marks.
2. Apply Mylands Sanding Sealer.
3. Apply three coats of BLO / CA. (Dot of BLO on paper towel, then drop of medium CA, rub on blank while lathe is spinning. Wait for it to dry. Use accelerator on final coat.)
4. Sand with Micromesh wet.
5. Apply Meguiars scratch x remover.
6. Apply Mylands friction polish to finish.

Appreciate any guidance you might have on this one. The pen still looks good - I wouldn't hesitate it give it as a gift - but it does feel a little rough in the worst section, which I put towards the middle of the pen. I can only see the error if I look at the finish in the right light.

This is a koa wood / kou wood combo pen. I specialize in locally-obtained Hawaiian woods. Feel free to check out my Etsy store for more examples: https://www.etsy.com/shop/AlohaPens.

Thanks, Wade
 

Attachments

  • image.jpg
    image.jpg
    170.4 KB · Views: 883
Signed-In Members Don't See This Ad

GeoWade

Member
Joined
May 25, 2014
Messages
17
Location
Waipahu, Hawaii
Thanks!

Thanks to all of you for the speedy replies. I'll try putting on a little less and then sanding with aluminum oxide paper again before the MM.

And copy on the Mylands. Honestly, I don't think it's doing that much, but I will admit the pens have a different feel after the Mylands friction polish finish. Nothing I can quantify, but there is a difference, to me anyways.
 

plano_harry

Member
Joined
Jan 12, 2012
Messages
1,959
Location
Plano, TX 75093
After CA use 400 wet (I prefer Arbranet open mess) to level the CA ridges. The wet keeps from overheating the CA. don't over-do this step. After lathe off longitudinal sanding, you should not see any shiny low spots. If you do a little more lathe on and lathe off sanding should get rid of the remaining spots. You are then ready to repeat with 600 - again don't over-do, you are only trying to remove the 400 longitudinal scratches. Once you have a nice, ridge-less, satin finish, work through your micromesh, again I recommend wet to keep from burning the CA, but some don't like to use water on wood. I have never had a problem, especially if you use delrin bushing eliminator cones for the CA application step.
 

lorbay

Member
Joined
Jul 2, 2009
Messages
3,378
Location
BC. Canada
Hello all! I am a relative newbie, having made only about 20 pens, the last half dozen or so have had a CA finish. Take a look at a picture of one I just completed. I am starting to see these ridges on the finished pen. I don't think this is a sanding issue, but I'm not sure. My only guess is that I'm not smoothing the CA enough when I apply it. Has anyone seen this before, and if so, know what causes it?

Here's my process:

1. Sand with oxide sandpaper to 600 grit, both on the lathe and then length wise to remove circular sanding marks.
2. Apply Mylands Sanding Sealer.
3. Apply three coats of BLO / CA. (Dot of BLO on paper towel, then drop of medium CA, rub on blank while lathe is spinning. Wait for it to dry. Use accelerator on final coat.)
4. Sand with Micromesh wet.
5. Apply Meguiars scratch x remover.
6. Apply Mylands friction polish to finish.

Appreciate any guidance you might have on this one. The pen still looks good - I wouldn't hesitate it give it as a gift - but it does feel a little rough in the worst section, which I put towards the middle of the pen. I can only see the error if I look at the finish in the right light.

This is a koa wood / kou wood combo pen. I specialize in locally-obtained Hawaiian woods. Feel free to check out my Etsy store for more examples: https://www.etsy.com/shop/AlohaPens.

Thanks, Wade
Why sanding sealer ?? If you use thin CA it is a sealer.
Ditch the BLO and just use a paper towel that does not smoke when you put CA on it.
I only use thin CA and my final coat is like glass, before I start sanding.
Lin
 
Joined
Jan 16, 2014
Messages
29
Location
Calif.
marks on ca finish

Here is my method and I must say everyone has a method that works well for them. I stabilize all my wood then turn and sand to 400 grit I apply ca to what ever depth looks good to me then sand again with 400 grit until there no shinny spots that will take care of all your high spots then mm to 12000 dry AT ABOUT 800 RPM any faster could cause your ca to roll and cause uneven areas then I polish with novis # 3 then # 2 the finish will be very wet looking. Again the key is to sand to the point that there is no shiny spots with out removing all the ca before sanding with mm Good Luck
 

mightymavkev

Member
Joined
Feb 13, 2013
Messages
34
Location
Cincinnati, OH
When I first started, I to got those spiral ridges on occasion and I found that I was applying too much medium in a single coat and moving up and down the spinning blank too fast with my applicator.

I now apply 2 coats of thin at the slowest speed my lathe will go to seal the blank. I use blue shop paper towels as they don't accelerate the CA like white paper towels seem to.

Then I apply 5, 6, or 7 coats of medium CA. Again, lathe as slow as it will go (I have a delta midi lathe and I think it goes down to 250 rpm if I'm not mistaken).

I apply a puddle on the blue shop towel applicator that is about half the size of a dime. Then I apply firm pressure while I move up and down the blank twice for each coat (e.g. left bushing -> right bushing -> left bushing -> right bushing). With the blue shop towel applicator, you don't have to hurry with the application. Each swipe of the pen blank in either direction I take about 1 second.

I also remove the bushings when I apply the CA and make sure I swipe off the edge of the barrel in each direction (similar to how you always spray beyond the end of a piece when spray painting).

I check each coat to see if I developed any ridges and if I did, I knock them off with 400 abranet before adding any more coats. Any more I don't have to do this though.

It's a "feel" thing I guess and just like everything else, the more you do the better you get.

The biggest thing for me was the change to blue shop towels and slowing down the swipes of the CA in each pass.

Hope this helps.
 

Rick_G

Member
Joined
Nov 30, 2007
Messages
1,994
Location
Bothwell, Ontario, Canada.
What works for me, I sand the wood to 600 grit, then apply 2 coats of thin CA, mainly to soak in, seal and stabilize the surface of the wood. Then 6 - 8 coats of med. CA. Bounty paper towels seem to work best for me anyway. If I am in a hurry I hit the blank with a couple sprays of accelerator between coats of med. Ca. If I'm not in a hurry I just apply the CA and go watch TV till the next commercial then come back and put on another coat. After the last coat of CA I wet sand with 2000, 2500 and then 25000 grit automotive sandpaper. I then polish with a plastic polish. I do my wet sanding and polishing with the lathe running at > 2500 rpm.

I have also seen ridges like that show up after several months because not knowing any better I turned the pen with wood that was not dry enough and as it later dried I got the ridges along the grain lines.
 

Jim Burr

Banned
Joined
Feb 23, 2010
Messages
3,060
Location
Reno, Nv
Holy crap that's a lot of work! Although this has been answered 300 times under "search", why not start with W/D 600 and move to MM? Little Hut and have a nice pen day. Once your finish is on...it's on.
 

wouldentu2?

Member
Joined
Jan 27, 2011
Messages
897
Location
Oak Creek WI
When you sand with the 400, stop the lathe and wipe the blank with a rag and look at the blank. The sanded areas should have a frosted look, the areas not frosted will need more sanding.
 

MikeinSC

Member
Joined
Mar 10, 2014
Messages
495
Location
SC
I switched from paper towels to the blue shpp towels and have not had ridges like that since. I also noticed that the CA does not flash off as fast when using shop towels vs. paper towels.

Since changing, I can start sanding at a higher grit almost everytime because there is a smoother finish.
 

keymaster61

Member
Joined
Jun 27, 2014
Messages
13
Location
buckley
I was having the same problems with ca glue now all i use is chestnut sanding sealer leave for 1hour then look wire wool then chestnut friction polish you get a fantastic shine
 

yorkie

Member
Joined
Mar 2, 2009
Messages
1,116
Location
Charlotte, North Carolina
A couple of thoughts.

I find the CSUSA finish CA to be the best and smoothest

Sometimes the wood isn't completely dry and the heat from the finishing process/CA curing will further dry the wood and cause those ripples.
 

randyrls

Member
Joined
Feb 2, 2006
Messages
4,821
Location
Harrisburg, PA 17112
You may want to start out the sanding process with a piece of wood backing up the sandpaper. I use this to remove minor ripples in the barrel. Sandpaper by itself will not remove the ridges. Applying more CA will only cause it to accumulate on the ridges quicker.
 

bekeeper

Member
Joined
Jan 17, 2014
Messages
14
Ripples

Look up "Liquid Taylor rings on a cylinder" . These rings form when a liquid is on the surface of a spinning cylinder. It is a major problem on any coating operation that is spinning. The thinner or less viscous a material is, the more likely they will form. The more liquid on the surface, the more likely. The free or open to the air, the more likely they will form.
Spin a beach ball in the pool and watch the water creap up to the outside and fly off.

I find that a drop of boiled linseed oil on the blue paper towel before a drop of medium CA works best for me. I think it lets me keep the rag on the surface longer. The rag forms a hard sheen that knocks down the rings but does not stick.
Also, keeping the rag on and moving it back and forth quickly helps keep the ridges from forming. If the wood is wet, that may accelerate
I know that sometimes I do things and don't understand why they work so my imagination comes up with it's own reasons. Smile. I did this for a while with pens until i REALIZED i WAS DEALING WITH THE SAME ISSUES AT WORK. I just had to understand the connection. I am still learning.
 
Top Bottom