Making fancy tool (gouge) handles...!

Signed-In Members Don't See This Ad

robutacion

Member
Joined
Aug 6, 2009
Messages
6,514
Location
Australia - SA Adelaide Hills
ROTFL! Bob, I took your comment just the opposite of how you intended it. I thought you were implying that I would be jealous because you used better wood (well you did, but...). Not that it looked, er, uh, let's just say less professional. :wink:

And I agree with George on the courage thing. But I appreciate your willingness to laugh at yourself. I laugh at me all the time. Did tonight, in fact. I finished destroying a amsll spalted Maple platter that once was a bowl I began destroying about 6 years ago. :eek: Oh well, I have tons of the stuff!

Well, if you don't mind me showing a couple of mine that will show how far, someone can go to make a nice/functional/smart, etc, etc...!:eek::wink::biggrin: tool handle,...??? I can do that just for laughs being within the subject you started...!!!:rolleyes:

Cheers
George
 
Signed-In Members Don't See This Ad
Charles, it works just fine... better than the cutter so far. But then I've only used it on a piece of punky spalted Maple I was turning into a platter. My swept ground bowl gouge gave me better cuts on that stuff. But I probably just need to figure out the best way to use the tool.

Well, if you don't mind me showing a couple of mine that will show how far, someone can go to make a nice/functional/smart, etc, etc...!:eek::wink::biggrin: tool handle,...??? I can do that just for laughs being within the subject you started...!!!:rolleyes:

Cheers
George

No problem at all, George. Go for it.
 
Last edited:
Charles, it works just fine... better than the cutter so far. But then I've only used it on a piece of punky spalted Maple I was turning into a platter. My swept ground bowl gouge gave me better cuts on that stuff. But I probably just need to figure out the best way to use the tool.

Well, if you don't mind me showing a couple of mine that will show how far, someone can go to make a nice/functional/smart, etc, etc...!:eek::wink::biggrin: tool handle,...??? I can do that just for laughs being within the subject you started...!!!:rolleyes:

Cheers
George

No problem at all, George. Go for it.

Thanks mate, we are going to have some fun with this one but, I need to comeback a little later with it as at the moment I'm putting another "wood" (well, sort of...!) story together, for you guys, sorry...!

Cheers
George
 
Fancy tool handle -1

Ok guys and gals, let start this "fancy" handle issue, where I will take it step by step, showing and explaining as I/we go, as I need your participation to make it work so, answer the questions, provided your opinion, if you can, thank you...!

This was the first handle I make for my first Carbide tipped (inserts) gouge tool so years back and where I thought that I need to use some of principals I knew from my time as a gunsmith, long ago...!

OK so, I thought, I need a tool shaft for 2 insert sizes that I had in mind, 17 and 15mm square inserts so, what would you do here...???

Tells us how you would go about achieving this and what would you use for a "shaft"...!

Bare in mind that at the time, I was only doing big turnings, about 1 tonne of green wood in a week (on those weeks that I felt the urge to turn...!) bowls, vases, plates, platters, etc., etc.,...!

I will come back, for the next step so, your participation would be most appreciated...!

Cheers
George
 
Uh, George, is there a picture missing? But to asnwer your question (if I understand it correctly), I would drill a hole large enough for the 17mm and drill and tap a smaller hole (or two) perpendicular for a set screw so it would work to hold either the 17 or 15.
 
Fancy tool handle -2

No, there is no pic missing on that post, the pics would come from now, today I show the pics of the previous question and I will ask another question, hoping that other will participate with what they would do or thing the next step is, I will then show the pic of that step on the following post, is like the pics are a step behind the questions, so that we all can see what other come up with, before I show what I did.

Some people may ask, why am I talking about inserts and gouge shaft, if the thread is about handles...????

Well, any handle is made to accommodate the tool so, the handle "fabrication" depend solely to what the tool is and require...!

OK, back to this step...!

Your suggestion is quite valid, even tough quite vague would expect to have some observations on what material you would use to make the shaft from, round, square, stainless, what size, etc. etc.. Handles made for square shafts are slightly different in the whole area.

I was also expecting the possibility of some people prefer to make 2 tools/handles for the 2 carbide inserts I mentioned so, you went for a single shaft to accommodate the 2 carbide inserts sizes, and the handle made to accommodate that tools however, you didn't say what size and profile of the shaft steal, you would be using...!

Now remember that, the point of these posts of mine, is to show how far and how exaggerated things can go, when making a gouge handle. I remind also everyone that, I'm talking about a super turbo size and strength capabilities of this general tool (shaft and handle) as it would be used to cut through very large chunks of wood, woods with lots of knots and other hard to cut areas, and some woods with plenty of "silica" of of extreme density/hardness so, I'm not talking about a gouge to turn pens, there is a big difference...!

Well, I decided that, the shaft needed to be very strong so, I though that stainless or black steal wouldn't be suitable as I also needed to use SQUARE profile steal in the 15mm size. So, I got myself a full length (32cm) of HSS tool steal in 15mm square...!:eek::eek:

For those that don't know what HSS steal is, is the same stuff used to make drill bits and many other turning tools such as most gouges where, the end is sharpen and your tool is ready to cut/work. Now, shaping both ends of this square piece of HSS steal was not easy but not so bad, where the S#!T hit the fan was when I needed to drill and tap the whole for the insert screw, that has proven to be a very expensive operation for me, as I broke every drill I had to drill the hole and after I got the whole done (3mm) I destroyed every tap I had that was suitable for the screw size and type I needed to use however, I was determined to finish what I started so, I got it done in the end...!

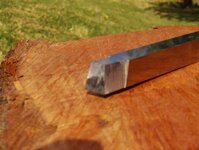
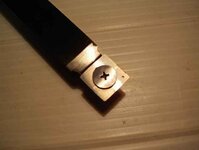
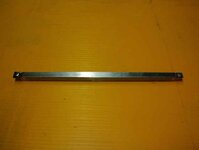
Here is the HSS shaft, on its beginnings, Timbers preparation 040_(1).jpg Timbers preparation 043_(1).jpg
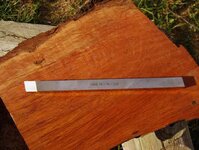
Here is the shaft being finished both ends, 15mm inserts done 005_(1).jpg 15mm inserts done 002_(1).jpg Franco offer cutters + steel bar 010_(1).jpg
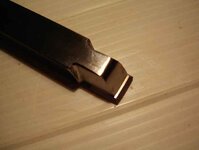
OK so, now we have the shaft with 2 insert sizes ready, the next thing is to make the wood handle and make the whole for the square shaft, the handle in this case, will require to have something done so that, some sort of "grab" screw can be added to secure the shaft into place so, what would you do to achieve this...???

Lets play, folks...!

Cheers
George
 
I made some segmented tool handles for myself. It would have been crazy to rely on the handle glue joints to withstand the pressures of turning large pieces of wood. I took a steel rod and drilled out the end to the diameter of my tool shaft. I epoxied the tool shaft into the steel rod and then epoxied the steel rod into the tool handle. The steel rod runs the length of the handle.

Thinking about that, and your situation, I think you could have taken square steel tubing (15mm - 16mm) and embedded it in your tool handle. It would be easy enough to build the handle around the tubing. The tool you made could be inserted in that tubing and secured with a set screw or two. The tool could be removed and swapped end for end as needed.

Don't know if that was your solution, but it's what I thought of.

Ed
 
I would drill a hole into the handle the same size as the diagonal measurement of the shaft. Then I would make a thick ferrule and tap a thread through this to hold the shaft in place.
_____________________
Bob.
 
Came on guys, any more suggestions...???

This should have been better probably all started on an separated thread but what the heck, I was told by the OP that is OK to do this here so, lets plays and see what come up of those ideas and processes to achieve a "funky" toll handle, you will be able to understand what I'm doing, when we get to the end of it.

I have no doubt that, in the process many ideas will be divulged and discussed, all have its merits but in the end, my contribution is to show how crazy and how technical one can go, making a toll handle with difference, you will see...!

Cheers
George
 
Its funny how things change your outlook, up until Billy made this lovely handle I was quite happy with my homemade jarrah job complete with a hose clamp for a ferrule. Now when I walk into my shed and see the "U-Beaut" handle that I was sort of shamed into making, I think, WOW! that looks really good, and I made it myself.
So Thanks Billy for the inspiration.
Cheers Bob.
 
I guess I missed the additional posts, George. Sorry, I was moving my sister-in-law all weekend. Anyway, I'm actually of the "make two handles" crowd. I'd rather reach down and grab a ready tool than take the time to switch out. But that's just me.

But let's play devil's advocate. How about going the quick change route? Fasten one of those quick disconnet female couplers for air hoses to the handle. Then braze a male coupler to each tool bar. Then you can just swap them out on the fly.
 
Fancy tool handle -3

Ok so, you would 2 handles and have 2 tools well, that is what I've done before and after this first carbide tipped tool, and I've made a few since so, I agree that is the easiest way to deal with the issue however, I decided that I would do it the hard way so, I needed a handle where I could used these double ended carbide tipped, shaft.

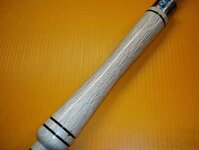
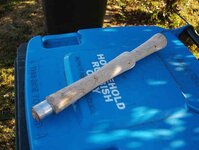
The main handle wood body, is made from one wood species that I don't have much of but when I got the branches, I cut it to about 1' 1/2 lengths and then rounded them on the lathe to 2" round, where I would be doing some wooden eggs, as this is what I used to do with small diameter branches before I got into pens. This wood is the rare(to me) #15 Bay tree (relative of the Bay leaf tree).

Square gouge handle 024_(1).jpg

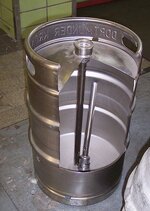
I then needed a big and strong ferrule where I could drill and tap for the grab screw(s) so, I remember that someone gave the the "guts" of an aluminium beer cage beer cage cut out.jpg so I cut one of the heavy duty ring part of the system, turn it slightly and glued it to the handle. Square gouge handle 001_(1).jpg Square gouge handle 003_(1).jpg

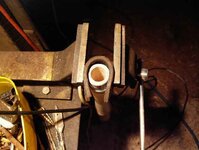
Now, with the ferrule in place, I need to drill a whole for the large diameter square bar HSS steal, that had to be deep enough to accommodate the other half of the shaft with the insert on it, so I measure and not having any accurate way to make a square whole, not that deep anyway, I had to come up with something...! Square gouge handle 004_(1).jpg

What would you do next...???,

You can't glue it, and it has to have a snuff fit for the grab screws to work and stop the tool wobbling while cutting...!

Let us know how you would deal with the issue, and why...!!!

Cheers
George
 
Last edited:
Hi peoples,

This thread I will talk about and show, how far one can go to make a toll handle with a difference. I've seen many other people making toll handles that are a work of art and functional at the same time, they can be made with lots of different types of materials so, lets have a look at what I've done with this one...!

I should also note that, this issue has started after this post from Billy (alamocdc), from what I got motivated to talk about the making of this particular handle and have a little fun in the process by requesting members to participate on it.

No long after I started, I felt that I done the wrong thing so, and with the permission of all those involved, I request to have the contents I put on that thread, transferred to this one on mine, where I will continued and concluded the subject in question.

For those following my information on that thread, I apologise for the jumping threads but, this will fix what I done wrong...!

Jeff (the boss) will be transferring the info soon...!

Thank you

Cheers
George
 
Hi George,
I have made hundreds of tool handles. Here's a few recent ones including a laminated walnut/maple. To preserve "strength" and avoid breakage on laminated hybrids, I cut a (+ shape) on one specie of wood and glue up another contrasting wood at 90 degree angles.

P1010029.JPG


P1010030.JPG
 
Back
Top Bottom