Texatdurango
Member
In another thread I mentioned doing a tutorial on making accent bands but as I set out to organize the tutorial I realized that it's not that big of a deal and my method can be explained with a few photos instead of a full blown tutorial. So, with that in mind here's the poor mans version of making accent bands.
First, a little background is in order. I started using sterling silver for lower body accent rings and cap bands. The accent rings are nothing more than sterling silver "washers" sandwiched in-between two parts of the pen body, not much else to add to that.
The cap bands are made from .625" sterling silver tubing with .020" wall thickness. I would use a collet and a home made contraption to hold and align the cap and ring while compressing the silver into a shallow groove I cut into the cap body. Needless to say, this was a very slow, tedious process with a high failure rate so I started looking for a different way of attaching the bands.
It is rare for many pen makers let alone pen company to share their secrets but I got a hint from one company and it was one word..... "Sleeves", so off I went.
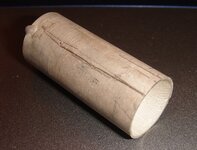
This photo show my earliest attempt at sleeving and the idea is simple, you make an inner (black) and outer (orange) sleeve and bond them together sandwiching the metal ring in-between. The trick is to make the inner sleeve wider than the threads you are going to cut into the cap. I quickly realized that I didn't need to make the entire cap sleeved, just a portion where the bands were going to be so this phase never left the mockup stage.

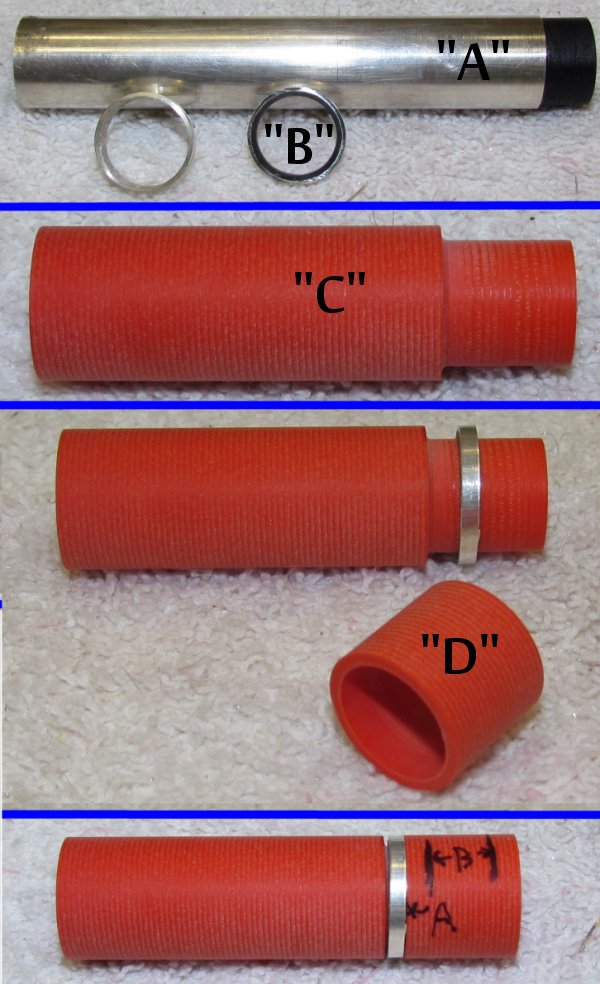
Now fast forward through several trials to my current method. It all starts with the silver tube ("A" in the photo), available at many jewelry supply houses. I use .625" diameter tube but with a wall thickness of only .020" I needed it to be thicker so I turned an alumilite rod to fit inside the silver tube and epoxied it in place. Then I drilled out the center and sliced the tube into thin slices ("B" in the photo) to become accent bands.
I cut the cap ("C" in the photo) to length and diameter then turn a tenon at the lower end for the bands to slide onto. Remember, this diameter must allow room inside the cap for the main body threads.
Notice the silver ring sliding over the tenon, make sure it's a snug fit so the ring has just enough room for a good glue bond and I do not recommend using CA for this else you will wind up with a lot of glue bonding before you're ready!
From an end cutoff, I turn the piece ("D" in the photo) the same outer diameter and inner diameter as the silver band. Looking at the photo you can see that by cutting the orange piece into thin bands you can create a spacer to go between two silver bands as well as an end piece. Once all the pieces have been cut, sanded and dry fitted, I use epoxy to glue everything together and clamp the assembly tight while curing. Set the assembly aside for 24 hours and don't get in a hurry to turn the cap smooth or you'll realize that turning silver generates heat quickly and heat makes uncured epoxy slip and things spin, not that I would know first hand of course! :biggrin:

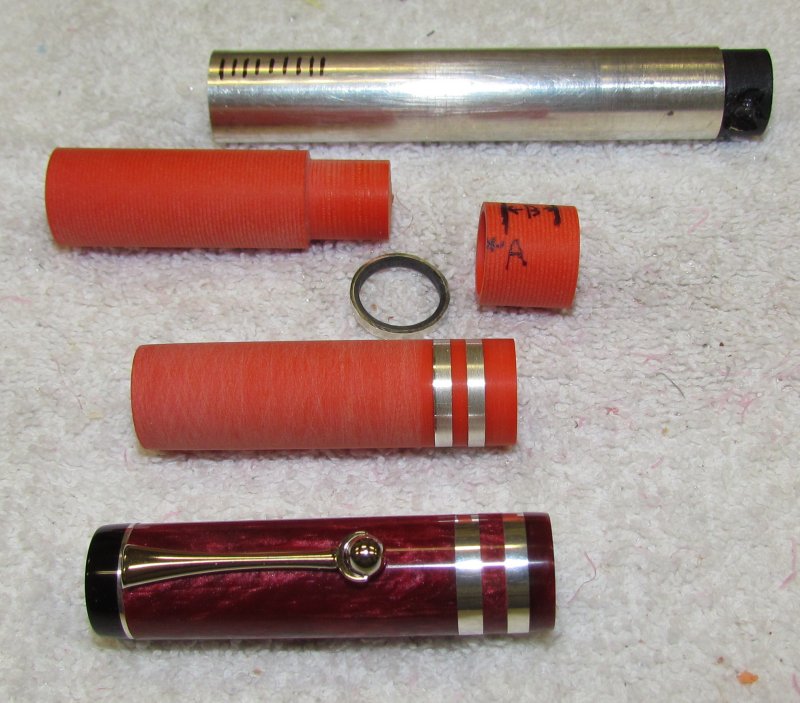
This photo shows all the pieces in order of how they all come together with a finished cap at the bottom. I use a cheap Harbor Freight mini-saw to cut the tubing and the body spacers are parted off on the lathe. On some pens I add a silver washer at the top between the finial and the cap because I think it adds a little to the look. Let your imagination be your guide, use one, two or more bands, and vary their widths if you like.

Well there you have it, this is the best way I have found to mount accent bands to my pens. When I get filthy rich I'll do the same with gold tubing!
First, a little background is in order. I started using sterling silver for lower body accent rings and cap bands. The accent rings are nothing more than sterling silver "washers" sandwiched in-between two parts of the pen body, not much else to add to that.
The cap bands are made from .625" sterling silver tubing with .020" wall thickness. I would use a collet and a home made contraption to hold and align the cap and ring while compressing the silver into a shallow groove I cut into the cap body. Needless to say, this was a very slow, tedious process with a high failure rate so I started looking for a different way of attaching the bands.
It is rare for many pen makers let alone pen company to share their secrets but I got a hint from one company and it was one word..... "Sleeves", so off I went.
This photo show my earliest attempt at sleeving and the idea is simple, you make an inner (black) and outer (orange) sleeve and bond them together sandwiching the metal ring in-between. The trick is to make the inner sleeve wider than the threads you are going to cut into the cap. I quickly realized that I didn't need to make the entire cap sleeved, just a portion where the bands were going to be so this phase never left the mockup stage.

Now fast forward through several trials to my current method. It all starts with the silver tube ("A" in the photo), available at many jewelry supply houses. I use .625" diameter tube but with a wall thickness of only .020" I needed it to be thicker so I turned an alumilite rod to fit inside the silver tube and epoxied it in place. Then I drilled out the center and sliced the tube into thin slices ("B" in the photo) to become accent bands.
I cut the cap ("C" in the photo) to length and diameter then turn a tenon at the lower end for the bands to slide onto. Remember, this diameter must allow room inside the cap for the main body threads.
Notice the silver ring sliding over the tenon, make sure it's a snug fit so the ring has just enough room for a good glue bond and I do not recommend using CA for this else you will wind up with a lot of glue bonding before you're ready!
From an end cutoff, I turn the piece ("D" in the photo) the same outer diameter and inner diameter as the silver band. Looking at the photo you can see that by cutting the orange piece into thin bands you can create a spacer to go between two silver bands as well as an end piece. Once all the pieces have been cut, sanded and dry fitted, I use epoxy to glue everything together and clamp the assembly tight while curing. Set the assembly aside for 24 hours and don't get in a hurry to turn the cap smooth or you'll realize that turning silver generates heat quickly and heat makes uncured epoxy slip and things spin, not that I would know first hand of course! :biggrin:

This photo shows all the pieces in order of how they all come together with a finished cap at the bottom. I use a cheap Harbor Freight mini-saw to cut the tubing and the body spacers are parted off on the lathe. On some pens I add a silver washer at the top between the finial and the cap because I think it adds a little to the look. Let your imagination be your guide, use one, two or more bands, and vary their widths if you like.

Well there you have it, this is the best way I have found to mount accent bands to my pens. When I get filthy rich I'll do the same with gold tubing!
Last edited:

