
There is a "tutorial" in the Resources section on how to do this. Here is the title :
Scalloped Segmented Pen Blank (Looks like Fish Scales.)
Has anyone made a blank using this as a guide? . How did it turn out ? . Do you have any comments about following this method ?
My comment is: there is lots of waste because for every scallop (or fish scale) that you make you throw away an equal length of wood.
Would appreciate any response you might have.
Thanks
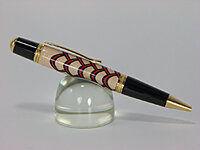

") I used that or it was a mixing stick, do not remember but I used it for a spacer. Cut up a few pieces from the same stick thinking it is all the same thickness. As I went from layer to layer I either added a piece or subtracted a piece, again memory is fuzzy. Have to go back and look at instructions. I did take notes and they are somewhere in my pen making stuff. But if you look closely one of the layers is not the same distance apart. I was going to correct that with the next one once I saw it after I took the photo. It is amazing what a photo sees that the eye does not.
I used that or it was a mixing stick, do not remember but I used it for a spacer. Cut up a few pieces from the same stick thinking it is all the same thickness. As I went from layer to layer I either added a piece or subtracted a piece, again memory is fuzzy. Have to go back and look at instructions. I did take notes and they are somewhere in my pen making stuff. But if you look closely one of the layers is not the same distance apart. I was going to correct that with the next one once I saw it after I took the photo. It is amazing what a photo sees that the eye does not.