Lathe alignment

Signed-In Members Don't See This Ad

Dale Allen

Member
Joined
Oct 27, 2012
Messages
1,384
Location
Massillon, OH
First off let me say this is not an exact setup and not high precision measurements. My eyes and tools are not that precise.
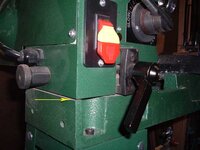
The lathe is a 32" HF with a rotatable head and there is a known .002" run-out in the headstock. Those 2 things alone eliminate the precision.
Anyway, I have been trying to adjust this thing to get the best entry-to-exit hole alignment. It has been OK, but could have been better. In the images to follow, setup #1 is what I have been using so I started from there.
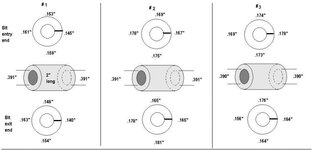
I concluded that the grain in the wood can have a profound effect on the travel of the drill bit because the plastic blank ended up being the most precise. Also, I believe that the drill bit will flex to some degree and follow the hole being drilled. I say this because in those cases where the hole is not centered front to back, the exit hole was not excessively larger.

During my typical process in the past, I brought the centers together and whacked the corner of the headstock with a rubber hammer if it needed alignment of the points. Not a very exacting mechanical adjustment to say the least.
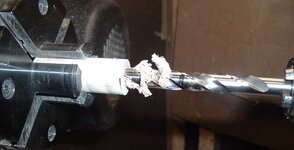
For this test I drilled 10mm holes in 5 wood blanks 2" long, then in a 3.5" wood blank and finally into a 2" PR blank that I made about 3 months ago. Measurements were taken at the entry and corresponding exit holes at 4 points. Then the holes in both ends were measured.
I use a 'not that expensive' pin jaw set and a 13mm drill chuck. After each adjustment of the headstock and tailstock, the 60 degree centers were aligned before putting in the setup for drilling.
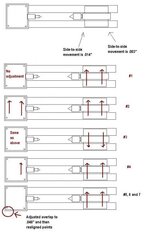
As noted in the drawing below, the tailstock has a lot of play side-to-side so I used that as part of the tests to vary the setup.
What I wanted to see is if there was a noticeable change in the measurements as I made changes to the 'Y' axis of the drill bit and blank.
In the end, the plastic blank was within my runout error and I now believe that is the best this rig will do.


The results of the longer wood blank are not so good.

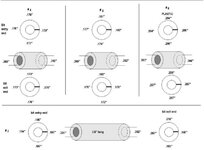
I now can check the overlap at a one corner of the headstock and then set the 60 degree points to alignment.
This will give me a more consistent setup....hopefully!
 

Attachments

  • Pin_jaws.jpg
    Pin_jaws.jpg
    42.3 KB · Views: 302
  • positions.jpg
    positions.jpg
    29.8 KB · Views: 317
  • specs_drilling.jpg
    specs_drilling.jpg
    32.2 KB · Views: 480
  • specs_drilling2.jpg
    specs_drilling2.jpg
    44.3 KB · Views: 294
  • Lathe_hd.jpg
    Lathe_hd.jpg
    54.9 KB · Views: 276
Last edited:
Signed-In Members Don't See This Ad
Lin, I have tried from both ends in the past but it was of no use. Any mis-alignment would cause the holes to not meet at the center of the blank and the tube would not fit. And, drilling clear through on the second end would often make the exit hole larger.
As I say, the bit will follow to some extent.
I set the blank in the jaws and make adjustments until I get it spinning dead center using a dial indicator. Then I pre-start the hole with a round end scraper.
Also, I keep the quill tightening lever very snug when I begin the drilling and go extremely slow until the bit has cut into the blank about 1/8" deep.
If I see ANY wobble in the bit then I know something is not in alignment and the hole will never be true.
 
Dale; I think, from looking at your measurements, that your problem is up and down, not side to side. Either your drive side or your tail stock are not pararllal to your rails and you are drilling down hill. Even if your two points meet when you bring them together if they are not pararllal to the rails when they advance, they are not going to drill straight lines. The way to check this is to get a length of drill rod about 12"s long and mount it in your tail stock. Place a flat board or piece of metal on your rails. Now, using a dial indicater, run it the length of the drill rod both top and side. Look for any runout. If you find any up and down devitation you will have to shim the tail piece. One way to do this is by drilling and taping the tail piece and adding set screws to make adjustments. Once you lock down your tail piece, it doesn't move. It's the advancing of the tail piece and drill bit that changes the angle. If you don't find anything out of line on the tail piece, do the same with the drive end. If there is a problem on this end, you can use shim stock to correct it. Unless you are drilling segmented blanks, .002 should not be a problem if you use 60 degree centers to turn down your pens. Jim S
 
Last edited:
I understand what you are saying about measuring with a drill rod. However, I do not think I have a problem based on the last adjustment and the results of blank #6, the plastic one. There is practically no deviation on those measurements.
Measuring the tailstock and headstock as you mentioned will tell me if either is parallel with the rails, but it would not tell me if the 2 are in a straight line with each other.
The whole idea of running these tests using drilled blanks was to substitute the difficult and error prone mechanical measurements.
The headstock has already been shimmed to correct for the height which was done many months ago. I also recently bought one of those double ended MT2 bars but even that is only a 'get it close' setup.
As for 'drilling downhill", I doubt it. If that were the case then the exit holes would be way bigger than the entry hole, and there would be a terrible wobble and chatter as the blank and drill bit work against each other. I see that same condition when the centers need to be aligned after a catch or other condition that jars the headstock.
As for the TBC, which is the only way I turn a blank, even a slight deviation from a straight 'Y' axis can cause the blanks to show some non concentric results.

OK; If you want to see if your head and tail stock are in a straight line, mount a chuck in both of them, insert two drill rods, bring them together until they meet, now use a straight edge across the top and sides of the rods to see if there is any gaps from end to end. Try this with the tail piece chuck all the way in, and again with it advanced all the way out. You could also use a small laser for this, that's what we used in the Paper mill for exact alignments. If this can't get you where you want to be, I suggest you go to a CNC lathe. Jim S
 
Last edited:
But I am already 'where I want to be' as noted above.:confused::rolleyes:

Dale; Please forgive me. I mistook your original thead as a quest to solve a problem, not as a help to other turners to solve theirs. I am glad you are where you want to be and wish I coulld be there also. Only problem with being where you want to be, is that when you get there, there is no place else to go. Or in other words, we will never achieve perfection. Sorry I wasn't helping you, but maybe it will help someone else out. Thank you for the detailed info. Happy turning !! Jim S
 
No problem Jim. My original writeup was kinda all over the place and could have been better organized. That's not my strong suit and you should see my shop on any given day.:eek:
I am a lot further along with the 'best setup' than when I started turning but will never achieve perfection...and would not want to.:smile:
 
Back
Top Bottom