Latest addition to "The Steampunk Collection"

Signed-In Members Don't See This Ad
See more from Si90

Si90

Member
Joined
Jul 19, 2013
Messages
269
Location
Doncaster, UK
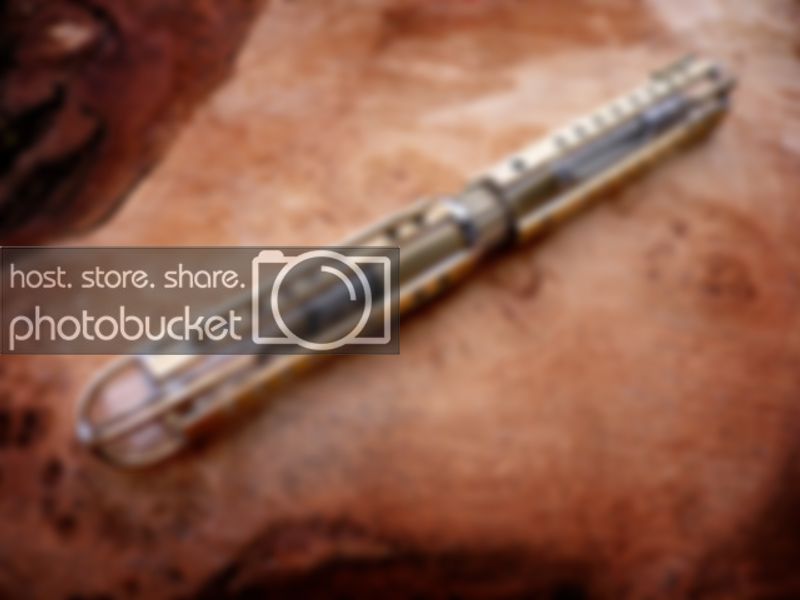
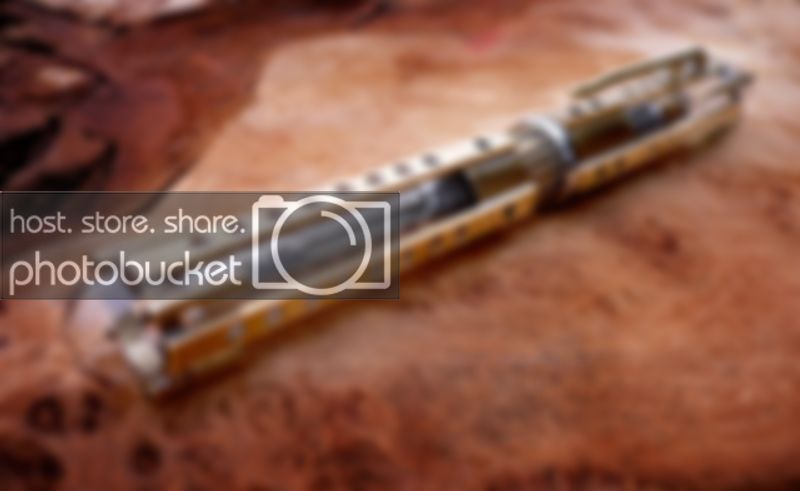
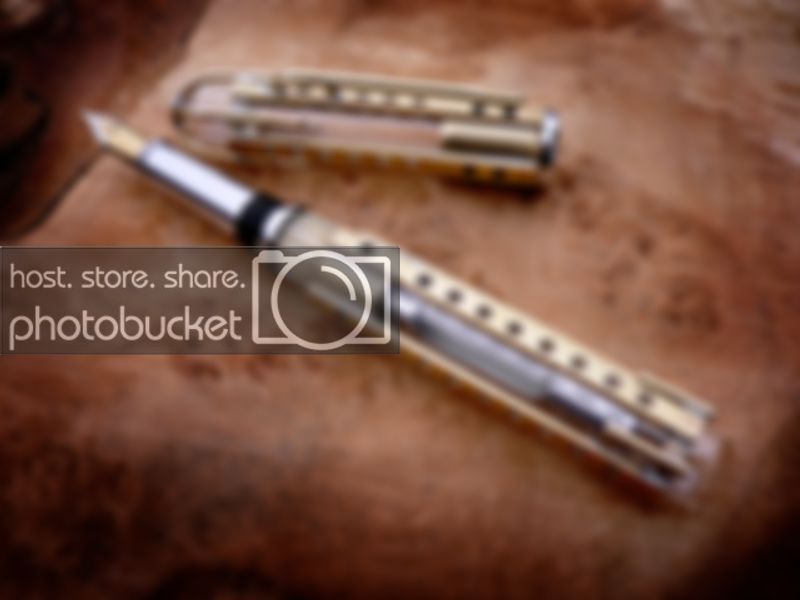
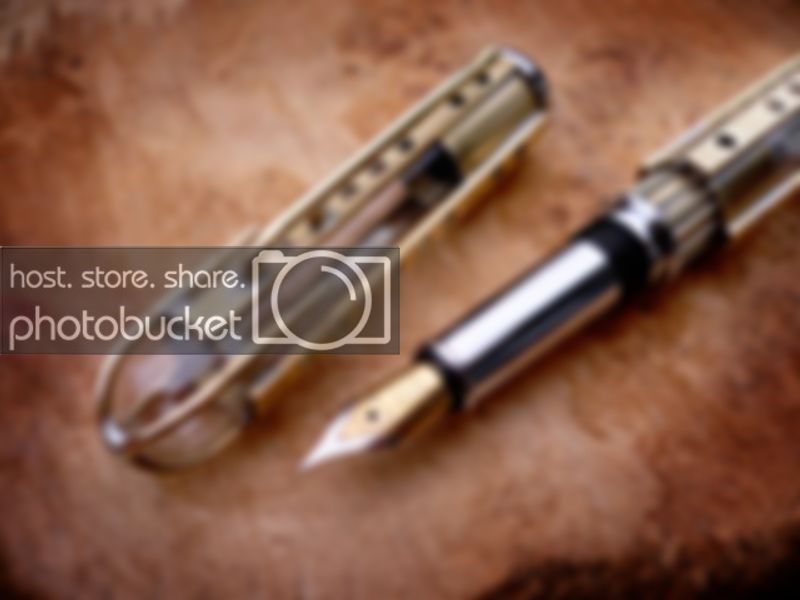
Hi all. After the Banksia pen I wanted to get back to the Steampunk Collection that I'm building up. Here is the latest addition to it. This pen features the Skeleton look by being made of 2 glass test tubes cut to the appropriate length. This proved to be much easier than you would first believe. The most difficult part is to keep everything straight and lined up. It's not perfect even now but it is close enough. The glass tubes are removable because I wanted to be able to replace them. Once you have removed the rim of the test tube they become quite delicate. I think the tube on the cap needs to be slightly shorter so that the nib fills the tube better and the pics have highlighted a few joints that could be tidied up but I'm happy with it for now. As always, thanks for taking the time to look at my efforts.

Simon.


Signed-In Members Don't See This Ad

PenPal

Member
Joined
Nov 29, 2006
Messages
2,708
Location
Canberra, A.C.T., Australia.
Simon, that pen is a killer even to the matching two toned nib, all your ducks are in a row with the test tube a clincher, once before I said looking forward to your posts and you exceeded my expectations. When the pen is open the full impact of the test tube reveals all in the hand it will be spectacular.

The best of Kind regards Peter.
 

ericofpendom

Member
Joined
Jun 6, 2012
Messages
371
Location
Bolton, England
Superb!!! that is all I can say about this pen. Very "out of the box" thinking and amalgamation of the different materials and techniques to achieve this result.

Keep them coming...

Eric...
 

greggas

Member
Joined
Jun 21, 2009
Messages
1,109
Location
North Easton, MA
love the glass tube! Great design. I am curious how many hours total this take you? Terrific work as always....thanks for sharing your pics
 

Si90

Member
Joined
Jul 19, 2013
Messages
269
Location
Doncaster, UK
Thanks everyone for taking the time to look and comment, as always it is much appreciated.

To answer the questions about hours it takes, it's not really easy to say. I have the ideas mulling over for days in my head. This one started as a design I did on the computer but the finished pen looks nothing like it. Bits get put on, took off, more put on until I'm happy with it. I tend to find my design idea is more complicated than the finished pen mainly down to the restraints of size once I started building. I have the next one mulling over in my head which will be based on the same fittings. I think after that I am going to move up to a much bigger pen to give me more space to build the multiple layers and depth that I want to achieve. Probably spent between 8 to 10 hours on this I would say.
 

OZturner

Member
Joined
Aug 5, 2013
Messages
6,663
Location
Sydney. NSW. Australia
Out Of This World.

Unbelievable, Incredible, Unreal, Awsome.
Plus any other Superlative, You care to Add.

This following the Banksia Blank -
So
What's Next?

After you've Climbed Everest, then What?
 

firewhatfire

Member
Joined
Mar 7, 2011
Messages
3,813
Location
Columbiana, Alabama
I love people that like to have fun with what they are doing. You are gonna mess around and inspire me to learn how to use a soldering iron.:confused:

When it happens, I am gonna tell my wife it is your fault by the way.:biggrin:
 

skiprat

Passed Away Mar 22, 2022
In Memoriam
Joined
Oct 19, 2006
Messages
7,812
Location
In a Skip in Wales
I must have come back to this thread and drooled over this pen, a hundred times.
It just struck me that there appears to be a part missing? Didn't you make one of the 'cages' for the end of the pen to protect to tube and match the cap?
I still love it though!!!! :)
 

Si90

Member
Joined
Jul 19, 2013
Messages
269
Location
Doncaster, UK
I must have come back to this thread and drooled over this pen, a hundred times.
It just struck me that there appears to be a part missing? Didn't you make one of the 'cages' for the end of the pen to protect to tube and match the cap?
I still love it though!!!! :)


Ah yes, right, ermmmmm, yeh. The one on the cap was originally on the pen but I felt because of the open design with the glass it made the end of the pen look too top heavy. I preferred it on the cap which obviously on many pens is larger than the barrel anyway.

The one that you must get the seal of approval from more than any, the wife :wink: (she has to put up with me disappering for hours) agrees with you so might have to make another. They are removable if I still don't like it so nothing to loose.
 

ossaguy

Member
Joined
Jan 3, 2010
Messages
1,370
Location
San Diego
Wow Robert, I saw all of your great looking fountain pens on your gallery.You really have some beauties there!!!


Steve
 

skiprat

Passed Away Mar 22, 2022
In Memoriam
Joined
Oct 19, 2006
Messages
7,812
Location
In a Skip in Wales
Wonderful! You really should post this pen in the penmakers forum on Fountain Pen Network so those traditional pen lovers can see it.

Pen Turning and Making - The Fountain Pen Network

Mmmmm......I wouldn't. :wink: Most of those members are Pen Snobs and really dislike kit pens and definetely don't approve of the IPG nibs.
Why would we send creative members away from here anyway??? If they get a warm welcome on another site, then we may not see them again here on IAP. :eek:

I do think that Simon should submit to PMG though.:biggrin:

( So should Brad :wink: )
 

CrimsonKeel

Member
Joined
Mar 1, 2013
Messages
495
Location
Royal oak, MI
Your pens are really creative and inspire me to some day try something like that. they say copying is the sincerest form of flattery.
ok now as a person had 5 semesters of metals/jewelry classes in college your solder job needs to be tightened up to put this over the top for me. however most people wouldnt notice it and it may be a part of your overall design so take this with a grain of salt. (photo's probably make it more noticeable than in person.)

Cant wait to see your next creation.

Btw where are you getting your brass parts from? are you making them yourself or buying them?
 

Si90

Member
Joined
Jul 19, 2013
Messages
269
Location
Doncaster, UK
Your pens are really creative and inspire me to some day try something like that. they say copying is the sincerest form of flattery.
ok now as a person had 5 semesters of metals/jewelry classes in college your solder job needs to be tightened up to put this over the top for me. however most people wouldnt notice it and it may be a part of your overall design so take this with a grain of salt. (photo's probably make it more noticeable than in person.)

Cant wait to see your next creation.

Btw where are you getting your brass parts from? are you making them yourself or buying them?


Yep, some of the joints could do with a tidy, working on that one. As regards the brass, anything other than the cogs and wheels as on my other pens I make. Would have thought that would be fairly easy for someone with so much experience in metals and jewellery. They just start off as tubes, rods and profiles from K and S Metals, Albion Alloys or any other supplier to the Scale Model Maker.
 

CrimsonKeel

Member
Joined
Mar 1, 2013
Messages
495
Location
Royal oak, MI
yeah the parts with the holes drilled in them look like a channel of some sort. i figured it would be very hard to do that by hand is why i asked. Ive actually been looking for something sort of like that to buy to ease some burden on a project i had in mind
there are a couple local places taht do doll and model stuff ill have to head over one of these days to see what they have that i can use for pen making
 
Top Bottom