Lacewood Jr. Gentleman with Custom Finial

Signed-In Members Don't See This Ad
See more from egnald

egnald

Member
Joined
Jun 9, 2017
Messages
3,119
Location
Columbus, Nebraska, USA
Greetings on this 2022 New Year's Day from the bitter cold Nebraska.

Last month I worked on learning how to make custom finials for the Jr. Gent kits. (With a big thanks to Mark James, John Underhill, Ken Burgess, Peter Christensen, and everyone else that helped me figure out the best way to do this with the tools and equipment I have available).

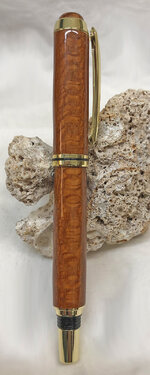
This is a Jr. Gent with a custom finial made from an offcut piece of Brazilian Lacewood that I picked up in Lincoln, Nebraska at Hardwood Heaven about 4 years ago. I've made a pen from Lacewood before, but I forgot how nice its grain structure is.

Anyhow, here are the thumbnail pictures - Dave

A couple of glamor shots:
IMG_2409 Cropped.jpg IMG_2416 Cropped.jpg

Pictures of the open pen as it is rotated to show the variation in the grain:
IMG_2410 Cropped.jpg
IMG_2411 Cropped.jpg
IMG_2412 Cropped.jpg


Pictures of the closed pen as it is rotated to show the grain and grain matching):
IMG_2413 Cropped.jpg
IMG_2414 Cropped.jpg
IMG_2415 Cropped.jpg
 

Attachments

  • IMG_2406 Cropped.jpg
    IMG_2406 Cropped.jpg
    204.8 KB · Views: 122
Signed-In Members Don't See This Ad

pewink

Banned
Joined
Feb 25, 2016
Messages
65
Location
Vires
At the risk of contempt.
I'm unfamiliar with this pen, so a few questions.
Is there supposed to be a gap between the pieces at the top (see arrow)?
It looks like the wood is smaller than the metal parts (see circles), I was shown to use a micrometer and make the materials the same dimension. Was that incorrect information?

1641080277397.png
 

egnald

Member
Joined
Jun 9, 2017
Messages
3,119
Location
Columbus, Nebraska, USA
At the risk of contempt.
I'm unfamiliar with this pen, so a few questions.
Is there supposed to be a gap between the pieces at the top (see arrow)?
It looks like the wood is smaller than the metal parts (see circles), I was shown to use a micrometer and make the materials the same dimension. Was that incorrect information?

View attachment 324329

I typically use the bushings as a guide and measure with a caliper to get the best fit, especially on pens with a short nib as the fit is more detectable by feel when the transition goes across one's fingers.

From left to right:

1) The finial sets down into a pocket (counterbore) on the cap so there is a 45 thousandths rim of cap surrounding the finial by design. This is also true of the stock finial that gets pressed out.

2) The center band on this does measure 6 or 7 thou. proud of the wood. I just used the bushings when I turned the upper blank. It may be by design though as both of the upper bushings have the same diameter but the pen parts (clip and center band) do not. The clip is 35/64 and the center band is 9/16. (My bushings match the clip diameter).

3) The variance at the nib interface looks much more exaggerated in the picture than it measures, however, the fit is off by 7 thousandths. I have no doubt that it could have been improved by measuring with a caliper more religiously when I was turning and sanding it.

As to the question about incorrect or correct information, I think you will find that their is a very broad range of regimens that makers have across the IAP community as well as a broad range of tolerances, expectations, and skill levels.

Dave
 
Last edited:

mark james

IAP Collection, Curator
Joined
Sep 6, 2012
Messages
12,752
Location
Medina, Ohio
Final pen and finial is AWESOME! Congrats.

These are not hard to do, but are initially daunting. Once you have done 2-3, they are readily within our wheel-works of our skill sets. I will do the finials every chance I have. Yes, another 20-30 minutes, but well worth the effort. As your pen shows, a beautiful result. Very nice!

The issues pewink illuminates are valid, but minor - no worries, learn, get better, all is well in a much more positive 2022!!! I LOVE LACEWOOD... fussy, but well worth the effort.
 

egnald

Member
Joined
Jun 9, 2017
Messages
3,119
Location
Columbus, Nebraska, USA
Final pen and finial is AWESOME! Congrats.

These are not hard to do, but are initially daunting. Once you have done 2-3, they are readily within our wheel-works of our skill sets. I will do the finials every chance I have. Yes, another 20-30 minutes, but well worth the effort. As your pen shows, a beautiful result. Very nice!

The issues pewink illuminates are valid, but minor - no worries, learn, get better, all is well in a much more positive 2022!!! I LOVE LACEWOOD... fussy, but well worth the effort.

Mark, something just seemed off so I took a deeper dive and re-measured some things. Here is what I found:

Blank at nib measured 0.504 (bushing measured 0.503) -- trim ring at nib measured 0.489.
Blank at post measured 0.490 (bushing measured 0.487) -- trim ring at post measured 0.506.

It made it obvious that the trim rings were flipped so I pulled out a couple of unopened kits to confirm. Maybe I did it when I was laying out the parts before pressing, but I am usually very careful to keep bagged parts together. In any case, it has a nearly perfect fit after knocking it apart and pressing it back together with the correct sized trim rings on each end.

I of course made a highlighted note on my instruction sheet for future reference to confirm the trim ring sizes before pressing the parts together.

Dave
 
Last edited:

Kcimdrib

Member
Joined
Nov 1, 2020
Messages
1,375
Location
UK
I can't fault it looks beautiful. I like this wood and you've made an excellent job of finishing.
ALL THE BEST FOR THE NEW YEAR
 

Jans husband

Member
Joined
May 4, 2020
Messages
278
Location
Doncaster England
Mark, something just seemed off so I took a deeper dive and re-measured some things. Here is what I found:

Blank at nib measured 0.504 (bushing measured 0.503) -- trim ring at nib measured 0.489.
Blank at post measured 0.490 (bushing measured 0.487) -- trim ring at post measured 0.506.

It made it obvious that the trim rings were flipped so I pulled out a couple of unopened kits to confirm. Maybe I did it when I was laying out the parts before pressing, but I am usually very careful to keep bagged parts together. In any case, it has a nearly perfect fit after knocking it apart and pressing it back together with the correct sized trim rings on each end.

I of course made a highlighted note on my instruction sheet for future reference to confirm the trim ring sizes before pressing the parts together.

Dave
You sound a bit crest-fallen now Dave. There is no need to be!!
Excellent pen and workmanship!!

Mike
 

egnald

Member
Joined
Jun 9, 2017
Messages
3,119
Location
Columbus, Nebraska, USA
You sound a bit crest-fallen now Dave. There is no need to be!!
Excellent pen and workmanship!!

Mike
Mike, I'm not disheartened at all but thanks for the sentiment. During most of my career I had to deal with what some would consider very tight tolerances, but for us they were the normal, so when things look wonky I can't help myself, I just have to get to the root cause. Besides, it would be a shame to have the nice blank and kit go up the spout. - Dave
 

Kcimdrib

Member
Joined
Nov 1, 2020
Messages
1,375
Location
UK
Dave
Don't be disheartened like you I worked in precision engineering most of my life but when I retired I found a new life with much wider tolerance. When I played golf years ago if I didn't hit it straight it was back to practise for hours, now I take it on the chin and just have fun. Life's not perfect but it should be fun.
HAPPY NEW YEAR.

Mike
 

sorcerertd

Member
Joined
Sep 30, 2019
Messages
2,704
Location
North Carolina, USA
Great looking pen! The finial really does give it that next level look.

Blank at nib measured 0.504 (bushing measured 0.503) -- trim ring at nib measured 0.489.
Blank at post measured 0.490 (bushing measured 0.487) -- trim ring at post measured 0.506.

It made it obvious that the trim rings were flipped so I pulled out a couple of unopened kits to confirm. Maybe I did it when I was laying out the parts before pressing, but I am usually very careful to keep bagged parts together. In any case, it has a nearly perfect fit after knocking it apart and pressing it back together with the correct sized trim rings on each end.

So after swapping ends, you are .002 over on each? Wow, that level of precision makes me jealous. I'm a low budget, no frills, Harbor Freight plain old outside diameter caliper kind of guy. There is much room for my own improvement in this area. As far as matching up parts, though, maybe this will safeguard your assembly process from that frustration, or at least help someone else reading this thread? It's stupid simple, but works for me
  • After cutting the first section to length in the blank, immediately lay the pieces next to each other and mark a line across the two on the mating grain ends/sides. Sometimes I even do this before cutting it. (I see you don't really have a problem matching the grain up, though)
  • After drilling, glue-up, and squaring, mark the inside of the tubes with a sharpie in the same places as the outer marks before turning the outer marks off.
  • Use the marks inside the tubes to determine which parts get pressed into which end without guesswork or re-measuring.
 

egnald

Member
Joined
Jun 9, 2017
Messages
3,119
Location
Columbus, Nebraska, USA
  • After cutting.....
Todd, Thanks for your suggestions. I do mark the blanks before cutting. To keep things oriented I put two lines across the free end and a line down the center where the cut is/will be. I used to mark the inside of the tube as you suggested, but was getting some discoloration from the sharpie ink in one of my steps I might have to reconsider. - Dave
 
Top Bottom