Jr. Milton in Bogwood

Signed-In Members Don't See This Ad
See more from sorcerertd

sorcerertd

Member
Joined
Sep 30, 2019
Messages
2,704
Location
North Carolina, USA
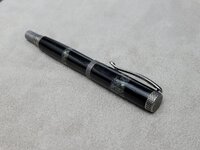
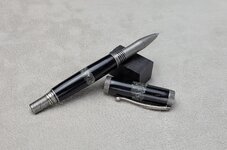
This is a Jr. Milton in antique silver, done in bog oak with labradorite inlay. The labradorite has some variating color flash when the light hits it just right, but doesn't pop like the cultured opal that is popular for rings right now.

Please tell me what you think of the finish on this. I purposely didn't level off the glue in the deeper pores of wood grain, wanting to leave it a little more rustic looking, and tried for a medium sheen on the end product. I may even hit it again with one level coarser MM, but I also don't want to mess anything up since it went together well after a fixing where the CA finish separated on the end of the main barrel. That's why the grain doesn't "come through" as much on the main barrel as on the cap.

Side note: Once I put it together and looked at it the first time, it brought a song to mind, so I guess this pen has a name, "Touch of Gray". Oh well, kinda suits me anyway. That is all I had to say. :D
 

Attachments

  • jr.bog.cl.jpg
    jr.bog.cl.jpg
    303.5 KB · Views: 269
  • jr.bog.open.jpg
    jr.bog.open.jpg
    324.4 KB · Views: 259
Signed-In Members Don't See This Ad

mnerland

Member
Joined
Mar 26, 2019
Messages
124
Location
Bowling Green, KY
Great looking pen! I am curious about how you did the inlay. Not a real defined line....which I like. Maybe you could explain that technique. Nice job!
 

jttheclockman

Member
Joined
Feb 22, 2005
Messages
19,148
Location
NJ, USA.
I made a couple pens using that wood and I will show one soon here but I like the grain look on that wood so I did not fill the grain at all and just used a satin lacquer as my finish and I love the look. Some woods are not to be glossy plastic looking and that to me is one of those woods.
 

TDahl

Member
Joined
Dec 11, 2019
Messages
1,894
Location
Brentwood
Very nice. I like the finish. I also like the inlay and the way it seems to fade into the blank. Well done.
 

magpens

Member
Joined
Feb 2, 2011
Messages
15,911
Location
Canada
@sorcerertd
In what form is the Labradorite when you apply it to the pen ?

Is it crushed rock ? . If so, do you mix it with resin or glue and form a ring of it in a groove in the pen blank ?

Or is it a rod that you cut into segments to glue to the bogwood sections ?

I am wondering about the words "inlay" ( used by you and some of the respondents) and "insert" ( one of the respondents ).
 

sorcerertd

Member
Joined
Sep 30, 2019
Messages
2,704
Location
North Carolina, USA
Thanks for the comments and compliments everyone. The combo of materials makes this a challenge with wanting the bog oak to remain a bit rustic. It's hard to polish only the inlay with the asymmetrical shape of it. I'll have to think on that for future pens. The last one I made didn't have that issue

So @mnerland and @magpens, and whoever else is interested, here's the process. For whatever it's worth, I'm just going to call it inlay.
  1. Cut the blank (I cut it a bit shorter than the tube since I'm cutting some out anyway)
  2. Drill the blank
  3. Cut the drilled blank in half on the band saw in an S shape (or whatever you like)
  4. Cut a little more out of the middle of the blank (in side end of one side) at a different angle for varied width of the inlay
  5. Paint the tube
  6. Glue the blank pieces on the tube so the ends match up with the tubes (allowing whatever space for trimming/squaring)
  7. turn the barrel down a bit, at least to round it
  8. Glue in the inlay. (I used medium CA. Also, I crushed the rock myself before I started.)
  9. After it sets up, turn as usual (obviously, you'll want carbide tools on this one)
  10. Finish as you would any other pen barrel
That's it. So show me what you come up with. As with wood, be careful with the dust from rocks, too. Labradorite is pretty much silica and the dust should definitely not be inhaled. Another note, cut slowly or the stone will heat up and melt your CA. Fortunately, I learned this on a test piece before I did this technique the first time on a real pen.
 

magpens

Member
Joined
Feb 2, 2011
Messages
15,911
Location
Canada
OK .....

I understand your process a bit better now, but I don't know what to say ..... other than, "I'll think about it."

Oh .... is the S-shape (or whatever) the profile of the end that you cut on the bandsaw ? . Is this shaping just for visual effect ?
 

sorcerertd

Member
Joined
Sep 30, 2019
Messages
2,704
Location
North Carolina, USA
Oh .... is the S-shape (or whatever) the profile of the end that you cut on the bandsaw ? . Is this shaping just for visual effect ?

Yes, that's the mid section in the blank that I cut in the S shape. Then I make sure that I do another cut so that it is purposely uneven, wider on one side than the other. Obviously, you can cut it any which way.

I first did this as a plan B when I had a blank I really liked blow out and the half I hadn't used was slightly shorter than the tube. On that original one, I just cut a straight 45 degree across and then twisted it slightly for the uneven effect. That pic is around here somewhere.
 
Top Bottom