It's About Time I Showed Something !

Signed-In Members Don't See This Ad
See more from magpens

magpens

Member
Joined
Feb 2, 2011
Messages
15,913
Location
Canada
I like long, single-barrel pens in order to show off beautiful blanks.

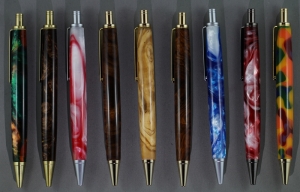
Recently, I made a batch of 10 ballpoint pens using the PSI Slimline Pro kit.
I made them, as I have shown before, omitting the centerband and brass tubes.

With this minor modification they become single barrel (about 4.2" long) pens.

I already gave one away to a granddaughter so that leaves 9 to show.

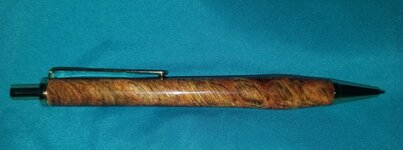
The three in the middle are wood (Olivewood in the middle surrounded by two Rosewood burls).
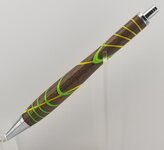
On each side is a triplet of "acrylics", five of which were cast by another IAP member many years ago. . I would like to acknowledge him, but I can't remember his name. . They polished up so beautifully ... I think they're PR . . The one on the far right is a commercial blank named "Carnival".


Last edited:
Signed-In Members Don't See This Ad

Brotherdale

Member
Joined
Apr 15, 2017
Messages
306
Location
Houston, TX
Those look great Mal. I like making this same kit with no center band, but I haven't had the courage to leave out the tubes. I bought 8mm 10 inch tubes so I can use a single piece.
 

magpens

Member
Joined
Feb 2, 2011
Messages
15,913
Location
Canada
Those look great Mal. I like making this same kit with no center band, but I haven't had the courage to leave out the tubes. I bought 8mm 10 inch tubes so I can use a single piece.

I was a little nervous leaving out the brass tubes at first but I have made enough of them now that I have gotten over the nervousness. . I drill the blank at 15/64" ... just big enough for the refill to slide smoothly ... and then I make the pen just a bit on the fat side ... about 0.540" in the middle. . So far, so good ! . For the wood ones I make sure that I use very sound wood ... no burls for sure.
 
Last edited:

PenPal

Member
Joined
Nov 29, 2006
Messages
2,708
Location
Canberra, A.C.T., Australia.
Neat pens Mal at the end of the day they are colourful,clean cut and as you chose display the colour and the grain in the Olive Wood so well.They will make great presents or sales mate.

Peter.
 

Ironwood

Member
Joined
May 31, 2010
Messages
1,226
Location
Mackay. Australia
I like what you have done here Mal. Its an improvement over the original constrains of the kit IMHO.
I haven't seen Slimline clicks before, I will have to look out for them, a lot of people seem to prefer a click over a twist.
 

Teodor

Member
Joined
Feb 27, 2019
Messages
256
Location
Brno Czech Republic
Nice combination of colour.
Did you made them or there is a kit involved, I'm interested to expand to other writing instruments, especially mechanical pencils.

Sent from my Redmi Note 5 Pro using Tapatalk
 

keithbyrd

Member
Joined
Sep 2, 2011
Messages
2,492
Location
Mount Wolf, PA
Awesome pens Mal - I really like those - great display of the blanks. You said, in your reply to Brotherdale, "For the wood ones I make sure that I use very sound wood ... no burls for sure." but two of them in your description are Rosewood burls?
I am going to have to try these - not familiar with these kits. Without the tubes do you glue the parts in? If so how do you change refills?
 

RKB

Member
Joined
Mar 17, 2014
Messages
729
Location
Apollo, PA
Thank you Mal for showing a great collection of pens. Hoping to try my luck at this process. The larger blank adds a great look. Well done.


Rod
 

TonyL

Member
Joined
Mar 9, 2014
Messages
8,904
Location
Georgia
Beautiful collections. I have a few of those kits. Your images inspired me to make some. Thank you.
 

Wagner11

Member
Joined
Jul 8, 2017
Messages
135
Location
Indiana
Beautiful pens Mal. I rather like the slimline pro kit but I'm about to give up on them as I keep having trouble with the click mechanisms. But now I want to make one without tubes.

Again beautiful pens and I hope you show your work more often.

Sent from my SM-G955U using Tapatalk
 

Brian G

Member
Joined
Jul 2, 2013
Messages
1,567
Location
Bloomington, MN
Mal, those look great.

If you'll indulge, I have a comment and a query.

I have a few like this in the works that I started a few months ago. A little "shop ennui" and a minor shop flood have gotten in the way of finishing them.

For my method, I pressed the center band into the upper and lower tubes, and then used a carbide tool to turn the center band flush with the brass tubes.

Before I did that, I inserted the outer sleeve into the upper barrel (the front and back mechanisms will drop in via the nib end). My thinking is that the "stem" of the center band keeps the outer sleeve of the click mechanism in place as a stop for the click assembly to work properly.

I just assumed that the click mechanism wouldn't work properly unless I did that. Am I wrong in that assumption?

Back to your pens. That's a great group!
 

magpens

Member
Joined
Feb 2, 2011
Messages
15,913
Location
Canada
Did you made them or there is a kit involved, I'm interested to expand to other writing instruments, especially mechanical pencils.

Teodor ... Thanks for your kind words ! .. As I think I said, there is a kit involved ... the PSI Slimline Pro kit.
I use all parts of the kit except the center band and brass tubes (no tubes at all in mine). . I have also done some resizing of the hole and final diameter (see one of the above posts).
 

magpens

Member
Joined
Feb 2, 2011
Messages
15,913
Location
Canada
Keith ...

You said, in your reply to Brotherdale, "For the wood ones I make sure that I use very sound wood ... no burls for sure." but two of them in your description are Rosewood burls?
Without the tubes do you glue the parts in? If so how do you change refills?

Thanks ...

You surely caught me here .. :redface: .. Rosewood burl is the exception !!! . . It is very sound compared to many other burls ... in fact, I often question whether it is a burl at all, lovely as it is.

Yes, I do glue in the parts. .. Changing the refill is just the same as for the complete kit ... the nib has a screw in coupler that glues into the blank leaving the threaded end protruding. . I enlarge the hole at that end to be a bit larger than the 15/64" (mentioned in a post above), but just for the required length, to accommodate the coupler. .. Hole size at the top of the blank also has to be enlarged to accommodate the click mechanism, but only for the required length (see another post in answer to Brian G ).
 
Last edited:

magpens

Member
Joined
Feb 2, 2011
Messages
15,913
Location
Canada
Brian ....

For my method, I pressed the center band into the upper and lower tubes, and then used a carbide tool to turn the center band flush with the brass tubes.

Before I did that, I inserted the outer sleeve into the upper barrel (the front and back mechanisms will drop in via the nib end). My thinking is that the "stem" of the center band keeps the outer sleeve of the click mechanism in place as a stop for the click assembly to work properly.

I just assumed that the click mechanism wouldn't work properly unless I did that. Am I wrong in that assumption?

Thanks for your kind words ...

You can certainly do as you have with the centerband, keeping the brass tubes as well.

With regard to the click mechanism, it does need a "stop" to hold it at its bottom end, which in the complete kit (and your method) is provided by the top end of the center piece. .. In my method, the main hole through the entire blank is drilled to 15/64" to just allow smooth movement of the refill. .. But the click mechanism requires this hole to be enlarged to a size "M" for the top 1.67" in order to accommodate both the click mechanism and the top finial kit piece. .. The click mechanism requires a "stop" at its bottom end. .. The top finial kit piece holds the mechanism in from the top. .. That finial piece is glued in, as is the nib coupler at the nib end. .. Hope that helps you complete your pens .. if you need more elaboration, don't hesitate to ask.

My reason for eliminating the tubes and down-sizing the hole is to avoid painting of hole in acrylic blank (brass tube show-through), and at same time strengthen the barrel a little bit (I also increase the outer diam.). .. My method is not totally successful for show-through at top end, but it does help ... and no barrel breakage so far due to weakness without tubes.
 

magpens

Member
Joined
Feb 2, 2011
Messages
15,913
Location
Canada
Doug ...

Beautiful pens Mal. I rather like the slimline pro kit but I'm about to give up on them as I keep having trouble with the click mechanisms. But now I want to make one without tubes.

Thanks for your kind words .

I know that others (and now you) have expressed concern about the PSI Slimline Pro click mechanism (and perhaps other click mechanisms as well).

In my experience, it has always worked for me but not always perfectly. . It is a little rough sometimes, but so far no failures.

It seems that click mechanisms in general are a bit of a concern for us pen-makers ... unless we make a kitless clicker pen using the Schmidt click mechanism that Richard Greenwald (and another person) sells ... But now PSI has just come out with their Duraclick EDC clicker pen kit which actually incorporates this very Schmidt click mechanism ... So things are looking up ! . However, using that Schmidt mechanism puts different constraints on the making of kitless, or semi-kitless, click pens. . For me, at the present time, I prefer to go with the Slimline Pro click mech. but I intend to try the Schmidt mech.

I hope I have been sufficiently encouraging for you to continue with your pens. . Please let me know if I can offer any further info about my methods.
 

Brian G

Member
Joined
Jul 2, 2013
Messages
1,567
Location
Bloomington, MN
Mal,

Thank you for the follow up. That all makes sense.

I had already started with the method I described, so I'll have to finish those before I attempt your method. I've done what I described with PSI's Power Pen, and it worked. I'm not overly fond of that component set, because the clicker sounds like it's crushing gravel. I'm trying it with Berea's Long Boy, too.

One problem with the method I use is that you have to insert the outer sleeve before pressing in the center band. I tried inserting backwards from the clicker end, but cracked one of the sleeves.
 

magpens

Member
Joined
Feb 2, 2011
Messages
15,913
Location
Canada
Brian ...

Outer sleeve (of the click mech.) ... not clear to me why you have to insert from the nib end ... but yes, you would have to do that before pressing in the center band ... in your method.

I insert the click mech fully assembled from the upper end ... can't see why it would crack for you. . I cannot insert just the outer sleeve because the next smaller pieces will not go through my 15/64" hole (clearly would have to go in from the nib end).

I have never seen PSI Power Pen ... will have a look at it on the site.


EDIT: Just looked at the instructions for the Power Pen. . Does it use the same mech. ?
Looks quite similar to the Slimline Pro ... I like the clip mounting better but not the clip retainer shape, and not the clip itself.
 
Last edited:

Lmstretch

Member
Joined
Aug 31, 2018
Messages
184
Location
Fl
Nice pens! Great idea taking a straight forward Slimeline Pro kit and with a few simple mods, making the pen cool. I hope you don't mind, but I would like to barrow your idea and make a few Mal pens in the future!


Sent from my iPad using Penturners.org mobile app
 
Joined
Apr 11, 2019
Messages
16
Location
Wrentham, Ma.
Nice job but I can't show my wife. As a waitress she only uses click pens and that diameter would work nicely for her and bandless presents nicely. Just don't need another item on the honey-do list quite yet!
 

John Eldeen

Member
Joined
Apr 3, 2019
Messages
419
Location
Sacramento, CA
Beautiful work there Mal! The slimline pro pen and mechanical pencil modified removing the center band is my every day carry. It is a nice solid kit and without the band really shows off the blank. I replace the tube with a new one cut to the appropriate length never thought about not putting the tube it at all. I will have to contemplate this. This is the last couple I made.

John
 

Attachments

  • 20180520_162931.jpg
    20180520_162931.jpg
    165 KB · Views: 153
  • 20190225_162419.jpg
    20190225_162419.jpg
    137 KB · Views: 147

magpens

Member
Joined
Feb 2, 2011
Messages
15,913
Location
Canada
Thanks for showing your pens, John. . I like the way you shape them ... just a little different from the usual.

I particularly like the segmented one on the right, and how you have made the yellow and green "rays" . . I have actually been thinking about doing that kind of segmenting ... you got to "publish" before I have even made any !!! . Congrats ... beautiful work !!

I think that type of segmenting is best done with the brass tube in. . Certainly a long blank is the best 'vehicle' for showing it off !
 
Last edited:

John Eldeen

Member
Joined
Apr 3, 2019
Messages
419
Location
Sacramento, CA
Thanks, Mal for the kind words. Hope I did not steal your thunder with the segmented pattern. As for the shape I really like the slight bulb at the nib end it makes it very comfortable in the hand. I would agree that it would need the tube to keep it all together and a long blank is best.

John
 

Gersh

Member
Joined
May 22, 2018
Messages
111
Location
Newbury oh
I could go on about how great they look but I think the best compliment I can actually give is that your work made me decide to give this kit and modification a try. I hope Dawn and Ed are giving you a credit for the sales you inspire with this post. :)
 

magpens

Member
Joined
Feb 2, 2011
Messages
15,913
Location
Canada
Beautiful finished product ...

Thank you.

... but how does omitting the brass tube(s) affect durability and longevity ???

Honestly, I don't know :rolleyes: ... I think that in many cases the brass tube is overkill and a nuisance (creates the extra work of gluing and back-painting). . The wall thickness in "my" design is about 0.15" = 3.8 mm, each side of center, so I am not very worried unless you are going to drive over the pen with a Mack truck or drop it from the Empire State Bldg. . The wood ones would be of most concern but I am pretty confident about even them. . I have recently been using some strong exotic hardwood burls (Concinna, Corrugatta, Brown & Red Mallee, Desert Iron Wood, Rosewood, Cocobolo, etc., etc.) ... I have no hesitation giving them to my grandkids or selling them to new customers. . The beauty of the long, uninterrupted finished barrel is so impressive that I have no problem giving a lifetime replacement guarantee because I just love making them. . And they are quicker to make than the tubed pens. . The only slightly tricky part is getting the hole of the right depth (1.70") at the top end to accept the click mechanism and hold it from sliding down too far.
 
Last edited:

Joel

Member
Joined
Jan 4, 2019
Messages
20
Location
San Francisco
That is a fantastic set of pens Mal!!!

The one in the middle of your photo is particularly impressive. Love how you brought out the grain in the wood.
 
Signed-In Members Don't See This Ad
Top Bottom