3-WAY SWITCH
Disclaimer: Follow all local codes & use box connectors and/or conduit or
BX Cable if indicated.
1). Add the double gang box where your existing switch is and a single gang box where you want the other 3-way switch.
2). Run a piece of 12/3WG Romex from the double gang box to the single gang box. (Again: Use conduit if required by local code.) We will call this wire the "Traveler". Then, run a piece of 12/2WG from the single gang box to where you want the 1st light (probably a 4" octogon box).
3). Use wire nuts & connect a short black wire from your incoming power
source (black is supposed to be hot, check with a meter) to the different colored screw of your new 3-way switch.
4). Connect the black wire of the "traveler" to one of the other silver colored screws of the 3-way switch. Connect the red wire of your "traveler" to the other silver screw. Also, connect the white wire of the traveler to the incoming white neutral of your power source.
(obviously also connect all of the green colored or bare grounds together and ground all devices)
5). At the single gang box, connect the black wire to one of the silver colored screws & the red wire to the other silver colored screws.
6). At the single gang box, Connect the Black wire of the 12/2WG (going to your light) to the different colored screw of the 3-way switch and connect your two white wires together with a wire nut.
7). At your 1st light you connect the Black & White wires to the device and then you can run another piece of 12/2WG romex to your second light and connect the two wires there. Again, don't forget the bare or green ground wires & ground each device.
hope this helps.....Again, follow all local codes & if in doubt, call a qualified electrician...

 Even from static...
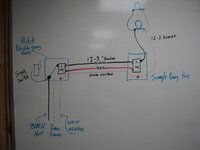
")