I hate my pen

Signed-In Members Don't See This Ad

Gilrock

Member
Joined
Oct 18, 2011
Messages
560
Location
Tucson, AZ
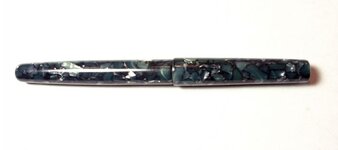
I was pretty happy with how my pen was looking till I went to make a cap. I think I've done about everything wrong possible. When I measured how long my cap would need to be I knew it seemed kinda long and after making it the cap looks goofy. I had numerous problems with it as well. Seems like you gotta plan everything you need to do to a piece because every time I re-chuck something in the collect chuck it doesn't seem to spin as good as the last time I had it in there. I'm frustrated with this pen and ready to just throw all my taps, dies and bits in the trash. So everyone encouraging others to make a kitless pen is feeling like "misery loves company".

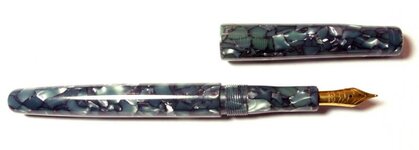
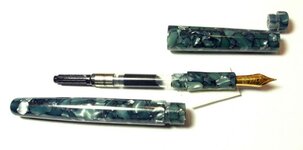
- The section seems about the right size to hold the housing and converter so to make it shorter I'd need to increase the length of the threaded section.
- This is my second housing/converter assembly where the ink does not want to draw a vacuum with only the feed hole covered....I have to dunk it almost all the way to the end of the nib. In the photo you can see how the ink is moving around and not holding vacuum.
- I don't like how my threads look where I flatten them so the cap will completely screw shut. I spent forever taking more and more material off before the cap would go on all the way.
- The cap is crooked because after turning it around in the chuck I could not get it centered.
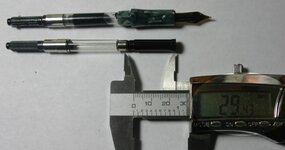
- The finial threads are too large for the clip I had...forgot to check the size of the stupid clip first...the threads are 9mm and the clip is 8.2mm.
- I didn't bother trying to get a good finish on it cause I hate it so much.

Frustrated and ready to go back to just making Slimlines and Wall Street II's where I was fat dumb and happy...lol.

Gil
 

Attachments

  • Kit3.jpg
    Kit3.jpg
    15.7 KB · Views: 519
  • Kit2.jpg
    Kit2.jpg
    20.1 KB · Views: 484
  • Kit1.jpg
    Kit1.jpg
    25.6 KB · Views: 540
Signed-In Members Don't See This Ad
Wow! A lot of grief and pain went into that pen. Looks pretty darn good to me. It would be a shame not to make a second pen to apply all of the things you learned.:smile:

Let me know when your trash day is, I'll fly out to AZ to pick through your garbage with a strong magnet.:biggrin::biggrin:
 
Well, I hope you feel a little better about it tomorrow. I think it's a great attempt. Beautiful in many ways!

I compared the OL of your section to Ken's in this photo:

http://www.penturners.org/forum/f13/classic-ebonite-93731/

Looks like yours is about 1/2" longer and your converter sticks farther into the section.

Also, I think most folks drill the interior out of the finial to make room for the nib point.

Have a beer or two and forget about it, then plan a new section. Getting this right is worth the effort.
 
After you get through beating yourself up...... THe pen looks ok. THe cap looks longer than the norm but not bad. I like longer pens. You have just found out that the details matter! Move this and it effects that. But just because it doesn't have the ratio's your used to seeing on kit pens means it wrong. Next time shorten your front section to 3/4 20mm ish, lengthen you lower body to 2.5 inches plus the finial drill the finial so the convertor will fit or a roller ball. make the cap 2 inches long plus the finial. Add a clip, or not. But quit whinning. We ALL make "oops that didnt work like I planned" or the dreaded "looked better in my head" pens.
 
Check out The All Black thread in SOYP for a clip fix. May work for you.
I like the look of your pen, and your long cap is in good company. I recently got a couple books of vintage fountain pens, and many of the caps are very long, some to the point of ridiculousness. So go put a shine on that sucker!

edit; honestly looks pretty shiney right now!
 
Last edited:
Hmmmm

I think you should send it to me for my collection....I won't tell anybody about the mistakes and few will notice anything but how pretty it is.
 
I compared the OL of your section to Ken's in this photo:

http://www.penturners.org/forum/f13/classic-ebonite-93731/

Looks like yours is about 1/2" longer and your converter sticks farther into the section.

Yeah I saw that pen. I don't see how he can make his section so short unless the feed housing he used is much shorter than mine. Checkout this photo I just took of my housing with converter outside the pen. I tried to place the calipers about where it looks like his section ends in relation to the converter. His section looks a lot shorter than 29mm.

Also its hard to see in my photos how bad my cap really is...it curves like an elf cap and has a crack I glued.

Gil
 

Attachments

  • SectionSize.jpg
    SectionSize.jpg
    32 KB · Views: 263
If you hadnt told us i doubt we would have known about the crack. The small Bock feed housing is 26.79mm the threads for the feed housing should be at the back inside the threads for the front section you made. You can move the whole assembly farther back until you get a length you like. You may have a longer thread area on the front section that fits inside the pen. Shorten up the amount of threads on the body for the cap by about 1/2. My thread area for the cap are .150 to .200 long.
 
Gil: That curvature in the cap is no big deal. Just go into photoshop, choose filters and choose the lens distortion tool and you can straighten it right up. A lot quicker than making a new cap:eek::biggrin:. Only joking. I think the pen, overall looks good. That's one of the beauties of being a kitless newbie. I don't see all the errors. BUT, one day, I'm sure I'll look back and say, I did that? Anyway, if you are not satisfied, like I tell the LOML It's a learning experience. I think you did good!
 
I compared the OL of your section to Ken's in this photo:

http://www.penturners.org/forum/f13/classic-ebonite-93731/

Looks like yours is about 1/2" longer and your converter sticks farther into the section.

Yeah I saw that pen. I don't see how he can make his section so short unless the feed housing he used is much shorter than mine. Checkout this photo I just took of my housing with converter outside the pen. I tried to place the calipers about where it looks like his section ends in relation to the converter. His section looks a lot shorter than 29mm.

Also its hard to see in my photos how bad my cap really is...it curves like an elf cap and has a crack I glued.

Gil

Yeah, I think you're right, Gil. His feed MUST be shorter than yours. Got to get your grip shorter somehow, but hollowing the finial will help shorten the cap, too. Get right back on that horse!
 
If Ken made his pen using a feed assembly from Meisternib the front section housing can be made much shorter. I have made them down to 16mm long.
 
Gil,

I think you are off to a good start. Don't get discouraged - learn from it.

I think your section length is fine, but you can shorten the cap threaded area on the body, which will enable you to shorten the cap. Also, I plan my caps so that the nib tip is about where the cap/finial transition is, which will enable you to shorten the cap even more.
 
CLicked post too soon.

you can drill into teh cap finail's threaded tenon to make room for the tip to go up in.

For the clip, if you recess it (see George's recent thread) then you can clip the ring and widen (or even shrink) the ring to fit. Doing this the ring size doesn't matter
 
I really appreciate all the feedback and tips everyone. I'm thinking of trying to make my next section around 30mm with 10mm of threads and 20mm visible.

Gil
 
If they were easy there would be no reason for people to sell the kits. You have went a long way in a short time, some would be thankful if they had done as good as you have. Next week this will be something to laugh about!
 
I think you are off to a great start. I am still trying to get to the point of putting a cap on anything that I have made so far. Maybe tomorrow. Don't give up now.
 
Gil, I looked at the pictures before I read your post and my thought was that is a nice looking pen. After reading your post and the other comments I went back and looked at the photos again and can see some of your concerns.

It took me a lot of tries before I came up with a kitless pen that I was happy with. Then the pen after that I destroyed a $17 piece of Casein and I realized that I still have a lot to learn for making kitless pens.

I think you should proudly add the pen you your collection!
 
Well I just killed some Dragons and Orcs in Lord of the Rings Online so I'm feeling better....LOL.

Gil
 
I think the pen looks great for a first. As others said, the next will be better, and the next even better. The sooner you move on, the better.

Mike
 
you can cut a section like this, with longer threads like you mentioned...

Bock #5 nib unit

section by snennewton, on Flickr

Just be sure you have just the right amount of threads towards the back end so the unit can thread in nice and snug.

I start with the A, thread it, and use an L to clean out for the width of the housing, and for a converter to seat properly. I have to do some careful measuring, and mark on my drill bits so I know when I've gone deep enough.

My opinions on your pen though - I really like the long cap. Go check out Nakaya and a couple of the Edison pens to see some expensive long cap pens. Lots of pens have had long caps. I like the proportions around 60/40 myself - which is just awful to some people, but I don't care. :)

Just keep turning and practicing and have fun.
 
You're almost there, so don't give up! Can't expect the first or second to be masterpieces. It will be very hard to remount a piece in a collet chuck and get it to run true if it is tapered at all.

Don't worry about the vacuum thing. All pens have to dipped all the way to the section for filling, with the exception of the Scheaffer Snorkle, which had a cute little tube that could be extended from the feed for filling. See here for illustration. The Snorkel: A Sheaffer Innovation In Filling

Dan
 
Back
Top Bottom