Skie_M
Member
A simple tutorial to put in the "Forum How-To" subforum.
Taking a photo of your creation is just the first step. Making certain that our picture is in focus, on subject, and of an appropriate size for viewing is the next step. Putting it in your thread to show off your work is the last step, making it look RIGHT along the way.
Please note that this is for a Windows based computer. If you are not using Windows, you will need to make certain adjustments based on your picture editing program and browser. If you are using a smartphone or tablet, certain other adjustments would be required as well. Please feel free to add those steps if you know them, as I do not.
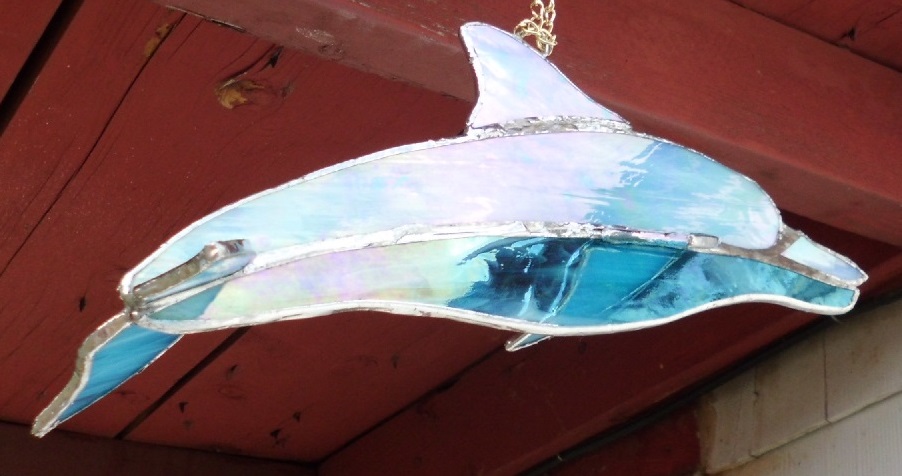
First, you need a picture to work with ... I'll use this one for this tutorial:

As you will see, this is the original unaltered picture.
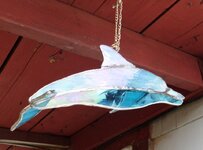
The first step is done ... we have the pic to work with. Next step is to adjust the pic so that it will work for our needs ... for this we need an image editing program. In Windows, there is an adequate one built into the operating system that we can use. Simply right-click the file and select "edit" to open Microsoft Paint in editing mode, with the photo loaded. Make your alterations using the program, and save it in a suitable file format. (I use .jpg, as it's a smaller file format and still conveys plenty of detail.) In this tutorial, I will crop the image down to center the work in the picture...
I then save the file and this is the result:
As you can see, it brings the subject at hand quite clearly to focus. This helps a lot if there is a lot of extra background around the item you wish to show ... reducing the distraction for your viewers.
Now step 2 is completed, we have our picture and it's prepared.
Step 3 is mainly about uploading our photo ... we'll take that up in the next post.
Taking a photo of your creation is just the first step. Making certain that our picture is in focus, on subject, and of an appropriate size for viewing is the next step. Putting it in your thread to show off your work is the last step, making it look RIGHT along the way.
Please note that this is for a Windows based computer. If you are not using Windows, you will need to make certain adjustments based on your picture editing program and browser. If you are using a smartphone or tablet, certain other adjustments would be required as well. Please feel free to add those steps if you know them, as I do not.
First, you need a picture to work with ... I'll use this one for this tutorial:
As you will see, this is the original unaltered picture.
The first step is done ... we have the pic to work with. Next step is to adjust the pic so that it will work for our needs ... for this we need an image editing program. In Windows, there is an adequate one built into the operating system that we can use. Simply right-click the file and select "edit" to open Microsoft Paint in editing mode, with the photo loaded. Make your alterations using the program, and save it in a suitable file format. (I use .jpg, as it's a smaller file format and still conveys plenty of detail.) In this tutorial, I will crop the image down to center the work in the picture...
I then save the file and this is the result:
As you can see, it brings the subject at hand quite clearly to focus. This helps a lot if there is a lot of extra background around the item you wish to show ... reducing the distraction for your viewers.
Now step 2 is completed, we have our picture and it's prepared.
Step 3 is mainly about uploading our photo ... we'll take that up in the next post.

")