
Bob in SF
Member
(and lived to tell about it):
As promised to those who've kindly indulged my little marbling obsession, i.e.
http://www.penturners.org/forum/f13/meet-mr-mrs-marbling;-marbled-pens-149261/
http://www.penturners.org/forum/f13/marblings-beget-quadruplets-149275/
http://www.penturners.org/forum/f13/marbling-craze-continues;-new-quintet-149479/
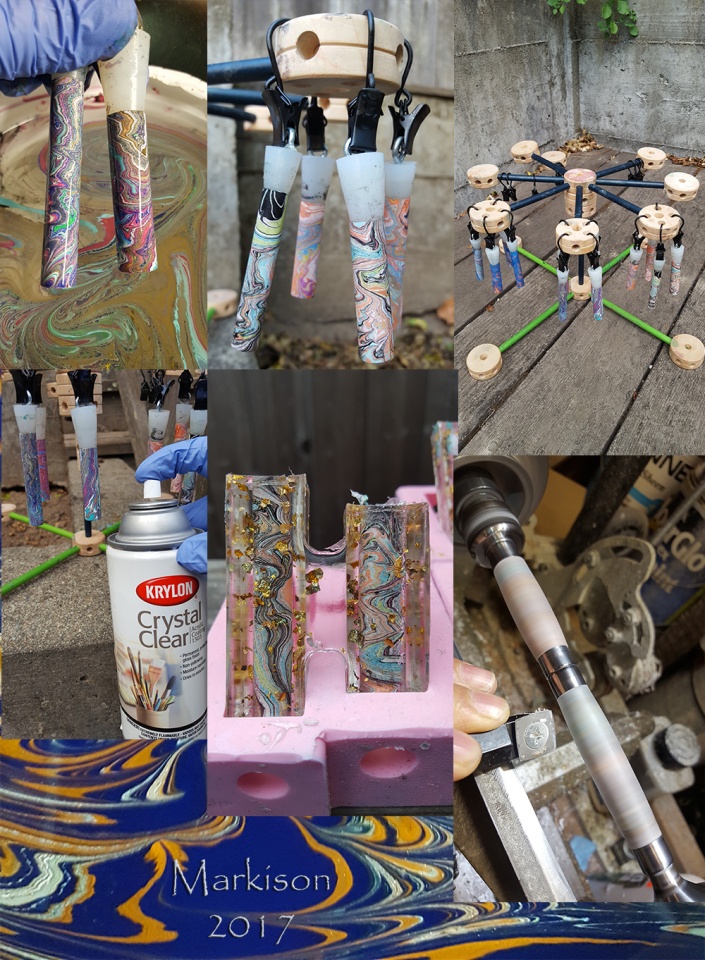
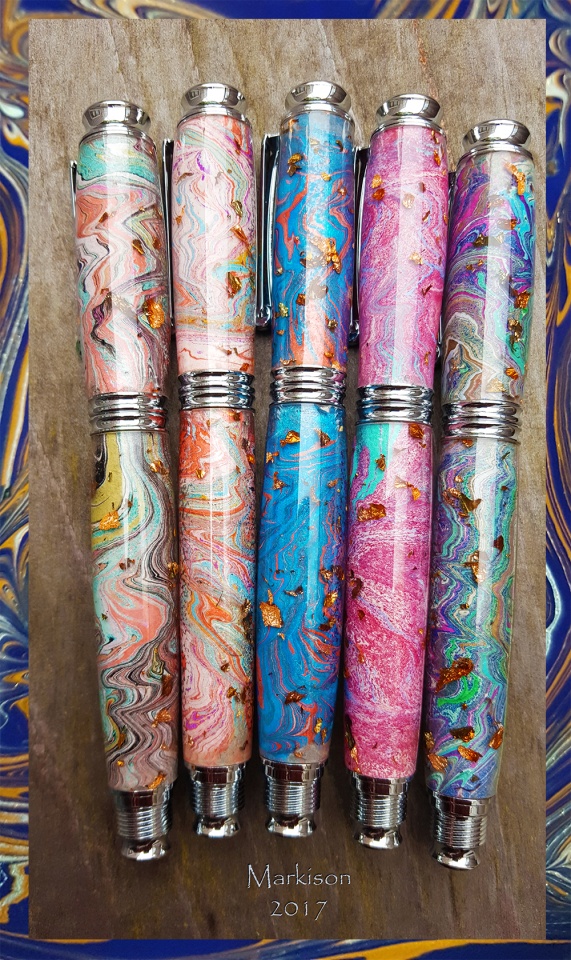
Here is one of many ways to do it - a quintet of Virages for a local book binder/antique book restorer who lives a marbelous life; steps:
The size: Methocel (methyl cellulose), 1.5TBS + 64oz/half gallon of warm water + 1TBS ammonia + 1tsp white distilled vinegar - mixed with a wire whisk, covered, left overnight at room temperature to "debubble". Lasts about 2 weeks - longer if refrigerated.
The mordant: Alum, 6tbs. mixed with 1 qt. of warm water - can be used immediately, lasts a long time.
The paper: I used master marbler Galen Berry's favorite: Texoprint, thin and durable - check out his website:
The Art of Marbling -- Marbled Paper & Marbling Supplies
Alum sponged onto the Texoprint paper - wear gloves because alum is a bit caustic.
Dried paper run through the Xyron to apply dry adhesive to the non-alum side.
Paper adhered to brass pen tubes, then trimmed.
(I vacuum-sealed the tubes to avoid alum oxidation/weakening while I was away camping for a week)
Methocel size (thickened water) poured slowly into a clean 64oz. plastic yogurt container (ideal diameter and depth for color concentration on the surface and depth for dipping tubes)
Golden high flow acrylic paints dropped carefully onto the surface of the size using makeshift brushes from whisk broom bristles glued onto Qtips, static and electric toothbrushes for tiny drops, fan brushes, etc. (and more about paint choices in forthcoming posts).
Home-made rakes (Tpins/balsa/dowels) and bamboo skewers used to make the painting.
Pair of top-stoppered paper covered tubes slowly wiggled down through the most interesting parts of the painting - up to the hilt.
Surrounding painting then cleared away to permit clean up-exit of the tubes out of the painting.
Marbled tubes immediately but gently wiggled around and rinsed in a separate yogurt container of fresh water to clear off the size.
Rinsed tubes hung out to dry on an improvised Tinker Toy-like setup that came to mind some time in my dreams (actually works quite well).
Dried tubes sealed with Krylon spray - or could have airbrushed them with Createx gloss top coat.
Sealed tubes left to dry for 3 days.
Pressure-cast at 50psi, tube-in using Douglas and Sturgess PR (clear casting resin) blinged with some metal flakes.
Turned and finished as usual.
Pix:

I'll post my direct tube marbling method and some other techniques soon - all of this is evolving (and fun).
Hope this helps.
Best regards to all - Bob
As promised to those who've kindly indulged my little marbling obsession, i.e.
http://www.penturners.org/forum/f13/meet-mr-mrs-marbling;-marbled-pens-149261/
http://www.penturners.org/forum/f13/marblings-beget-quadruplets-149275/
http://www.penturners.org/forum/f13/marbling-craze-continues;-new-quintet-149479/
Here is one of many ways to do it - a quintet of Virages for a local book binder/antique book restorer who lives a marbelous life; steps:
The size: Methocel (methyl cellulose), 1.5TBS + 64oz/half gallon of warm water + 1TBS ammonia + 1tsp white distilled vinegar - mixed with a wire whisk, covered, left overnight at room temperature to "debubble". Lasts about 2 weeks - longer if refrigerated.
The mordant: Alum, 6tbs. mixed with 1 qt. of warm water - can be used immediately, lasts a long time.
The paper: I used master marbler Galen Berry's favorite: Texoprint, thin and durable - check out his website:
The Art of Marbling -- Marbled Paper & Marbling Supplies
Alum sponged onto the Texoprint paper - wear gloves because alum is a bit caustic.
Dried paper run through the Xyron to apply dry adhesive to the non-alum side.
Paper adhered to brass pen tubes, then trimmed.
(I vacuum-sealed the tubes to avoid alum oxidation/weakening while I was away camping for a week)
Methocel size (thickened water) poured slowly into a clean 64oz. plastic yogurt container (ideal diameter and depth for color concentration on the surface and depth for dipping tubes)
Golden high flow acrylic paints dropped carefully onto the surface of the size using makeshift brushes from whisk broom bristles glued onto Qtips, static and electric toothbrushes for tiny drops, fan brushes, etc. (and more about paint choices in forthcoming posts).
Home-made rakes (Tpins/balsa/dowels) and bamboo skewers used to make the painting.
Pair of top-stoppered paper covered tubes slowly wiggled down through the most interesting parts of the painting - up to the hilt.
Surrounding painting then cleared away to permit clean up-exit of the tubes out of the painting.
Marbled tubes immediately but gently wiggled around and rinsed in a separate yogurt container of fresh water to clear off the size.
Rinsed tubes hung out to dry on an improvised Tinker Toy-like setup that came to mind some time in my dreams (actually works quite well).
Dried tubes sealed with Krylon spray - or could have airbrushed them with Createx gloss top coat.
Sealed tubes left to dry for 3 days.
Pressure-cast at 50psi, tube-in using Douglas and Sturgess PR (clear casting resin) blinged with some metal flakes.
Turned and finished as usual.
Pix:
I'll post my direct tube marbling method and some other techniques soon - all of this is evolving (and fun).
Hope this helps.
Best regards to all - Bob
Attachments

Last edited:


