Justturnin
Member
I have seen a lot of great Bottle Stoppers of late on the IAP. I really enjoy making them as a break away from the norm. They are quick, and are only limited by your imagination.
One thing I have noticed on some of the stoppers is the stopper itself sometimes does not sit flat against the wood/acrylic. I have a few finished stopper tops like that that are just sitting around w/ not base.
So, here is what I do when I turn my stoppers. If this helps one then my time was well spent. Thanks for looking.
1. Mount your stopper blank into you DP or on your lathe. I mounted mine on my 4 jaw chuck
2. Inset Forestner bit into the drill chuck. Drill out until you have a full smooth circle on your blank. Now your surface is square with your drill chuck.
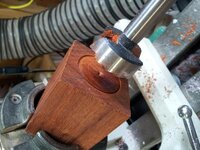
3. I picked up a 3/8"x16 Bit and Tap at Lowes for about $6. Install the appropriate size drill bit to go w/ your 3/8"x16 tap. My Tap is tapered so I drill about 1/4" deeper to make sure my BS mandrell will bottom out in the blank before the screw reaches the bottom of the threads. Drill baby drill.
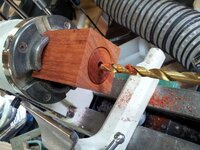
4. I apply 2-3 coats of thin CA to re-enforce the area that will be tapped.
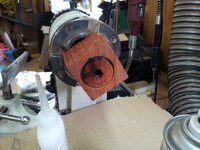
5. Insert the Tap in the drill chuck and start the threading. I go just up 'til the first full thread gets into the hole.
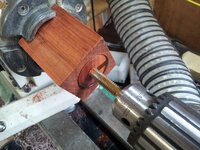
If you have done this so far the bottom of you blank should be square to the hole you drilled and the threads should be started into the blank straight. Before removing I will in the future kiss it with the Forestner again to remove any CA drips that could cause a gap.
6. Remove the blank and finish tapping by hand. You can probably do this on the lathe or DP but I find it easier this way.
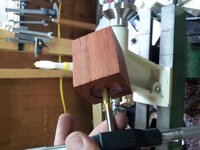
After I tap it I apply 1 coat of thin CA and tap it again and then do this one more time. This makes sure the threads in there are strong and less likely to strip out.
7. Finished threads are somewhat shiny because there are several coats of CA in there.
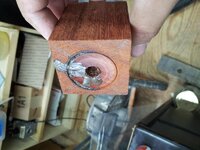
8. After turning I like to finish the bottom all the way in. This way if the customer/owner removes the top to wash the stopper it is finished throughout. To accomplish this I stuff a bit of paper towel in the hole and put it back on the mandrel. Now the blank is sitting a little off of the mandrel and you can get a small tool in there to clean it up and apply finish.
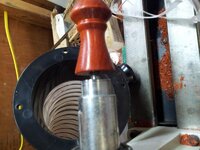
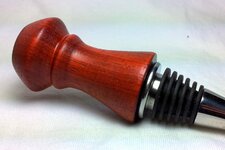
9. TAA DAAA!!!!!! I wasn't going to turn it but could not stop myself. I don't play chess but that is what I was thinking w/ this piece, I am sure I missed the boat but that is where the shape came from. I just threw on 3 coats Friction Polish and a coat of Wax. Typically I would CA but this was for a fun demo.
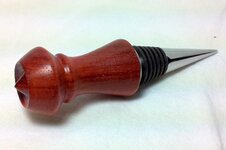
One thing I have noticed on some of the stoppers is the stopper itself sometimes does not sit flat against the wood/acrylic. I have a few finished stopper tops like that that are just sitting around w/ not base.
So, here is what I do when I turn my stoppers. If this helps one then my time was well spent. Thanks for looking.
1. Mount your stopper blank into you DP or on your lathe. I mounted mine on my 4 jaw chuck
2. Inset Forestner bit into the drill chuck. Drill out until you have a full smooth circle on your blank. Now your surface is square with your drill chuck.

3. I picked up a 3/8"x16 Bit and Tap at Lowes for about $6. Install the appropriate size drill bit to go w/ your 3/8"x16 tap. My Tap is tapered so I drill about 1/4" deeper to make sure my BS mandrell will bottom out in the blank before the screw reaches the bottom of the threads. Drill baby drill.

4. I apply 2-3 coats of thin CA to re-enforce the area that will be tapped.

5. Insert the Tap in the drill chuck and start the threading. I go just up 'til the first full thread gets into the hole.

If you have done this so far the bottom of you blank should be square to the hole you drilled and the threads should be started into the blank straight. Before removing I will in the future kiss it with the Forestner again to remove any CA drips that could cause a gap.
6. Remove the blank and finish tapping by hand. You can probably do this on the lathe or DP but I find it easier this way.

After I tap it I apply 1 coat of thin CA and tap it again and then do this one more time. This makes sure the threads in there are strong and less likely to strip out.
7. Finished threads are somewhat shiny because there are several coats of CA in there.

8. After turning I like to finish the bottom all the way in. This way if the customer/owner removes the top to wash the stopper it is finished throughout. To accomplish this I stuff a bit of paper towel in the hole and put it back on the mandrel. Now the blank is sitting a little off of the mandrel and you can get a small tool in there to clean it up and apply finish.

9. TAA DAAA!!!!!! I wasn't going to turn it but could not stop myself. I don't play chess but that is what I was thinking w/ this piece, I am sure I missed the boat but that is where the shape came from. I just threw on 3 coats Friction Polish and a coat of Wax. Typically I would CA but this was for a fun demo.


Last edited:
