Painfullyslow
Member
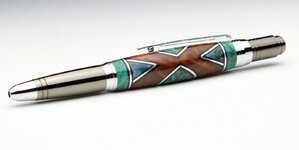
I was asked how I did the scallops in this pen:

I am not sure if this is how others do this, it is just something that I tried and worked for me. I apologize if this is redundant information.

4. Take to the bandsaw and cut the blanks. It is helpful if you have a jig to keep the angles consistent. You want to be as precise as possible with these cuts as it will determine how the entire design lines up at the end. This is also a great test to see if your bandsaw is out of alignment (ask me how I know this).

5. Cut your veneer into a strip the same width as your blank. Once done, hold it against the angle of your main body piece like so:

6. Flip it over and mark the veneer right where it meets the top, making sure that it is properly aligned with the body.

7. Take the piece to your vise, being careful to not clamp it down too tightly as you can easily distort aluminum that is this thin. Set it so that the mark you made is flush with the top of the jaws of the vice. In order to ensure that it is correct, check it with a square.

8. Using a highly precise plastic persuasion implement, bend the aluminum over so that it is at a sharp 90 degrees.

9. Place the aluminum back on the base piece and mark it right at the edge and cut it.

10. Scuff the heck out of all the surfaces, especially the aluminum. When you are done scuffing, scuff it again. Afterwards, wipe all surfaces down with rubbing alcohol to remove any sanding dust. This needs to be rough and clean. Lay down your epoxy between all mating surfaces and clamp at the ends to force the pieces together snugly. Do not over tighten as you are essentially driving a wedge into the acrylic piece here.

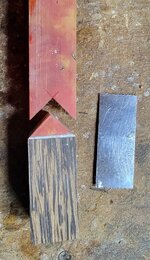
11. Once your epoxy is cured, take it to the bandsaw and remove the excess acrylic. You can cut it as close to the aluminum as you like as you will be removing most of it anyway in the next steps. It is important that everything is flush and square so it is time to re-square the blank again. If you did everything right, it should look like this.

12. Rotate the blank 90 degrees and we now repeat the entire process. Mark the angles exactly the same as you did in step 3.

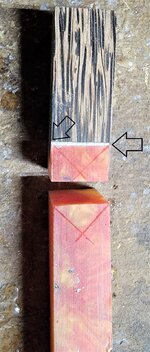
13. Off to the band saw and make your cuts. It is critical that they are even on each side, where the arrows show in the above picture. You should start your cuts exactly where the aluminum meets the wood.

If you did everything right, it should look like a perfect "X" from the top

14. Scuff, clean, and epoxy the pieces together just as you did before. Once it is set, trim the excess off. Square up the blank a 3rd time and you are ready to begin drilling for the tube.

@jttheclockman
I am not sure if this is how others do this, it is just something that I tried and worked for me. I apologize if this is redundant information.
- Pick out your blank materials. I am using black palm, 0.032 aluminum, and a red/yellow acrylic that I cast the other day. Cut the main body to approximate tube length to make it easier to work with.
- Square up the blanks.
- Mark your cuts on both pieces as shown. I am using a 45 degree cut here but you can use whatever you feel like as long as it is consistent throughout the build.
4. Take to the bandsaw and cut the blanks. It is helpful if you have a jig to keep the angles consistent. You want to be as precise as possible with these cuts as it will determine how the entire design lines up at the end. This is also a great test to see if your bandsaw is out of alignment (ask me how I know this).
5. Cut your veneer into a strip the same width as your blank. Once done, hold it against the angle of your main body piece like so:
6. Flip it over and mark the veneer right where it meets the top, making sure that it is properly aligned with the body.
7. Take the piece to your vise, being careful to not clamp it down too tightly as you can easily distort aluminum that is this thin. Set it so that the mark you made is flush with the top of the jaws of the vice. In order to ensure that it is correct, check it with a square.
8. Using a highly precise plastic persuasion implement, bend the aluminum over so that it is at a sharp 90 degrees.
9. Place the aluminum back on the base piece and mark it right at the edge and cut it.
10. Scuff the heck out of all the surfaces, especially the aluminum. When you are done scuffing, scuff it again. Afterwards, wipe all surfaces down with rubbing alcohol to remove any sanding dust. This needs to be rough and clean. Lay down your epoxy between all mating surfaces and clamp at the ends to force the pieces together snugly. Do not over tighten as you are essentially driving a wedge into the acrylic piece here.
11. Once your epoxy is cured, take it to the bandsaw and remove the excess acrylic. You can cut it as close to the aluminum as you like as you will be removing most of it anyway in the next steps. It is important that everything is flush and square so it is time to re-square the blank again. If you did everything right, it should look like this.
12. Rotate the blank 90 degrees and we now repeat the entire process. Mark the angles exactly the same as you did in step 3.
13. Off to the band saw and make your cuts. It is critical that they are even on each side, where the arrows show in the above picture. You should start your cuts exactly where the aluminum meets the wood.
If you did everything right, it should look like a perfect "X" from the top
14. Scuff, clean, and epoxy the pieces together just as you did before. Once it is set, trim the excess off. Square up the blank a 3rd time and you are ready to begin drilling for the tube.
@jttheclockman