How do you deal with exposed tubes?

Signed-In Members Don't See This Ad

goldendj

Member
Joined
Apr 13, 2020
Messages
163
Location
Virginia
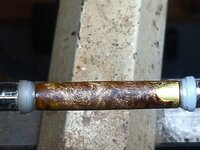
What do you do when you get right down to the finish line turning a blank, and part of the tube is exposed? I.e. there were unexpected voids right up against the tube (or sloppy drilling), which filled with glue.

I can deal with open voids--small ones I gather sanding dust and fill, and for multiple tiny ones I may sand with CA to fill with slurry. But this is already filled with epoxy.

Do you use a dremel and try to clean it out to fill with something colored? Do you give up and scrape the tube clean to try another blank? I really like the blank and hate to see it turned into chips on the floor.

You can see a tiny void to the left the epoxy couldn't flow into, which I filled with sanding dust. But the right is just epoxy exposing the tube. The other end is the same, only on the other side.
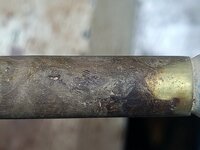
20220315_213349.jpg
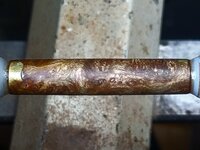
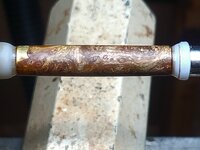
Otherwise I think the blank will look great once finished.
Here it is sanded at 220 with thin CA to fill the tiny voids, then again at 320 with tung oil.
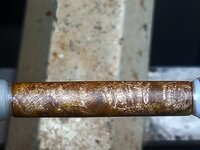
20220315_214404.jpg
20220315_214350.jpg
20220315_214417.jpg
20220315_214425.jpg
Suggestions? Hate to waste a pen kit, but also really like the figure on this.
 
Signed-In Members Don't See This Ad

goldendj

Member
Joined
Apr 13, 2020
Messages
163
Location
Virginia
I think JT is spot on. Do you have any non-burl wood of the same species that you might use for the "oops bands"?
I have no clue what the wood is--it was one of many in a big box of unidentified blanks I got a while back. In my database it's labeled "assorted wood, figured."

I've got some black acrylic that might match the kit.

Do I need to worry about shattering the blank when I go to trim the ends? The wood is less than 0.5mm thick at that point.
 

jttheclockman

Member
Joined
Feb 22, 2005
Messages
19,150
Location
NJ, USA.
I have no clue what the wood is--it was one of many in a big box of unidentified blanks I got a while back. In my database it's labeled "assorted wood, figured."

I've got some black acrylic that might match the kit.

Do I need to worry about shattering the blank when I go to trim the ends? The wood is less than 0.5mm thick at that point.
No not at all. Just use either a skew or parting tool to take of the same amount on both ends. Yes you can use acrylic. It will have a different look than wood.
 

goldendj

Member
Joined
Apr 13, 2020
Messages
163
Location
Virginia
No not at all. Just use either a skew or parting tool to take of the same amount on both ends. Yes you can use acrylic. It will have a different look than wood.
No joy. Must have done a lousy job gluing tube on, because when I pushed on the Sharpie to mark where to turn, the wood crumpled like an eggshell over another void ...
 

jttheclockman

Member
Joined
Feb 22, 2005
Messages
19,150
Location
NJ, USA.
No joy. Must have done a lousy job gluing tube on, because when I pushed on the Sharpie to mark where to turn, the wood crumpled like an eggshell over another void ...
See it is always difficult to tell people what to do or share our methods because we do not know all factors. If you are still going to try to save the blank then maybe coat the blank with several coats of thin CA to stabilize it and give it some strength. I would just use a pencil to make a mark for cutting and with lathe running allow pencil to encircle the blank leaving a mark. Not much more I can say. Good luck.
 

goldendj

Member
Joined
Apr 13, 2020
Messages
163
Location
Virginia
See it is always difficult to tell people what to do or share our methods because we do not know all factors. If you are still going to try to save the blank then maybe coat the blank with several coats of thin CA to stabilize it and give it some strength. I would just use a pencil to make a mark for cutting and with lathe running allow pencil to encircle the blank leaving a mark. Not much more I can say. Good luck.
Win some, lose some. It was good advice either way.
 

jrista

Member
Joined
Aug 12, 2021
Messages
2,241
Location
Colorado
Turn the ends down with a parting tool and put oops bands on the ends with maybe a black ebony wood or you could go light like aspen or maple. I would not use a burl because it contrasts with what the main body is.
Oops Bands. I like it!
 

penicillin

Member
Joined
Feb 27, 2019
Messages
1,036
This is a perfect example of why I recommend that beginning pen turners buy spare pen tubes. (I assume that most people have extra pen blanks, too.) Having spare tubes on hand takes away much of the beginner's concerns about failures. They happen. With spare tubes and pen blanks, you can start over and use the pen kit parts as before. No muss, no fuss, no stress.

(Note: I am not implying that @goldendj is a beginner. All I am saying is that this is a perfect example of a scenario where having spare tubes helps to take away the stress and concern about penturning or glue failures.)
 

egnald

Member
Joined
Jun 9, 2017
Messages
3,125
Location
Columbus, Nebraska, USA
I fully concur with penicillin's recommendation for buying spare pen tubes. I usually buy some pre-packaged sets and I have long, cut-to-length tubes in several of the standard sizes just in case. The spare tubes have saved me on multiple occasions, especially when I was using CA to glue the tubes in and the glue seized up with the tube only partially inserted. (There is a fix for that - by gluing in a second tube from the opposite end and then trimming it flush). I mostly use epoxy now though, but still have had multiple occasions when I simply didn't like how the blanks looked after I got them turned - nothing can fix that other than turning a new blank using a new set of tubes. - Dave
 
Top Bottom