Hollow Form with Red Tailed Hawk Feathers

Signed-In Members Don't See This Ad
See more from mhbeauford

mhbeauford

Member
Joined
Sep 4, 2011
Messages
167
Location
North Texas
This is a hollow form 13" x 4" in box elder. The feathers are done with a woodburning tool then colored with acrylic. The piercing was done with a dental type tool, air powered @350,000 rpm. The feathers are done to look like the feathers of a Red Tailed Hawk.

1_Redtailed_feathers.jpg
 
Signed-In Members Don't See This Ad

holmqer

Local Chapter Leader
Joined
Aug 3, 2007
Messages
1,662
Location
CT, USA.
Absolutely fantastic. Consistent piercing, great detail on the feathers, nice rim
 

flyitfast

Member
Joined
Sep 3, 2009
Messages
1,690
Location
San Antonio, TX 78247
Uuhhhhhhhhhhhhhhhhhhhhhhhhh! :bulgy-eyes:

Once I get my jaw back in place, I will say how really great that is.........
Thanks for showing something awesome besides a pen.
gordon
 

firedkm

Member
Joined
Aug 23, 2011
Messages
89
Location
Medford, NJ
That is some purty looking art work! Awesome job on faking me out with the feathers. I thought they were real too:embarrassed:
 

SDB777

Member
Joined
Feb 6, 2010
Messages
6,620
Location
Cabot, Arkansas USA
350,000 RPM! I wouldn't want to be anywhere around equipment turning that fast.


What kind of wood did you use here?

There is so much going on, I'm amazed by everything!


Scott
 

mhbeauford

Member
Joined
Sep 4, 2011
Messages
167
Location
North Texas
350,000 RPM! I wouldn't want to be anywhere around equipment turning that fast.


What kind of wood did you use here?

There is so much going on, I'm amazed by everything!


Scott

It's the same kind of tool that the dentist uses in your mouth except I use one with a straight shaft like dental techs use. The cutters are solid carbide with 1/16" shaft and a 1/32" cutting tip about 5/32" long. With cutters that small you need that speed to get the surface speed to cut well. I work with a magnifying head piece to see the detail.

The wood is Box Elder (Ash Leaf Maple)
 

ctubbs

Member
Joined
Sep 12, 2010
Messages
3,588
Location
Murray, Kentucky
When i manage to get a pen finished where the blank and components come together with no detectable bump, I nearly break my arm patting myself on the back. Something of this nature is inconceivable to me. Your talent and patience must be great.
Charles
 

fernhills

Member
Joined
Jan 22, 2007
Messages
2,142
Location
Hellertown, PA, USA.
Very nice, Beautiful.. Is that a 2 piece HF ?.. I have been reading about them. I am very interested in making them, not any where near the art work that you can do, but a little further down the line. There is not to much info out there about 2 piece HF`s. I have attempted to crudely make a small one, shown in another post. Now that i have seen yours i will strive to make one a little better then the 1st one i did. Thanks for showing.. Carl
 

socdad

Member
Joined
Feb 2, 2010
Messages
1,137
Location
Dayton, Ohio
I always look at the photos before I read the description and I was ready to go into a 'you can not use hawk feathers' rant … Absolutely stunning!
 

mhbeauford

Member
Joined
Sep 4, 2011
Messages
167
Location
North Texas
Very nice, Beautiful.. Is that a 2 piece HF ?.. I have been reading about them. I am very interested in making them, not any where near the art work that you can do, but a little further down the line. There is not to much info out there about 2 piece HF`s. I have attempted to crudely make a small one, shown in another post. Now that i have seen yours i will strive to make one a little better then the 1st one i did. Thanks for showing.. Carl

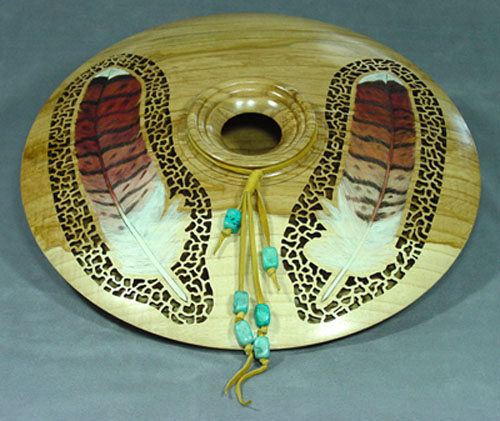
Yes, its 2 piece. The top has to be 1/8" thick or less to pierce, the cutting tip is 1/32" in diameter and about 5/32 long. I have found no tools that will undercut that far, at that angle and that thin. I have turned one piece HFs for piercing up to about 6-7" and open vase and bowl forms larger.

In this piece, the seam is at the knife edge which kind of fools the eye and the seam isn't readily visible. This was cut from one piece of Box Elder and split with a chainsaw, it was too big for my bandsaw (12"). Each half was rough turned, bagged, dried and then finished turned, glued on the lathe for alignmen. Then a small amount of turning was done to true up the edge and shape the center opening, then sanded. Then reversed chucked (pressure chuck between centers), the bottom finished, except for the nub, which was removed after removing from the lathe. Sanded on the lathe as much as possible, Mylands Celluose sanding sealer applied and finished sanded. After woodburning the feathers, adding color toning with acrylics (airbrush paint, it's thin and translucent) and piercing, it was finished with Deft Spray Lacquer.

Making it from the same block matches the color and grain patterns, except for the chainsaw kerf and truing the edges!!!!
 

PaulDoug

Member
Joined
Mar 2, 2008
Messages
3,488
Location
Benton City, WA.
"The feathers are done with a woodburning tool then colored with acrylic." per his post. They sure look real! That is some nice art.
 
Top Bottom