Hi first post. Help for lathe

Signed-In Members Don't See This Ad

mrclint

Member
Joined
Oct 20, 2023
Messages
7
Location
Missouri
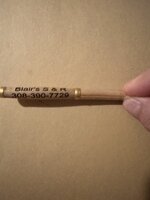
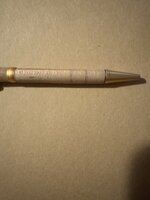
Hi I got a customer that ordered 10 slim line pens with engraving. I made the first one came out perfect, went and add EEE Wax and I had my rpm's at 1500 and used a blue rag that mechanics use and it left some black spot on pen.
Here's my questions:

How fast should my lathe run buffing wax?

What rags do people use for finishing?

Is there a way to get black marks off my assembled pen that's been laser engraved?

Thanks in advance.
 

Attachments

  • IMG_0467.jpeg
    IMG_0467.jpeg
    173.4 KB · Views: 108
  • IMG_0468.jpeg
    IMG_0468.jpeg
    148.9 KB · Views: 115
Signed-In Members Don't See This Ad

jrista

Member
Joined
Aug 12, 2021
Messages
2,241
Location
Colorado
How much pressure were you using to finish? Too much could cause problems.

Some of the marks look perfectly round around the blank. Curious how that happened...

As for resolving the issue. Well, that is probably going to require disassembling the pen, removing the finish, re-sanding a bit, and re-finishing. I wouldn't try to sand back a wax finish...its not that its impossible, but its very problematic. It'll take some careful tooling with something. I'd avoid using a gouge...either a negative rake carbide tool, or a normal carbide tool (although negative rake would be better IMO), or perhaps a strait edged skew in a negative rake orientation to the blank, should do the trick to scrape off the finish without removing much wood. If the marks are in the finish, then you could just re-finish at that point. If the marks are in the wood, then you might have to do some very light turning to take off the finest amounts of wood until the marks are gone. I wouldn't go too hard at it, though, as if you turn off too much then the blanks will no longer match the fittings well enough. Not to mention losing the engraving. The fact that its engraved certainly complicates the issue...if you can't re-mount the blank so it is entirely true, then...there might not be much you can do, outside of turning and engraving a new set of blanks from scratch.

If you were using CA you could build up the finish to the right diameter again. Same should go for polyurethanes. Both would provide a more durable finish than wax. If you want a wax finish, I recommend Pens Plus instead. Its a friction polish with microcrystalline wax, which creates a film on the surface that hardens to a crystal-clear, fingerprint resistant and fairly durable coating that isn't susceptible to degeneration from use (like most friction polishes and waxes are).
 

mrclint

Member
Joined
Oct 20, 2023
Messages
7
Location
Missouri
Since you mentioned it, I remember using quite a bit of pressure, so I'll remember that next time, I'll disassemble the bottom part of pen and redo like you said. I appreciate you taking the time and explaining for me thank you very much.
 

jttheclockman

Member
Joined
Feb 22, 2005
Messages
19,151
Location
NJ, USA.
First and foremost, welcome to the site. Glad you found us. Hope you stick around and share with us. next what wood is that you are using. I see a straight brownish line running down the top of the pens barrel. No polishing is going to do that. Next thing is start with sanding. If you are going to use just EEE pen turners wax and no other top coat underneath then you need to close the grains of wood and sand to about 800 to 1200 grit to get a nice feel. Sanding is done at a lower speed than polishing. Usually 750 works well. When done always sand with the grain before moving onto the next grit. This helps get rid of circular scratches. Do not try to jump grit sizes to fast. You are not helping yourself. Also always wipe the blank with a clean cloth before sanding with next grit. Do not put pressure on sanding to make it hot. Heat is the enemy. You get to the polishing portion then things change abit. you increase the speed( 1500 to 1750) because now heat to an extent will help melt that EEE wax. But never use any colored cloths. You want soft cotton bits of white cloth. When applying EEE, a little goes a long way. The rings you see are too much product in one area and heated and burnt into the wood grain. Keep the cloth moving in a back and forth motion as you climb both up and down pen blank. Do not put alot of pressure as you do this. Let the speed and your motion do the work. Besides if at any time you use excessive pressure and are using a mandrel you will and I mean will bend that shaft and then you will get out of round blanks and be back here asking how that happened. Seen it too many times here with newbies.

Now you said you took it apart but you can try DNA to get rid of marks because that is just a wax. If not then you need to sand back and try with your last grit size first to see if they are removed. If you sanded correctly the grain of the wood should be closed very well. Good luck and show us finished pens.
 

jrista

Member
Joined
Aug 12, 2021
Messages
2,241
Location
Colorado
Since you mentioned it, I remember using quite a bit of pressure, so I'll remember that next time, I'll disassemble the bottom part of pen and redo like you said. I appreciate you taking the time and explaining for me thank you very much.
Yeah, with friction polishes, you need to be careful with pressure. You want firm pressure, and a lot of back and forth movement, to produce friction and heat, but not so much that you are burning the applicator into the finish. That is surprisingly easy to do. I used to use Myland's friction polish on a lot of stuff, as well as home made O.B. Shine Juice. I've ditched both in favor of other finishes, though, as they can be a bear at times (beyond their propensity to go bad, shellac doesn't last forever, which then makes them even harder to deal with.)

For pens, aside from Pens Plus, its best to steer clear of friction polishes or anything with a natural wax (i.e. carnauba, bees, etc.) as they aren't really up for the kind of use a pen gets. Pens Plus's microcrystalline wax is a high grade, hardening synthetic wax with small crystals that produces a durable, crystal clear film, and is significantly more reliable for pens than other friction polishes. Note, though, that it too has shellac, and it will go bad (had this happen to me twice now, and I've not been able to get through an entire bottle...) I really like the look of a glassy clear pens plus finish, but the cost of the bottle when you can only use about half of it, is pretty high.

I've recently switched to using GluBoost. It was actually something on my list to try for over a year here. My last bottle of Pens Plus went bad (shellac is a natural secretion from the Lac bug, so it breaks down over time and will go bad in solution), and I decided to give GluBoost a try. Its amazing stuff, and I think its now my favorite finish. I've tried other CA glues, but I have never been able to get results like GluBoost delivers, and its a lot safer too (I have a severe allergic/toxic reaction to most CA, but GluBoost is low fume, low odor, and I have not had any major issues with it.)

I've also worked with polyurethane finishes as well. This will also create a durable finish, and one that might be even more resilient to scratches than CA. I've applied wipe on poly with a rag and foam brush. Results are ok, but there are resources (PDFs) here on IAP that show how to use a dipping method to get much better results, which might be worth a try.

Another option is Craft Coat. I have a bottle of that stuff, and its another hard, durable coating. I think its urethane based, IIRC, but a water based form I think. Anyway, it produces a nice hard finish that can either be left satin and thin, to let the wood character show through, or built up a bit and sanded back/polished smooth for a nice shiny hard finish. Being water based, you might need to work the first coat a bit to get it to saturate into the wood well, otherwise it might form more of a surface coat (which doesn't bring out the chatoyance of the wood as well as poly, or CA.)

In any case...it is worth looking into other finishes. If you really like friction polish, then I'd try a bottle of Pens Plus. I have shared my techniques with it a few times on these forums...you can search through my posts to find some of them. Otherwise, I'd look into one of the hard, durable finishes. Wipe On Poly is actually pretty easy to use, and might make a good first trial. It will produce a more lusterous sheen, than a shiny glossy finish, but that is part of its appeal! ;) You do need to let each coat dry for a while, then cut it back just a bit to smooth it out, before applying the next. You can apply a few coats pretty easily though, and it will make for much more durable pens. CA can be a bit more challenging, as you only have a few seconds to apply each coat, but its also a good reliable finish. I'd do some research on how to apply it, what applicator (i.e. foam) is best to get smooth results without wasting much of the CA.

Another possible option, although not necessarily the most ideal, might just be a plain oil finish. Finishing oils will polymerize and cure to a hard-ish finish over about 20 days or so. They can make a nice satin finish that can bring out the chatoyance of the wood nicely. The key drawback is you need to wait the full 20-30 days for the oil to harden, otherwise it won't be resilient to use and will leave an oily residue on the user's fingers. Plain oil finish can be buffed to a very nice shine, too, if that's what you want. Not as hard and resilient as CA, poly, or craft coat, but probably better than friction polish.
 

mrclint

Member
Joined
Oct 20, 2023
Messages
7
Location
Missouri
First and foremost, welcome to the site. Glad you found us. Hope you stick around and share with us. next what wood is that you are using. I see a straight brownish line running down the top of the pens barrel. No polishing is going to do that. Next thing is start with sanding. If you are going to use just EEE pen turners wax and no other top coat underneath then you need to close the grains of wood and sand to about 800 to 1200 grit to get a nice feel. Sanding is done at a lower speed than polishing. Usually 750 works well. When done always sand with the grain before moving onto the next grit. This helps get rid of circular scratches. Do not try to jump grit sizes to fast. You are not helping yourself. Also always wipe the blank with a clean cloth before sanding with next grit. Do not put pressure on sanding to make it hot. Heat is the enemy. You get to the polishing portion then things change abit. you increase the speed( 1500 to 1750) because now heat to an extent will help melt that EEE wax. But never use any colored cloths. You want soft cotton bits of white cloth. When applying EEE, a little goes a long way. The rings you see are too much product in one area and heated and burnt into the wood grain. Keep the cloth moving in a back and forth motion as you climb both up and down pen blank. Do not put alot of pressure as you do this. Let the speed and your motion do the work. Besides if at any time you use excessive pressure and are using a mandrel you will and I mean will bend that shaft and then you will get out of round blanks and be back here asking how that happened. Seen it too many times here with newbies.

Now you said you took it apart but you can try DNA to get rid of marks because that is just a wax. If not then you need to sand back and try with your last grit size first to see if they are removed. If you sanded correctly the grain of the wood should be closed very well. Good luck and show us finished pens.
Thank you so much for the pointers. After I'm done I supply a picture of finished pen, made from Maple.
 

mrclint

Member
Joined
Oct 20, 2023
Messages
7
Location
Missouri
Yeah, with friction polishes, you need to be careful with pressure. You want firm pressure, and a lot of back and forth movement, to produce friction and heat, but not so much that you are burning the applicator into the finish. That is surprisingly easy to do. I used to use Myland's friction polish on a lot of stuff, as well as home made O.B. Shine Juice. I've ditched both in favor of other finishes, though, as they can be a bear at times (beyond their propensity to go bad, shellac doesn't last forever, which then makes them even harder to deal with.)

For pens, aside from Pens Plus, its best to steer clear of friction polishes or anything with a natural wax (i.e. carnauba, bees, etc.) as they aren't really up for the kind of use a pen gets. Pens Plus's microcrystalline wax is a high grade, hardening synthetic wax with small crystals that produces a durable, crystal clear film, and is significantly more reliable for pens than other friction polishes. Note, though, that it too has shellac, and it will go bad (had this happen to me twice now, and I've not been able to get through an entire bottle...) I really like the look of a glassy clear pens plus finish, but the cost of the bottle when you can only use about half of it, is pretty high.

I've recently switched to using GluBoost. It was actually something on my list to try for over a year here. My last bottle of Pens Plus went bad (shellac is a natural secretion from the Lac bug, so it breaks down over time and will go bad in solution), and I decided to give GluBoost a try. Its amazing stuff, and I think its now my favorite finish. I've tried other CA glues, but I have never been able to get results like GluBoost delivers, and its a lot safer too (I have a severe allergic/toxic reaction to most CA, but GluBoost is low fume, low odor, and I have not had any major issues with it.)

I've also worked with polyurethane finishes as well. This will also create a durable finish, and one that might be even more resilient to scratches than CA. I've applied wipe on poly with a rag and foam brush. Results are ok, but there are resources (PDFs) here on IAP that show how to use a dipping method to get much better results, which might be worth a try.

Another option is Craft Coat. I have a bottle of that stuff, and its another hard, durable coating. I think its urethane based, IIRC, but a water based form I think. Anyway, it produces a nice hard finish that can either be left satin and thin, to let the wood character show through, or built up a bit and sanded back/polished smooth for a nice shiny hard finish. Being water based, you might need to work the first coat a bit to get it to saturate into the wood well, otherwise it might form more of a surface coat (which doesn't bring out the chatoyance of the wood as well as poly, or CA.)

In any case...it is worth looking into other finishes. If you really like friction polish, then I'd try a bottle of Pens Plus. I have shared my techniques with it a few times on these forums...you can search through my posts to find some of them. Otherwise, I'd look into one of the hard, durable finishes. Wipe On Poly is actually pretty easy to use, and might make a good first trial. It will produce a more lusterous sheen, than a shiny glossy finish, but that is part of its appeal! ;) You do need to let each coat dry for a while, then cut it back just a bit to smooth it out, before applying the next. You can apply a few coats pretty easily though, and it will make for much more durable pens. CA can be a bit more challenging, as you only have a few seconds to apply each coat, but its also a good reliable finish. I'd do some research on how to apply it, what applicator (i.e. foam) is best to get smooth results without wasting much of the CA.

Another possible option, although not necessarily the most ideal, might just be a plain oil finish. Finishing oils will polymerize and cure to a hard-ish finish over about 20 days or so. They can make a nice satin finish that can bring out the chatoyance of the wood nicely. The key drawback is you need to wait the full 20-30 days for the oil to harden, otherwise it won't be resilient to use and will leave an oily residue on the user's fingers. Plain oil finish can be buffed to a very nice shine, too, if that's what you want. Not as hard and resilient as CA, poly, or craft coat, but probably better than friction polish.
Thank you for all this information, was very helpful and probably will help others as well. 👍
 

randyrls

Member
Joined
Feb 2, 2006
Messages
4,829
Location
Harrisburg, PA 17112
The "flashing" around the engraving is from the laser vaporizing the surface of the pen. Finish the pen completely but no wax. Put painters tape over the blank and laser engrave. Remove the tape and wax / polish.
 

mrclint

Member
Joined
Oct 20, 2023
Messages
7
Location
Missouri
The "flashing" around the engraving is from the laser vaporizing the surface of the pen. Finish the pen completely but no wax. Put painters tape over the blank and laser engrave. Remove the tape and wax / polish.
Wow never thought of that can't wait to try it out. Thanks!
 
Top Bottom