Help with my first Celtic knot results

Signed-In Members Don't See This Ad

ramaroodle

Member
Joined
Feb 15, 2018
Messages
686
Location
Seattle
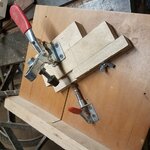
I am trying to figure out what I'm doing wrong with the making of this blank. The knots are made of a strip of lacewood veneer sandwiched between 2 strips of figured maple veneer. (both commercial veneer from Rockler I had in the shop)

I've got 2 issues that I see right away. The bottom of my knots are obviously screwed up. Also, there appears to be "ghosting" around the edges of the knots but I'm thinking that it's because there is a gap between the insert and the blank which I should have clamped better. I notice that depending on the orientation the lacewood has striations that look like rope, which is interesting.

The bandsaw jig requires me to make 2 cuts in order for the slot to be wide enough to accept the veneer sandwich but it's hard to get the bottom of the cuts to line up perfectly.

1. Should I use a table saw jig instead of a band saw so the bottom of the slot is always square?
2. Should I not use veneer strips because they are too thin and are tearing out? It only seems to happen at the bottom of the cut which is why I think it might be related to the squareness of the slot.
3. I also notice that the edges of the knot layers are not as well defined as I would like. Could this also be due to the integrity of the veneer and I should find a way to cut my slices from solid wood vs commercial veneer?

Any advice would be greatly appreciated.

Spt3A7Ul.jpg
 
Signed-In Members Don't See This Ad

jttheclockman

Member
Joined
Feb 22, 2005
Messages
19,082
Location
NJ, USA.
Andy lets start with asking a few more questions. I am assuming you are using a bandsaw because you ask about the table saw. No matter weather you use a bandsaw or a tablesaw you need a jig. This is because you need exact repeatable cuts all the time. So are you using a jig and what kind.?? It has to be one that locks solid and does not waver. Many examples here if you do a search. I prefer a tablesaw.

The blade. Now from the looks if you are using a bandsaw they you are making multiple cuts some how. If you are cutting once and sticking material between cuts your knot will never end up even because you keep losing material with each cut. The best way to get a good knot is to not cut all the way through and then fill the kerf with whatever material you choose as long as it matches the thickness of your kerf. Can you make a kerf wider than a bandsaw blade width you ask?? Yes you can if you use some stops and use them for all 4 cuts. In other words you need to establish a true edge weather top or bottom does not matter as long as every time you make a cut that edge is against your designated stop. Hard to explain. There are many videos out there on knots.

Material. Any material is acceptable for fill as long as it matches the kerf.
 

chartle

Member
Joined
Mar 13, 2015
Messages
1,287
Location
Pgh, PA
I've only used a table saw for my cuts since I have a crap band saw. But even with a good one I think it would be difficult getting a perfect slot using 2 passes. I would think the blade could flex a bit on the second cut.

I do think the veneer is tearing out. How did you glue the strips together be fore you put them in? Maybe alternating the grain would help. also maybe soaking the knot in CA before you get down to finished size.

Also I have 2 clamps that keep everything tight to the fence as I cut my slots.
 
Last edited:

ramaroodle

Member
Joined
Feb 15, 2018
Messages
686
Location
Seattle
Andy lets start with asking a few more questions. I am assuming you are using a bandsaw because you ask about the table saw.

I am using a jig like this one found in this video.
MkiePjB.jpg


I insert a strip of material that gives me the proper gap for the thickness of my insert. The bandsaw blade requires multiple cuts as the kerf is too narrow for the insert.

I also built one like this for the table saw for segmenting which is easy enough to add a stop to. Haven't tried that one yet.
8EWnrpWm.jpg


I've only used a table saw for my cuts since I have a crap band saw. But even with a good one I think it would be difficult getting a perfect slot using 2 passes. I would think the blade could flex a bit on the second cut.

I do think the veneer is tearing out. How did you glue the strips together be fore you put them in? Maybe alternating the grain would help. also maybe soaking the knot in CA before you get down to finished size.

Also I have 2 clamps that keep everything tight to the fence as I cut my slots.

I am using CA for the sandwich then soaking the entire insert in CA once I stick it in then again once I turn it some.
 
Last edited:

jttheclockman

Member
Joined
Feb 22, 2005
Messages
19,082
Location
NJ, USA.
The bandsaw the blade is just not stiff enough for things like that to be accurate. You would be much better working on the tablesaw. You can do it with one cut depending on blade thickness. Then match the infill to the blade kerf. 3/32 is good for things like that or even 1/8" As I said your accuracy increases if you do not cut all the way through the blank. Easier to clamp and glue up too. The infill needs to be able to slide in smoothly without distorting the blank and yet stays in if tipped. This allwos enough room for the glue. Here is a photo of my jig.
 

Attachments

  • IMGP0970.jpg
    IMGP0970.jpg
    227.5 KB · Views: 378

ramaroodle

Member
Joined
Feb 15, 2018
Messages
686
Location
Seattle
:)
The bandsaw the blade is just not stiff enough for things like that to be accurate. You would be much better working on the tablesaw. You can do it with one cut depending on blade thickness. Then match the infill to the blade kerf. 3/32 is good for things like that or even 1/8" As I said your accuracy increases if you do not cut all the way through the blank. Easier to clamp and glue up too. The infill needs to be able to slide in smoothly without distorting the blank and yet stays in if tipped. This allwos enough room for the glue. Here is a photo of my jig.
Yes! That's kind of what I was thinking. I don't cut all the way through. I'm not at home so I can't send a pic of my actual jig but it's more like yours. (which I think I'll try and duplicate if you don't mind) I'm thinking that it's better to make the infill the width of the saw kerf rather than trying to make the kerf the width of the infill. That eliminates the "multi-cut" step. The table saw would give me a a consistent width, depth and a flat bottom in the slot? Can't really do much about the thickness of the commercial veneer so I just need to cut my own. Does that seem like I'm on the right track? I've got regular and thin kerf blades. Also, I think the "ghosting" is a result of the blank being distorted because neither the veneer or the slot are consistent.

And I love the look of that aluminum insert too.:)
 
Last edited:

chartle

Member
Joined
Mar 13, 2015
Messages
1,287
Location
Pgh, PA
Here is my jig. I had the push clamp already so figured I'd use it.

I would size the kerf to the insert and use 2 cuts. It very easy to do by adding thin shims to the stop block.
 

Attachments

  • 15529536021756937530592644034324.jpg
    15529536021756937530592644034324.jpg
    386.2 KB · Views: 398

jttheclockman

Member
Joined
Feb 22, 2005
Messages
19,082
Location
NJ, USA.
:)
The bandsaw the blade is just not stiff enough for things like that to be accurate. You would be much better working on the tablesaw. You can do it with one cut depending on blade thickness. Then match the infill to the blade kerf. 3/32 is good for things like that or even 1/8" As I said your accuracy increases if you do not cut all the way through the blank. Easier to clamp and glue up too. The infill needs to be able to slide in smoothly without distorting the blank and yet stays in if tipped. This allwos enough room for the glue. Here is a photo of my jig.
Yes! That's kind of what I was thinking. I don't cut all the way through. I'm not at home so I can't send a pic of my actual jig but it's more like yours. (which I think I'll try and duplicate if you don't mind) I'm thinking that it's better to make the infill the width of the saw kerf rather than trying to make the kerf the width of the infill. That eliminates the "multi-cut" step. The table saw would give me a a consistent width, depth and a flat bottom in the slot? Can't really do much about the thickness of the commercial veneer so I just need to cut my own. Does that seem like I'm on the right track? I've got regular and thin kerf blades. Also, I think the "ghosting" is a result of the blank being distorted because neither the veneer or the slot are consistent.

And I love the look of that aluminum insert too.:)

Andy as far as infill you can sand down commercial veneers or build your own. I have different degree jigs like this. That one happens to be 45 degree and the blank you see is actually not a knot. It is more a feather blank and the results were this. Just something else you can do with the jig. Basically these are only cut half way through the blank and infilled. These are part of my black acrylic and aluminum series of pens I have been making. I find it alot easier to match the fill to the kerf.
 

Attachments

  • Copy of IMGP0993.jpg
    Copy of IMGP0993.jpg
    154.7 KB · Views: 355
Last edited:

ramaroodle

Member
Joined
Feb 15, 2018
Messages
686
Location
Seattle
Thanks everyone for the suggestions. I abandoned the bandsaw jig and built a table saw jig a la John & Cliff. After applying medium CA into the slot and onto the infill I then infused it with thin CA and clamped it. I did this for each cut before moving on to the next one. The knot in the first picture was made without clamping the blank between each process and you can still see the ghosting around the edges.

Then, once I started clamping then that seemed to fix my ghosting and uneven slot bottom issues. I then cut my own thin strip veneer (using solid wood, not commercial veneer) which I glued using CA making sure it was a semi-snug fit that didn't cause any distortion of the slot. Going forward I will probably make the infill layers using wood glue but was anxious to see the fruits of my labor this time.

Not perfect, but getting there. Please excuse the fog in the 3rd picture as I rushed the finish before the tube glue had cured as the goal was to get the knot right, not make a finished pen.

mDvLCgvm.jpg
UoFlFqOm.jpg
 

jttheclockman

Member
Joined
Feb 22, 2005
Messages
19,082
Location
NJ, USA.
Hey that jig looks familiar:biggrin::biggrin::biggrin: You are getting much better. The one on the lower left I can tell you did not drill dead center of the design because it shifted on you. Need to be careful of that. You are hooked. :):)
 

chartle

Member
Joined
Mar 13, 2015
Messages
1,287
Location
Pgh, PA

ramaroodle

Member
Joined
Feb 15, 2018
Messages
686
Location
Seattle
Hey that jig looks familiar:biggrin::biggrin::biggrin: You are getting much better. The one on the lower left I can tell you did not drill dead center of the design because it shifted on you. Need to be careful of that. You are hooked. :):)

Maybe I should look into really doing a library article on my celtic knot squaring jig it cut s the sides of the blank square to the predrilled hole.

http://www.penturners.org/forum/f30/celtic-knot-squaring-jig-132105/
It scares me to drill the hole before cutting the slot and inserting the infill but I might give that a try. For starters I think if my blank is "perfectly" square to start with and I find dead center on one end and put the other end in my "pen blank" chuck and start it with a centering drill I'm hoping I can avoid building yet another jig, but maybe not. The one that is a little off center was drilled using my drill press. The others were done on the lathe/pen chuck system.
tpW0tkDm.jpg
 

chartle

Member
Joined
Mar 13, 2015
Messages
1,287
Location
Pgh, PA
Hey that jig looks familiar:biggrin::biggrin::biggrin: You are getting much better. The one on the lower left I can tell you did not drill dead center of the design because it shifted on you. Need to be careful of that. You are hooked. :):)

Maybe I should look into really doing a library article on my celtic knot squaring jig it cut s the sides of the blank square to the predrilled hole.

http://www.penturners.org/forum/f30/celtic-knot-squaring-jig-132105/
It scares me to drill the hole before cutting the slot and inserting the infill but I might give that a try. For starters I think if my blank is "perfectly" square to start with and I find dead center on one end and put the other end in my "pen blank" chuck and start it with a centering drill I'm hoping I can avoid building yet another jig, but maybe not. The one that is a little off center was drilled using my drill press. The others were done on the lathe/pen chuck system.
tpW0tkDm.jpg

I also did create this jig before I got the exact jaws in your pic. A plus with this jig is that you can make 8 sided pens
 
Last edited:

jttheclockman

Member
Joined
Feb 22, 2005
Messages
19,082
Location
NJ, USA.
Hey that jig looks familiar:biggrin::biggrin::biggrin: You are getting much better. The one on the lower left I can tell you did not drill dead center of the design because it shifted on you. Need to be careful of that. You are hooked. :):)

Maybe I should look into really doing a library article on my celtic knot squaring jig it cut s the sides of the blank square to the predrilled hole.

http://www.penturners.org/forum/f30/celtic-knot-squaring-jig-132105/
It scares me to drill the hole before cutting the slot and inserting the infill but I might give that a try. For starters I think if my blank is "perfectly" square to start with and I find dead center on one end and put the other end in my "pen blank" chuck and start it with a centering drill I'm hoping I can avoid building yet another jig, but maybe not. The one that is a little off center was drilled using my drill press. The others were done on the lathe/pen chuck system.
tpW0tkDm.jpg

Andy I have always made the blank first too and then drilled for the holes and the way you described is the way I do it also and has worked well. You are better off drilling on the lathe. Much more accurate. Keep up the good work.
 

ramaroodle

Member
Joined
Feb 15, 2018
Messages
686
Location
Seattle
Thanks. I also make these blanks 7/8" to start with, which leaves more margin for error it seems when turning. That seems to make the blank sturdier because the bottom of the infill slot doesn't have to get as close to the edges.
 

jttheclockman

Member
Joined
Feb 22, 2005
Messages
19,082
Location
NJ, USA.
Thanks. I also make these blanks 7/8" to start with, which leaves more margin for error it seems when turning. That seems to make the blank sturdier because the bottom of the infill slot doesn't have to get as close to the edges.
I make mine 1" for that reason too. If you do not cut enough through can cause your ghosting too. Did that when I first started doing them until I found out the reason.:):)
 

ramaroodle

Member
Joined
Feb 15, 2018
Messages
686
Location
Seattle
Thanks. I also make these blanks 7/8" to start with, which leaves more margin for error it seems when turning. That seems to make the blank sturdier because the bottom of the infill slot doesn't have to get as close to the edges.
I make mine 1" for that reason too. If you do not cut enough through can cause your ghosting too. Did that when I first started doing them until I found out the reason.:):)
Probably an even better strategy. 1" it is. Thanks.
 
Top Bottom